Turkey, Pumpkin and Veggie Chili ~ ElephantEats.com

While you’re reading this post, I’m currently in Italy, most likely ODing on pasta and gelato ;)

You see, I kind of conned my way into being included in my parent’s Italian vacation (thanks mom and dad!). Unfortunately, Nate wasn’t able to join because he doesn’t get as many vacation days as me :(

Being the awesome wife that I am, though, I wanted to make sure that my hubby was well-fed while I was away. Since he is ok with leftovers, and his mom was going to be in town to take him out for a few meals, I figured that I would cook two big meals and freeze it so he had enough for the 6 dinners he’d need.

Turkey, Pumpkin and Veggie Chili ~ ElephantEats.com

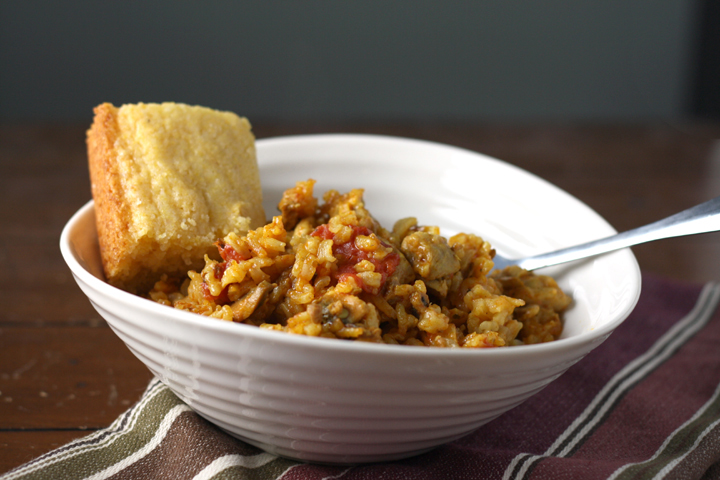
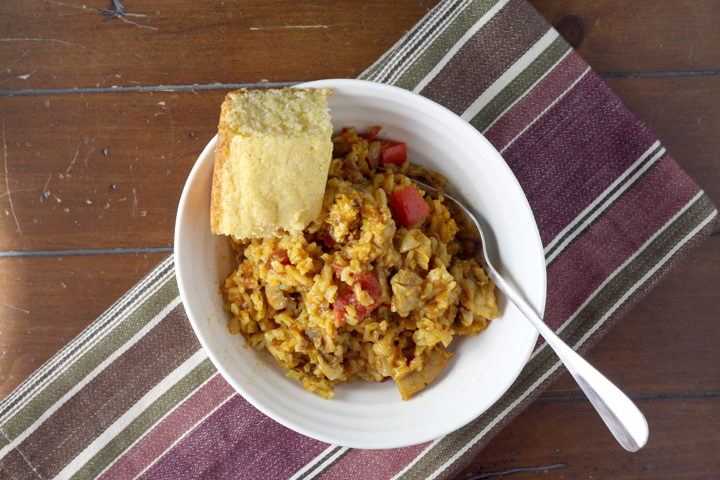
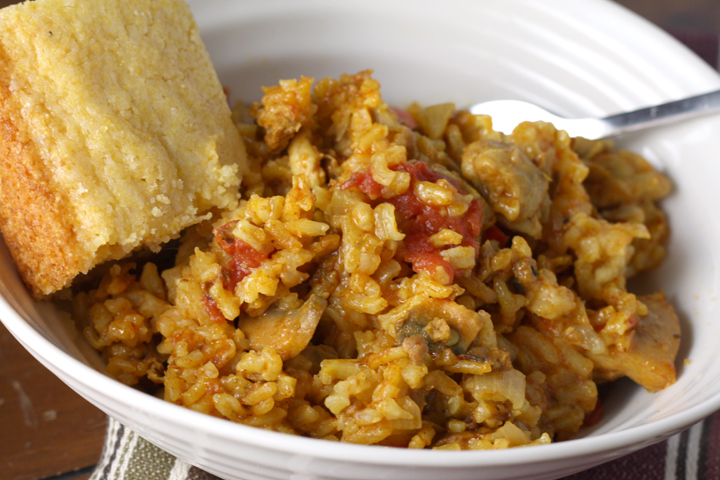
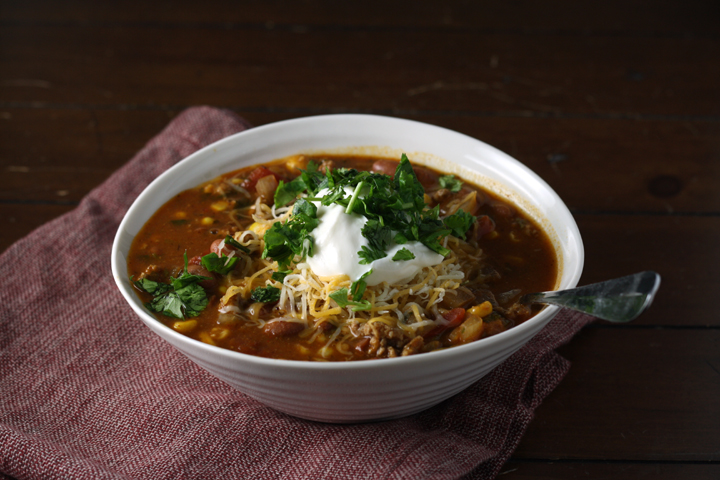
Not all meals freeze and reheat well, but chili happens to be great for that. I made a HUGE batch that we ate for dinner one night before I left, and then froze two giant tupperwares full. Each one of these holds about 3 meals worth, so he’ll use one while I’m gone and the other can be taken out another time when I’m just not in the mood to cook. It’s always good to have a few frozen meals laying around for convenience!

I also baked up my favorite Trader Joe’s cornbread to go along with it. I used the butter-flavored olive oil sample that I got, and it definitely took it to another level! Also, I added pumpkin to the chili purely because I made pumpkin bread and had a little less than a can leftover in my fridge. You could make this chili without the pumpkin but you’ll need less liquid.

And while I’m talking about favorites/Trader Joe’s/freezing things, I used some Dorot garlic in this recipe. I had seen some of their products in Trader Joes before and used them, but when Natalie posted about them on her blog and I commented, Dorot reached out to me and sent me some coupons! 

What makes Dorot products amazing is that you can have garlic, ginger and fresh herbs on hand all the time! They’re basically little frozen cubes made entirely out of these fresh things. When you want to use them, you pop one or two of the little cubes out of the freezer tray they come in, and into your pan! They don’t stick to the container at all and literally pop right out. They’re SO convenient. Dorot makes crushed garlic, crushed ginger, chopped chile, sauteed glazed onions,chopped basil, cilantro, parsley and dill…AMAZING, i know!

I especially love the garlic ones because i hate stinky garlic fingers (and just generally detest mincing garlic). Do you ever notice that like 2 days after chopping garlic, you get a whiff of something funky and it’s your garlic fingers? It’s especially disconcerting/confusing when you’re eating your oatmeal in the morning. And I love the chopped ginger and basil because let’s face it, when you buy either of those fresh, you never use it all and end up wasting the rest. 

Turkey, Pumpkin and Veggie Chili ~ ElephantEats.com

Apparently Dorot also has frozen cubes of sauces too!…but sadly no supermarkets near me carry them :( I wish it wasn’t the case.

But back to the chili! I find that the best way to eat this after having frozen it is to take it out of the freezer and put it in the fridge the night before you want to eat it. Giving it 24 hours to partially defrost in the fridge makes reheating it much easier. Once defrosted, youcan either microwave it or put it in a pot and heat it over the stove.

Hopefully Nate is doing ok on his own. At least I know his belly is full, and someone is home to take good care of our kitty!

Turkey, Pumpkin and Veggie Chili ~ ElephantEats.com

*Note that I was compensated for these products but all opinions are my own. I would never post about a product that I didn’t love and plan to use again!

Turkey, Pumpkin and Veggie Chili for a Crowd
Serves 8
A steaming bowl of healthy chili that can be on the table in under 30 minutes!
Write a review
Print

Cinnamon Roasted Pears over Arugula with Blue Cheese and Balsamic Glaze ~ www.ElephantEats.com

The other day I was reading one of the blogs I follow, Bake Your Day, and she had posted a recipe and reviewed a new butter-flavored olive oil product. I commented on the post saying how good it sounded, and the makers of the oil, Star Fine Foods, was kind enough to reach out to me and send me some samples!!!

Cinnamon Roasted Pears over Arugula with Blue Cheese and Balsamic Glaze ~ www.ElephantEats.com

They not only sent me that flavored olive oil (which I can’t wait to try), but also 2 different flavors of one of their other new products: flavored balsamic glaze!!

I decided to use the glaze on an autumn update of my favorite summer salad. All summer long I ate watermelon cubes over arugula, with feta or blue cheese, basil, and a balsamic glaze. At the time I used Trader Joe’s brand balsamic glaze because it was the only brand I had ever seen. Well, when I saw that Star Fine foods sent me an Apple Balsamic Glaze I was SOOO excited! I knew it would be a perfect way to transition my summer salad to fall.

Cinnamon Roasted Pears over Arugula with Blue Cheese and Balsamic Glaze ~ www.ElephantEats.com

I decided to go with pears for the fall fruit portion of the salad….but not just any pears- cinammon roasted ones! In the summer I love the cold, juicy watermelon, but on a cold day these warm pears are just perfect. They slightly wilt the arugula and soften the blue cheese crumbled on top. The Apple-flavored Creamy Balsamic Glaze added the absolute perfect sweet/tart flavor to go with the juicy pears and bitter arugula. 

I see myself eating this all the time this autumn and it might just be my new favorite salad! I hope it will become yours too :)

Cinnamon Roasted Pears over Arugula with Blue Cheese and Balsamic Glaze ~ www.ElephantEats.com

**I was given these products free of charge, but all opinions are my own. I would never post about a product I didn’t love and plan to use again.

Arugula Salad with Roasted Cinnamon Pears, Blue Cheese and Apple Balsamic Glaze
Serves 4
Warm cinammon roasted pears over a bed of arugula with blue cheese and an apple balsamic glaze
Write a review
Print
Ingredients
  1. 2 pears (I used Bartlett because I think they're the juiciest), not overly soft, cut into quarters and cored
  2. 1/2 tsp cinnamon
  3. 4 cups arugula
  4. 1/4-1/3 cup blue cheese crumbles (depending on how much cheese you like)
  5. 1-2 Tbsp olive oil
  6. 1-2 Tbsp Creamy Apple Balsamic Glaze (or any balsamic glaze if you can't find this one)
  7. salt and pepper to taste
Instructions
  1. Preheat oven to 450.
  2. Spray a foil lined baking sheet with cooking spray. Place pears on sheet, cut side up. Spray pears with cooking spray or drizzle with some olive oil
  3. Sprinkle pears with cinnamon, salt and pepper.
  4. While pears cook, divide arugula onto 4 plates.
  5. Bake pears for 30 min. Remove from oven and immediately place 2 quarters each over arugula on each plate. Drizzle with blue cheese, oilve oil, and balsamic glaze. Salt and pepper to taste.
https://elephanteats.com/

Nate's Birthday 2013

Beardo is how I affectionately refer to my husband, Nate. I think you can figure out why. 

As I mentioned in my last post, we had a little get-together, where I cooked up dinner for 6 of Nate’s closest friends. 

Having vegetarians to dinner always makes it hard for me to plan a menu. It’s easy to leave out any animal protein, but then there’s only so much you can do with legumes as your protein…and I never have the courage to serve soy products, for fear the non-vegetarians in the group would hate me forever.

Butterscotch Cake ~  ElephantEats.com

I decided to try not to think about how balanced the meal was and went with a slow-roasted tomato pasta dish, beets with mint, homemade marinated mushrooms, some asparagus with chopped tomatoes and a vinaigrette, and some good crusty bread. I’ll try to share some of the recipes with you soon.

I also had some cheese and crackers, and nuts for an appetizer, plus there was cheese in the pasta, so I figured that was plenty of protein for the vegetarians. I served some turkey sausage on the side so the meat eaters wouldn’t feel too deprived.

But the real star of the show was this 9-layer butterscotch cake.

Butterscotch Cake ~  ElephantEats.com

If you noticed my cake only has 7 layers, well you’re very perceptive. That’s because I generously scooped the batter into the prepared pans, thinking it was only supposed to be six layers. When I got to layer 4, I realized my error but by that point I had already baked 3 layers. There was still time to correct it to 7 layers but I couldn’t get 9 out of the remaining batter, and figured it would still look impressive and no one would know the difference. Thankfully I was right.  

All of the comments of this cake on the site I got it from raved about it’s amazingness. It was definitely good but was SO rich. I cut Nate a huge piece not knowing, and he proceeded to eat the whole thing, though I’m not sure how. I think, being the sweet husband that he is, he didn’t want to offend me by not finishing what I served him. I cut myself a small piece and made myself nauseous finishing it.

The cake was definitely impressive-looking, tasted good, and I was proud of myself for making a homemade butterscotch… but aside from that I think it wasn’t worth the effort to attempt it more than once in a lifetime.

Butterscotch Cake ~  ElephantEats.com

*Helpful notes if you try this yourself:

When you go to reheat the butterscotch for the top and sides of the cake, make sure you use a heavy-bottomed saucepan over EXTREMELY low heat.

I think my pan wasn’t “heavy” enough and the butterscotch completely separated. I was ready to cry since it took me about 45 minutes of stirring over a hot pot to make that damn butterscotch, but I was thankfully able to salvage it. The butter basically separated out so I poured it off and had a butterscotch that was more spread-able than pourable, but still tasted exactly the same. So it worked out…phew! If it hadn’t worked, I probably would have thrown my brand new pot out the window, along with the cake and anything else nearby. Hopefully my cat would know well enough to run into the bedroom to hide. 

Also, since there was so little batter that you had to spread it as evenly as possible in the pan, the layers were all slightly uneven/lumpy. When I stacked them I noticed they were sagging on the sides since the middles were so much higher. So i took each cake layer and very carefully shaved off the top of the middle section to make them as flat and even as possible. It wasn’t too hard to do with a good, sharp serrated knife.

I didn’t change a thing, so you can find the recipe here at Leite’s Culinaria

 Chicken and Chorizo "Paella" ~ www.ElephantEats.com

We headed down to my Nate’s mom’s house this past weekend. We had a relaxing couple days, and I started a new craft project

I’m going to make my mother-in-law a cushioned ottoman/coffee table. I bought a coffee table at a thrift store and we went out and got some fabric that will cover the foam I’m putting on top. I’m so excited to finish making it. I’ll show you guys when it’s done :) We picked out a beautiful purple tweed that matches her couches and I’m going to sew piping onto it- it will be the first time I’ve attempted that, so fingers crossed.

Chicken and Chorizo "Paella" ~ www.ElephantEats.com

Oh, I also fixed a drawer while I was down there that she was going to have a handyman come fix. I was pretty impressed with myself. I went to Lowes and got what I needed and fixed it! Girl power!!

It’s so rewarding to make or repurpose/create/fix something! I think that’s why I like cooking so much. It’s like creating one thing out of something entirely different- putting all these pieces together to make a new whole. And on top of it, you really get to enjoy the fruits of your labor :)

I’ve been so busy lately with house stuff, so I was on the lookout for a quick, simple dinner. It’s not completely authentic paella but it’s very similar. This dish hit the spot and was really really delicious and filling

Chicken and Chorizo "Paella" ~ www.ElephantEats.com

Chicken and Chorizo "Paella" with Mushrooms
Serves 6
A quick, simple and veggie-packed take on the traditional Paella
Write a review
Print
Ingredients
  1. 1.5 lbs boneless, skinless chicken thighs , cubed
  2. 4 ounces Mexican chorizo (i used a veggie version)
  3. 1 large white onion, chopped
  4. 1 red bell pepper, chopped
  5. 16 oz mushrooms, sliced
  6. 2 Tbsp olive oil
  7. 1 tsp paprika
  8. 1 tsp oregano
  9. 1 tsp turmeric
  10. 1 tsp salt
  11. 1/2 tsp black pepper
  12. 1/2 tsp red pepper flakes
  13. 1-1/2 cups long grain white rice
  14. 3 cups water
  15. 1 14oz can diced or stewed tomatoes
Instructions
  1. Heat the olive oil in a large Dutch oven over medium heat. Add the chorizo and onion, stir to combine and let it sit and caramelize/soften for about 5-7 minutes.
  2. Add the cubed chicken, and stir to combine, letting it cook for about a couple minutes.
  3. Add the chopped red bell pepper, mushrooms, and cook several minutes. Add paprika, oregano, turmeric, salt, black pepper, red pepper flakes and rice. Stir everything to combine, and then add the water and tomatoes.
  4. Bring to a boil and then reduce the heat, cover, and allow to cook for about 30 minutes until the rice is tender.
  5. Serve hot!
Adapted from Heather's Dish
https://elephanteats.com/

Fresh Corn Polenta with Eggplant Sauce ~ ElephantEats.com

Before I get to the recipe, I just wanted to share some news. As of today, we are officially homeowners! I know I mentioned the house in a past post, but our closing was today. Also, this weekend we did the walk-through and Nate FINALLY saw the house for the first time. Ridiculous, I know. He says he just really doesn’t care what our house looks like. I’d like to think it’s that, plus that fact that he trusts my judgement.

 First Time Homeowners!

Anyway, I’m happy to report that he really liked the house, especially the front porch. We’re going to be doing major renovations and I’ll try to share some pics along the way. I don’t want to show you guys the “before” pics til we have “after” pics because it really doesn’t look like much. Also, the layout is going to completely change.

Also, I don’t share many pictures of my adorable kitty L.C. on the blog (there was her hatred of halloween costumes, and her attempt to photobomb my food pic, and her wearing her christmas best), mainly because I feel like once I get started it would be hard not to share a ton- she is by far the most photographed subject in our apartment. Anyway, I thought this picture was just too funny not to show you. 

So a while back, I took this picture of L.C. while Nate was squishing her head with his chin, and when I showed it to him he said she looked like Teddy Roosevelt. I could not imagine what on earth he was talking about until I searched pics of Roosevelt and found this one. There is an uncanny resemblance! Right?!

 Teddy Roosevelt Cat

Ok, so moving along. I wanted to share this recipe with you guys before summer, and the season’s yummy corn, is no longer around. I pinned this last summer because I thought the idea of making a polenta out of fresh corn instead of cornmeal just sounded really intriguing. I would never have thought of it. 

Fresh Corn Polenta with Eggplant Sauce ~ ElephantEats.com

Anyway I finally got around to making it. I invited my friend Erica over and she seemed to really like it, although she did put a lot of hot sauce on it. I think I just undersalted it a bit. Anyway, it was delicious and rich, but not exactly what I was imagining. I totally think you should give it a try though. The combo of the creamy polenta and chunky eggplant topping was really good.

I slightly altered the amounts in the recipe. My main adjustment was to cut back on the water added before cooking it down. As you can see from my pics, I couldn’t get it to thicken up to the consistency it should have been because I didn’t have the patience to sit and stir it for another hour. In my directions below I say not to add any liquid back, in order to fix this problem. Definitely give it a try before summer’s over!

Fresh Corn Polenta with Eggplant Sauce ~ ElephantEats.com

Sweet Corn Polenta with Eggplant Sauce
Serves 4
A creamy polenta made from fresh corn instead of dried goods!
Write a review
Print
Eggplant Sauce
  1. 1/3 cups vegetable oil
  2. 1 medium eggplant, cut into 3/4-inch dice
  3. 2 teaspoons tomato paste
  4. 1/4 cup dry white wine
  5. 1 cup chopped peeled tomatoes (fresh or canned) (I used canned)
  6. 6 1/2 tablespoons water
  7. 1/4 teaspoon salt
  8. 1/4 teaspoon sugar
  9. 1 tablespoon chopped oregano
Polenta
  1. 6 ears of corn
  2. Water
  3. 3 tablespoons butter, diced
  4. 7 ounces feta, crumbled
  5. 1/4 teaspoon salt
  6. Black pepper
Eggplant Sauce
  1. Heat up the oil in a large saucepan and fry the eggplant on medium heat for about 15 minutes, or until nicely brown. Drain off as much oil as you can and discard it -- the safest way to do this is to scoop out the eggplant to a plate using a slotted spoon, then pour off the oil into a bowl before added the eggplant back in. You can save the oil for another use.
  2. Add the tomato paste to the pan and stir with the eggplant. Cook for 2 minutes, then add the wine and cook for 1 minute. Add the chopped tomatoes, water, salt, sugar and oregano and cook for a further 5 minutes to get a deep-flavored sauce. Set aside; warm it up when needed.
Polenta
  1. Remove the leaves and "silk" from each ear of corn, then chop off the pointed top and stalk. Use a sharp knife or corn stripping tool to shave off the kernels -- either stand each ear upright on its base and shave downward, or lay each ear on its side on a cutting board to slice off the kernels. You want to have 1 1/4 pounds kernels.
  2. Place the kernels in a medium saucepan and barely cover them with the water. Cook for 12 minutes on a low simmer. Use a slotted spoon to lift the kernels from the water and into a food processor; reserve the cooking liquid. Process them for quite a few minutes, to break as much of the kernel case as possible. Add some of the cooking liquid if the mixture becomes too dry to process. Now return the corn paste to the pan and cook, while stirring, on low heat for 10 to 15 minutes, or until the mixture thickens to mashed potato consistency, adding more cooking liquid if you like a thinner polenta. (If you have a lot of liquid left in the pan, it can take a while to cook down the polenta, and it will sputter.
  3. Fold in the butter, the feta, salt and some pepper and optionally cook for a further 2 minutes. Taste and add more salt if needed.
Adapted from (slightly) Yotam Ottolenghi @ Food 52
https://elephanteats.com/