05. February 2014 · 52 comments · Categories: house, life · Tags: , ,

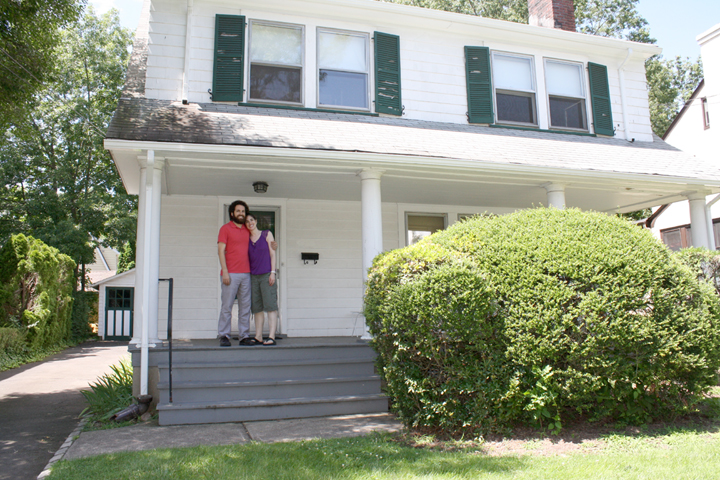
Well, I haven’t done much cooking lately, and the cooking I’ve done didn’t get photographed, so I figured it’s time for a house update.

I showed you recently that our house has a new roof! And now, after being delayed for over 2 weeks, we finally have new windows!!! I’m super excited about this because these windows were about to start delaying our project, but luckily the contractor could mostly work around it until they finally arrived in the nick of time. 

Of course I forgot to take a pic with the windows completely in, but here’s a progress pic when they had removed the upstairs windows but hadn’t put new ones it- i.e. there were two gaping holes in the house. They were there installing when I took this pic, though. They didn’t leave the house like that!

House New Windows

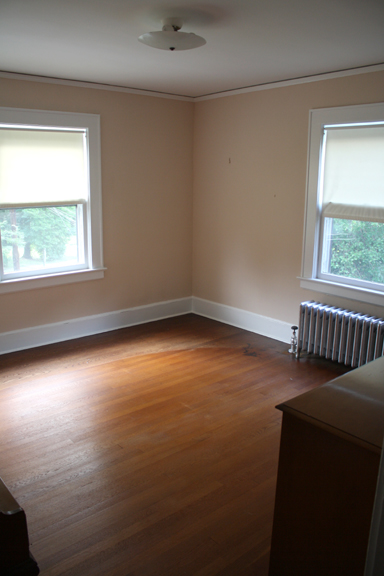
If you look very closely, you can see the new triple windows on the ground floor. So pretty!

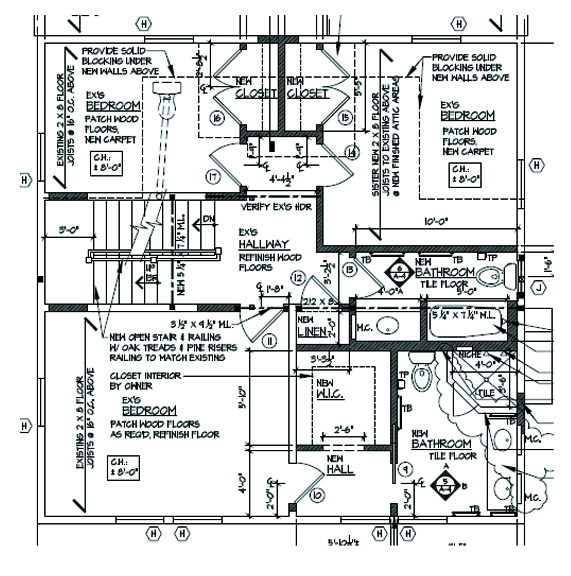
I also went to the new tile store a couple weekends ago and finalized all my tile selections. I also met with the tile installer so I finally know the amounts of tile I need and can place my order.

I should really create a moodboard, but for now I’ll just tell you the following:

Master Bath:

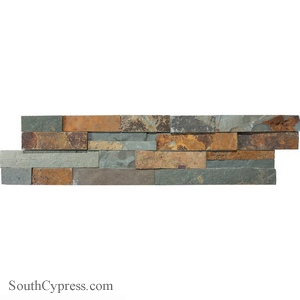
Our master bath is going to have a stacked slate ledgestone wall behind the vanity as like a feature wall. This is the stone:

Slate Ledgestone

 Here’s an example of something similar to what I’m planning that I found on Houzz (my favorite website):

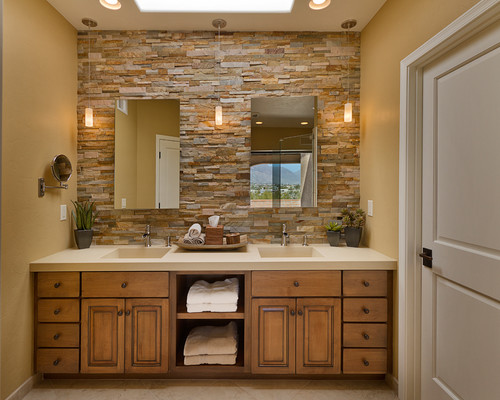
The vanity is going to be a custom rustic wood piece I found on Etsy. I’m very excited for it to arrive. They’re also going to make me matching rustic wood mirrors. I’m still deciding on sconces but our faucets are going to be Oil Rubbed Bronze finish. 

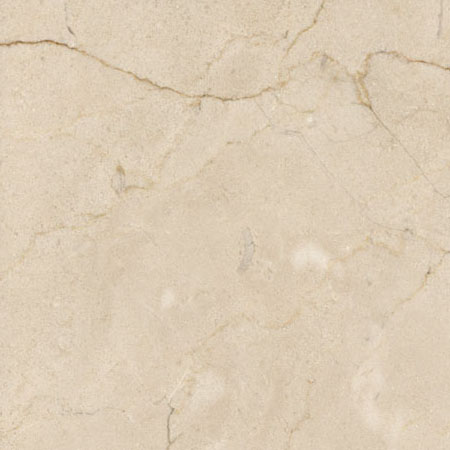
Because I really want the accent wall to stand out, the floor is just a basic ivory marble like this:

Crema Marfil 12x12

The shower is just plain ivory with a 5-6″ strip of slate tile accent border that coordinates with the accent wall.

I don’t know what to choose for the counters! I have a feeling it’s going to be ivory of some sort as well, although I’d like to bring in a different color from the slate that would go with the wood vanity.

Hall Bath:

For the hall bath I found this really fun penny tile that I’m also going to have going up the entire wall behind the vanity:

Terra Tile and Marble- Penny Round Blue Yellow

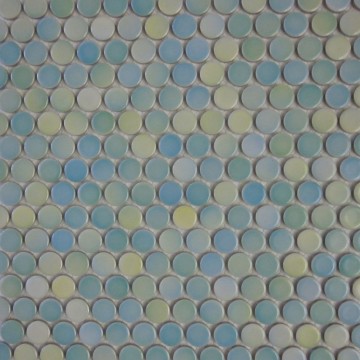
The mirror will be set into the penny tile and framed out with a white border tile.

The faucet finish is chrome, along with the light fixtures. The floor is going to be a plain white marble. And the vanity is going to be a basic natural birch piece.
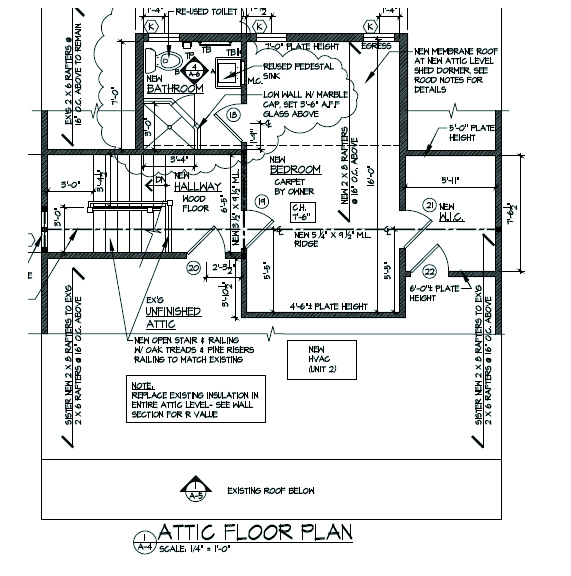
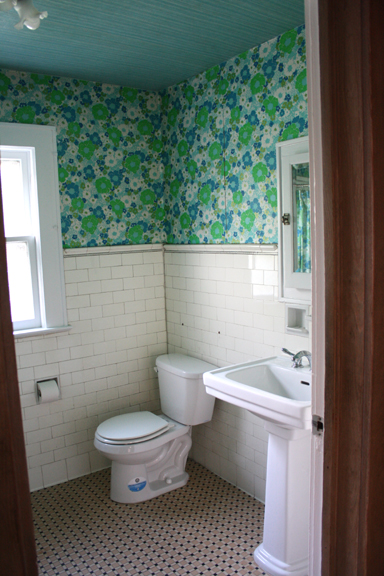
3rd Floor Bath:

For the 3rd floor bath, I’m reusing the pedestal sink from the old bathroom. The floors are going to be this blue/green porcelain:

Blue Wave Porcelain

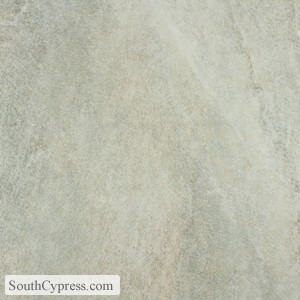
You can’t tell much from the pics, but it’s a really interesting tile.

The shower is going to have white subway tile with the prettiest irridescent mosaic border!:

Iridescent mosain tile

I’m very excited for it. 
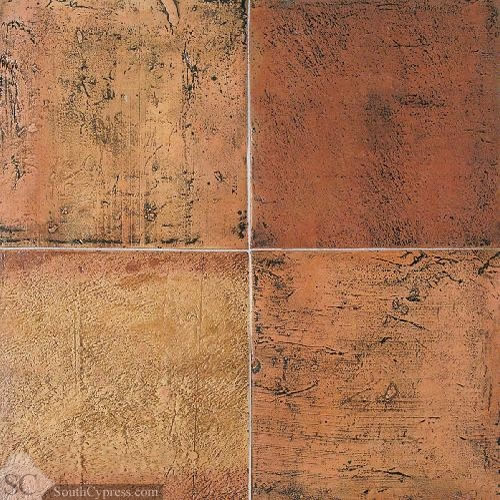
Laundy/Mudroom:

The laundry room is going to have an antique terra cotta looking tile:

Saltillo Antique Red

The desk/cabinets in there are going to be sage green :) I really wanted them for my kitchen but my mom convinced me to stick with a basic white in the kitchen.

The only tile I haven’t decided on yet is the kitchen backsplash. I think I’m going to wait on that since, as my mom pointed out, I could totally move into the house without a backsplash. I’d rather wait on things I don’t ahve to do RIGHT NOW, as I already have 10,000 other decisions to make…like my lighting fixtures- the current bane of my existence :(

15. November 2013 · 106 comments · Categories: house, life · Tags:

For those of you who like to know about how the house is going, here we go!

For those that don’t care, feel free to skip this post as there’s no recipe. But next week I’ll have a Thanksgivukkah recipe coming your way! :)

So today (Friday), I’m going out to NJ because I’ve officially chosen a contractor (!) and he’s going to do a walk-thru of the house with me so I can point out everything I want to save. I want to preserve as much of the original house as I can, both because it will hopefully save money and because the house is 85 years old and I want to be sensitive to its history.

We’ve already begun work on the detached garage. We removed the very cracked and old concrete floor and poured a new reinforced slab. We also had to reframe the door opening because it had two old doors on hinges, with each opening from the middle. Here’s the “before” garage pic- sorry for the cut-off pic, but the contractor took it:

Garage Before Photo

Anyway, as much as I would love to keep these awesome doors, we really don’t want to have to get out of the car and open them every time we want to pull inside- there is currently no electricity out to the garage. Can you believe the little 96 yr old lady who sold us this house used to get out and open those doors??

Since we’re installing an electric door, we decided it made more sense to have one big door instead of two small ones. If we had kept the two small ones, they’d be really really narrow. But because there were two doors there was a column between them holding up the front of the garage. In order to get rid of that structural column, we had to put a big header over the door.

That has now been completed and we’re just waiting for the door to be delivered so we can install it! I’ll add a pic when it comes in. I tried to pick a door that looked very similar to the original doors. Here’s a pic of the style I chose. They look like they open on hinges like the original doors, but they really go up like a typical electric door:

Ours will be all one piece tho, not two separate doors. I may paint the trim like the existing doors, though not green…i’m thinking black perhaps, or gray. I dunno. The “hardware” isn’t included (like the handles, and fake hinges if we want them), but the door company charges an arm and a leg for them. You can get cheap ones at Home Depot which is what I think I’ll do and just install them myself. 

As for the house, the architect finished up the floorplans and here they are!!! I’m so so excited. Sorry they’re kinda blurry. I couldn’t figure out how to get them the right size.

I’ve included the current floorplan so you could see the difference. I already gave you a tour of the inside of the house’s first and second floors, but go check that out if you haven’t seen it. Pardon all the call-outs and measurements that gunk up the new floorplan drawing. Hopefully you can read around them. 

FirstFloorplanBefore

First Floor Plan “Before”

First Floor Plan "After"

First Floor Plan “After”

Did you SEE MY NEW KITCHEN?! How glorious is it? :) Oh my gosh, guys, I’m going to cook you so much yummy food in that kitchen!

Here’s the second floor:

SecondFloorplanBefore

Second Floor Plan “Before”

Second Floor Plan "After"

Second Floor Plan “After”

That whole front part of the house is the Master Bedroom suite!

And here’s the third floor where there is currently only an unfinished attic:

Third Floor Plan "After"

Last weekend my mom came into town and we went tile shopping. What I learned is that all pretty tiles are really expensive :(

I ended up making most of my decisions for the bathrooms though, so that’s good. If you know me at all, you know that I’m extremely indecisive, so this was a big step. Thank goodness I had my Interior Designer mama there helping me out or it would have been futile. 

I think maybe in these coming months I’ll post moodboards every so often for the various rooms, showing the color/decor that I’m thinking. Would you guys like to see that?

Sorry for the photo-less and recipe-less post. I hope to have more updates soon. The house is supposed to be done in 4 months! I can’t believe it :)

23. August 2013 · 36 comments · Categories: house, life · Tags:

Before I get to the house, I must wish a very

Happy Birthday to my wonderful husband, Nate!!

We’re having some friends over tonight and I’m going to cook him up quite the birthday dinner feast, complete with a butterscotch cake. So, I will have recipes for you soon, assuming I don’t forget to take pics :)

Alright, so I left off last time after giving you a tour of the first floor of our house. Today, I’m moving onto the second floor!

Again, here’s a friendly floorplan to help you ground yourself while I’m giving my tour:

SecondFloorplanBefore

Right now the second floor has 4 bdrooms (one is miniscule- the top left) and one bathroom. We’re going to turn it into three bedrooms and 2 full baths, and then put another bed/bath on the third floor (currently a walk-up unfinished attic). One of the bed/baths will be a master suite with a walk-in closet!

 Ok, so remember those stairs that you could go up and down to the kitchen? Well if you were to turn right on the landing, you’d head up to the second floor. Here we go.

Stairs1

Gotta love that carpet. Again, hardwood floors are underneath it throughout the house! 

StairsTop

Here you are at the top of the stairs. Directly ahead of you is the bedroom that’s in the top right of the floorplan. Unfortunately, I completely forgot to take a pic of that room…and in my opinion it’s the nicest room. Oh well.

If you turn to the right, you’re facing the bedroom in the bottom left of the floorplan. Here it is:

BottomLeftBedroom


It’s a decent sized room but I just couldn’t capture it well. It’s going to be combined with the room next to it to turn into a giant master suite.

If you come back out of that room and look across the hall you can see the bathroom and the corner of the bedroom I didn’t get a pic of:

ViewFromBottomLeftBedroom

If you come out of the room and turn right, you see what was being used as the master bedroom. It will become the hall bath combined with the master suite:

Master

Ironically, the master bedroom is the only bedroom that has carpet over the hardwood, but after we renovate it will be the only bedroom with hardwood…I think. I feel like kids’ rooms are better with carpet but look prettier with hardwood.

If you come out of the master bedroom and look across the hall, this is your view. It’s the best view to kind of get a feel for the size of the hallway upstairs:

ViewFromMaster

Come walk across the hall and check out the existing bathroom. Please try not to be jealous of the wallpaper ;) The sink is actually in really good shape so I’m thinking maybe I can reuse it in the guest bath upstairs:

Bathroom


The two bedrooms that border the bathroom are actually going to expand into where the bathroom is, and the bathroom will no longer be there. The two new bathrooms will be on the bottom right part of the house.

I’ll share the new floorplan when it’s final.

And finally, let’s head up to the attic:

AtticStair

You walk up some stairs to a landing, turn right and continue going up the stairs. Here’s your view at the top:

AtticStair2

As I said, we’re going to finish part of it and put a bed and bath up there. There’s going to be a huge dormer put into the back (left of the pic) with several windows.

If you go to the other side of the attic where the fan is and turn around, this is your view…and Nate’s favorite pic of all the photos I took of the house:


Attic

That concludes my house tour. I hope you enjoyed it!

I’ll update you with the floorplans when the architect is done…and I’ll show you a pic of the backyard when I take it, because it’s super cute :)


I interrupt this week’s food post for some house photos :) I’ll try to get back to food posting soon, I’ve just been so busy!

Since so many of you requested “before” house pics, your wish has been granted. Honestly there’s not much to see here and the changes will be so huge that it will be hard to compare after. But I’ll give you a little tour…

Welcome to our house, come on in!

First Time Homeowners!

For those of you that are really interested, here’s the first floor plan. You’ll be able to understand my tour a little better this way:

FirstFloorplanBefore

Here’s what you see when you walk in the front door:

FrontDoortoKitchen

First of all, there’s hardwood floors under all that gross carpet, which we will obviously remove. Second, how gorgous is that woodwork? It’s going to look amazing stained a dark color to go along with the floors. Or Maybe painted white? I dunno yet!

To the your left is a coat closet and to the right is the living room:

Living Room

Pardon they photo quality. I’m not sure how to take photos when the windows are all blown out.

Ok back to the stairs. There’s a weird thing where you go up a couple stairs to a landing and then you can either go upstairs to the second floor or back down two more stairs to the kitchen. If you go to the kitchen that way, this is what you’ll see:

KitchenFromStair


The door through there goes to the back door and a powder room.

If you walk down the steps and into the kitchen and turn to the right, this is the view through the kitchen, with the dining room behind it:

Kitchen

That door that’s open on the right goes to the basement.

If you walk through the kitchen, this is the dining room:

DiningRoom

If you turn to the left, you see the den, which was an addition to the house:

Den

And if you had turned to the right you get back to the living room, facing the front of the house:

LivingRoomfromDining

If you then walk into the living room and turn right, you face back towards the front door and staircase:

LivingRoom2

Ok, well my computer’s about to die…so I’ll share the second floor with you soon. 

I hope you enjoyed the tour :) I can’t wait to show you the “after” photos. And I especially can’t wait for construction to begin!!!

Fresh Corn Polenta with Eggplant Sauce ~ ElephantEats.com

Before I get to the recipe, I just wanted to share some news. As of today, we are officially homeowners! I know I mentioned the house in a past post, but our closing was today. Also, this weekend we did the walk-through and Nate FINALLY saw the house for the first time. Ridiculous, I know. He says he just really doesn’t care what our house looks like. I’d like to think it’s that, plus that fact that he trusts my judgement.

 First Time Homeowners!

Anyway, I’m happy to report that he really liked the house, especially the front porch. We’re going to be doing major renovations and I’ll try to share some pics along the way. I don’t want to show you guys the “before” pics til we have “after” pics because it really doesn’t look like much. Also, the layout is going to completely change.

Also, I don’t share many pictures of my adorable kitty L.C. on the blog (there was her hatred of halloween costumes, and her attempt to photobomb my food pic, and her wearing her christmas best), mainly because I feel like once I get started it would be hard not to share a ton- she is by far the most photographed subject in our apartment. Anyway, I thought this picture was just too funny not to show you. 

So a while back, I took this picture of L.C. while Nate was squishing her head with his chin, and when I showed it to him he said she looked like Teddy Roosevelt. I could not imagine what on earth he was talking about until I searched pics of Roosevelt and found this one. There is an uncanny resemblance! Right?!

 Teddy Roosevelt Cat

Ok, so moving along. I wanted to share this recipe with you guys before summer, and the season’s yummy corn, is no longer around. I pinned this last summer because I thought the idea of making a polenta out of fresh corn instead of cornmeal just sounded really intriguing. I would never have thought of it. 

Fresh Corn Polenta with Eggplant Sauce ~ ElephantEats.com

Anyway I finally got around to making it. I invited my friend Erica over and she seemed to really like it, although she did put a lot of hot sauce on it. I think I just undersalted it a bit. Anyway, it was delicious and rich, but not exactly what I was imagining. I totally think you should give it a try though. The combo of the creamy polenta and chunky eggplant topping was really good.

I slightly altered the amounts in the recipe. My main adjustment was to cut back on the water added before cooking it down. As you can see from my pics, I couldn’t get it to thicken up to the consistency it should have been because I didn’t have the patience to sit and stir it for another hour. In my directions below I say not to add any liquid back, in order to fix this problem. Definitely give it a try before summer’s over!

Fresh Corn Polenta with Eggplant Sauce ~ ElephantEats.com

Sweet Corn Polenta with Eggplant Sauce
Serves 4
A creamy polenta made from fresh corn instead of dried goods!
Write a review
Print
Eggplant Sauce
  1. 1/3 cups vegetable oil
  2. 1 medium eggplant, cut into 3/4-inch dice
  3. 2 teaspoons tomato paste
  4. 1/4 cup dry white wine
  5. 1 cup chopped peeled tomatoes (fresh or canned) (I used canned)
  6. 6 1/2 tablespoons water
  7. 1/4 teaspoon salt
  8. 1/4 teaspoon sugar
  9. 1 tablespoon chopped oregano
Polenta
  1. 6 ears of corn
  2. Water
  3. 3 tablespoons butter, diced
  4. 7 ounces feta, crumbled
  5. 1/4 teaspoon salt
  6. Black pepper
Eggplant Sauce
  1. Heat up the oil in a large saucepan and fry the eggplant on medium heat for about 15 minutes, or until nicely brown. Drain off as much oil as you can and discard it -- the safest way to do this is to scoop out the eggplant to a plate using a slotted spoon, then pour off the oil into a bowl before added the eggplant back in. You can save the oil for another use.
  2. Add the tomato paste to the pan and stir with the eggplant. Cook for 2 minutes, then add the wine and cook for 1 minute. Add the chopped tomatoes, water, salt, sugar and oregano and cook for a further 5 minutes to get a deep-flavored sauce. Set aside; warm it up when needed.
Polenta
  1. Remove the leaves and "silk" from each ear of corn, then chop off the pointed top and stalk. Use a sharp knife or corn stripping tool to shave off the kernels -- either stand each ear upright on its base and shave downward, or lay each ear on its side on a cutting board to slice off the kernels. You want to have 1 1/4 pounds kernels.
  2. Place the kernels in a medium saucepan and barely cover them with the water. Cook for 12 minutes on a low simmer. Use a slotted spoon to lift the kernels from the water and into a food processor; reserve the cooking liquid. Process them for quite a few minutes, to break as much of the kernel case as possible. Add some of the cooking liquid if the mixture becomes too dry to process. Now return the corn paste to the pan and cook, while stirring, on low heat for 10 to 15 minutes, or until the mixture thickens to mashed potato consistency, adding more cooking liquid if you like a thinner polenta. (If you have a lot of liquid left in the pan, it can take a while to cook down the polenta, and it will sputter.
  3. Fold in the butter, the feta, salt and some pepper and optionally cook for a further 2 minutes. Taste and add more salt if needed.
Adapted from (slightly) Yotam Ottolenghi @ Food 52
https://elephanteats.com/