I don’t want our wedding to look like anyone else’s. Is that so much to ask? I don’t think so.

I really want to make a statement on the tables and so I decided a while back that I wanted the napkin to have a pretty print on it. Do you know how hard it is to find printed rental napkins in my color scheme that are exactly what I want? Harder than it should. Actually, impossible.

Anyway, I finally convinced my mom that I could find a fabric cheap enough that we could get napkins made for the same price as renting would be…AND we could keep some and sell the rest after.

This way I got a gorgeous fabric that was exactly what I wanted, and no one else could  possible have it!

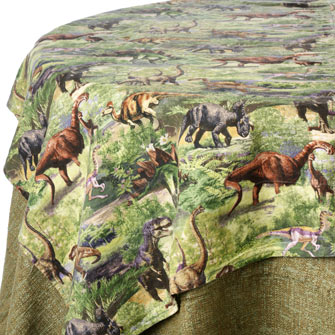
But in my fruitless search for the perfect napkin and tablecloth, I came across this one and showed it to Nate:

source

Have I mentioned that Nate LOVES dinosaurs?

This was the IM conversation that ensued:

Nate:  oh my god
MAKE THOSE THE TABLE CLOTHS
me:  we could do it just for our table
tell you what
we’ll make our first child’s bday a dino theme
Nate:  obviously
im gonna groom them
to become a paleontologist
me:  haha
Nate:  and then they will create the first real jurassic park
me:  as long as they make enough money to support their folks
Nate: well if my son/daughter creates the first real jurassic park that will be our family business
i’ll work there
and with any luck, at a ripe old age, be eaten by a dinosaur
by far the way i want to go

So there you have it. Nate’s chosen way to go is death by dinosaur. Probably not a bad way, in fact, assuming there isn’t too much chewing involved.

That also solves the mystery of who on earth would rent dinosaur tablecloths. But luckily Nate is not involved in making wedding-related decor decisions, or it would be a dino-themed wedding…and he’d probably serve these ribs.

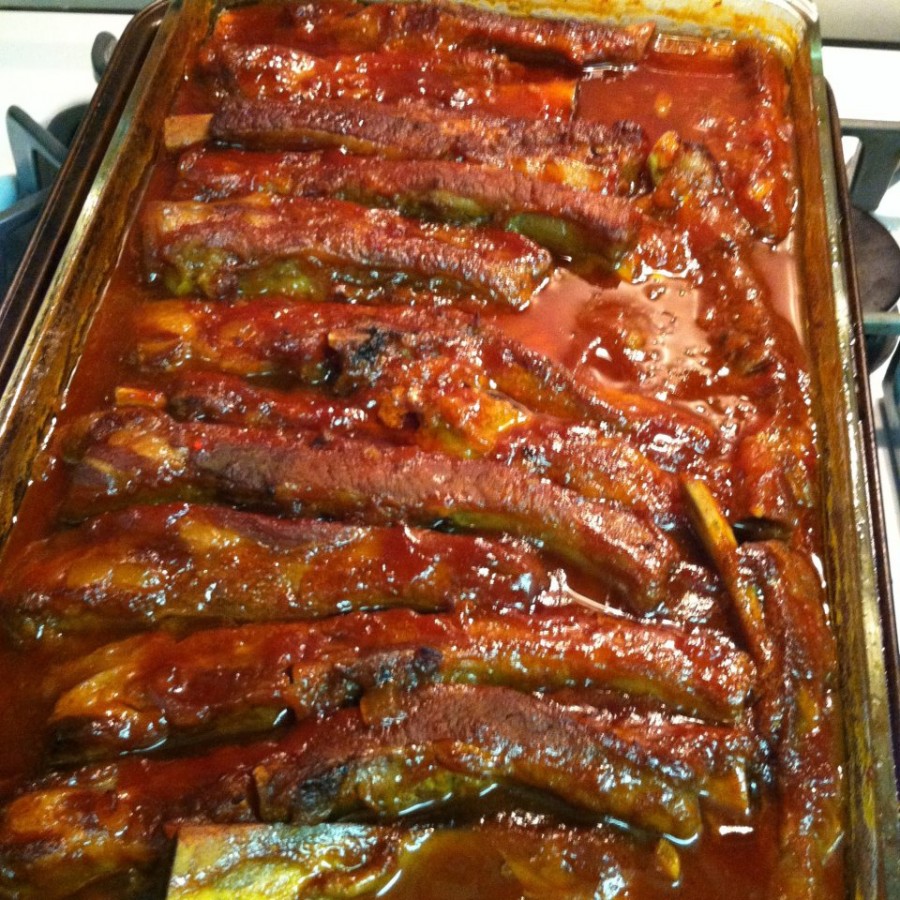
These aren’t dinosaur ribs, but they’d certainly go with a paleontology-themed event. And I can’t say I’d be upset if someone served them to me.

Unfortunately, the only photo I have to prove I made these ribs is one from my iphone, since Nate somehow deleted the others before I got them off the camera.

We, unfortunately, don’t have a grill, but this is better than ribs you could ever make on a grill. Yeah, take that, grill!

You give them a quick boil beforehand and then shove them in the oven for an hour and a half.

I’m a fan of saucy, succulent meat. I know this is definitely possible on the grill, but I hate dry things. These ribs get braised in the oven, mixing with the homemade tangy bbq sauce you add, creating their own, absolutely delicious sauce. I could eat it with a spoon.

Even if you have a grill, you NEED to make these this summer.

I served it up with some baked beans and corn on the cob. Felt like summer for sure!

Too bad the caterer doesn’t offer them….

Oh and here’s another photo for you since I don’t have any more of the ribs. Here’s the ring bearer pillow I made for the wedding :)
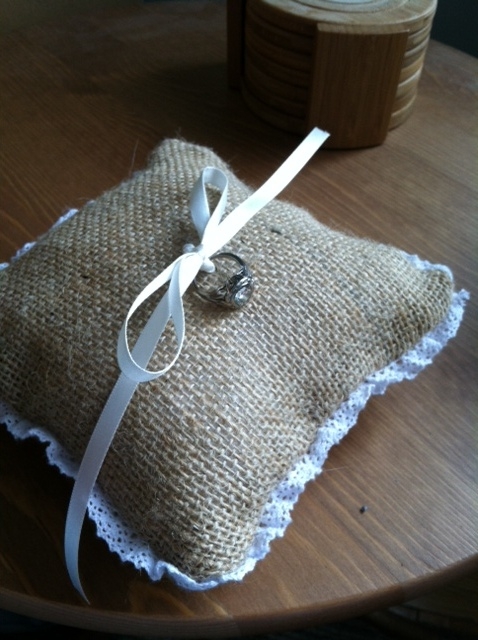
burlap ring pillow


Saucy Country-Style Oven Ribs

from Gourmet 

Print this recipe!

serves 6-8

4 lb boneless country-style pork ribs
1 large onion, finely chopped (2 cups)
4 garlic cloves, minced (2 tablespoons)
2 tablespoons vegetable oil
1 1/2 cups ketchup (12 oz)
2/3 cup honey
1/2 cup cider vinegar
1/2 cup Worcestershire sauce
6 tablespoons fresh lemon juice (from 2 lemons)
2 tablespoons plus 1 teaspoon dry mustard
2 teaspoons drained bottled horseradish
1 teaspoon black pepper
Put oven rack in middle position and preheat oven to 350°F.

Put ribs in a 6- to 8-quart pot and cover with water by two inches. Bring to a boil, reduce heat and simmer, uncovered, skimming froth, 30 minutes (I only cook for 15 and it’s completely fine).

Meanwhile, cook onion and garlic in oil in a 3- to 4-quart heavy saucepan over moderate heat, stirring occasionally, until onion is tender, about 15 minutes.

Stir in remaining ingredients and simmer, stirring occasionally, 15 minutes.

Drain pork in a colander and pat dry, then arrange in 1 layer using tongs in a 13- by 9-inch baking dish. Pour sauce over pork to coat evenly, then cover dish tightly with foil.

Bake 1 hour, then remove foil and carefully turn pork over with tongs and cook, uncovered, until very tender, about 30 minutes. Skim fat from sauce if desired.

(**note that I don’t normally cut the ribs apart before cooking as in the above pic, but that’s how this particular batch came. Usually I put the whole rack in the pan in one long piece, only cutting off the ribs that don’t fit the length and putting them along the side)

The goal of the Pinterest Challege, is to make one thing each season that’s inspired by all the gorgeous stuff that we’ve pinned on  Pinterest!

The Pinterest challenge is hosted by:

Sherry from Young House Love
Katie from Bower Power Blog
Erin from The Great Indoors
Cassie from Hi Sugarplum

You may remember I participated in this challege last summer and made myself a jewelry holder! I have to confess that as gorgeous as that jewelry holder looked, it hasn’t been working out quite so well. The earrings are very precariously hanging and I need to have a way for them to stay better so they don’t all fall off every time I touch it. If you have any ideas, please let me know! I’ve already lost an earring that fell off and I have no idea where it went.

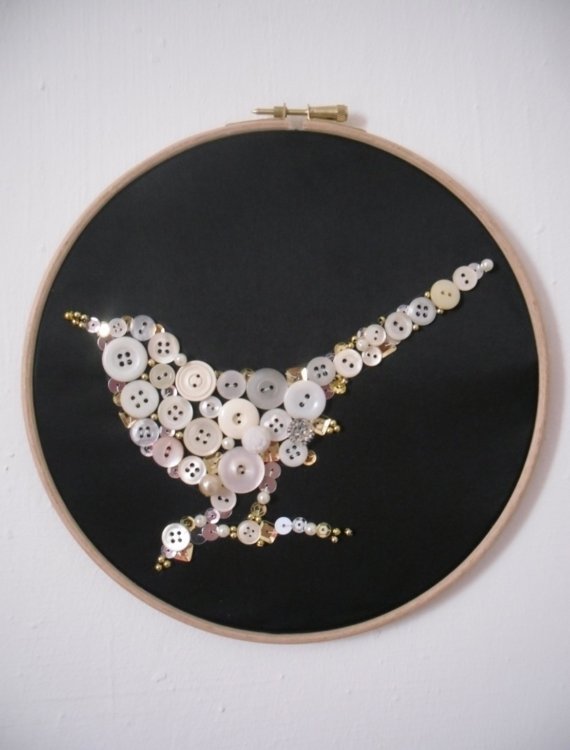
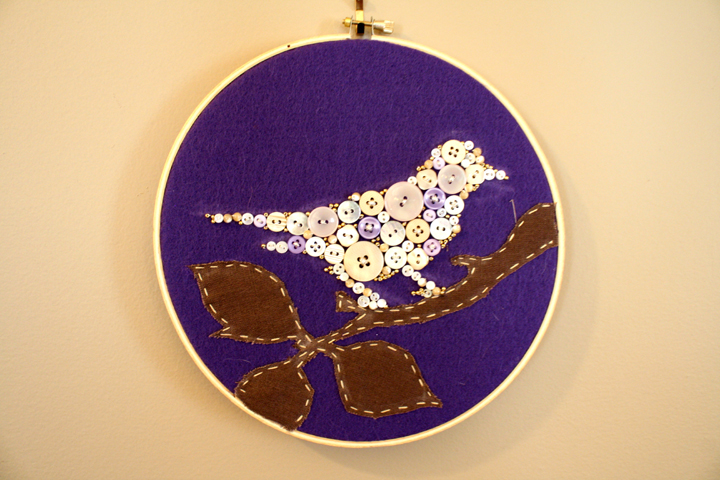
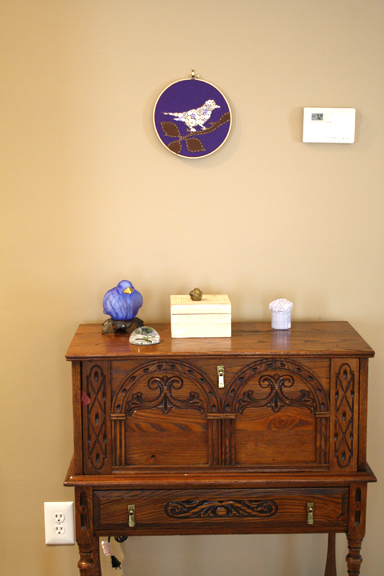
Aaaaaanyway, so this time I knew what I wanted to do way ahead of time. You see, during my Pinterest browsing, I came across this really cool bird made out of buttons.

source

I knew that it would be a perfect Christmas present for Nate’s mom (she loves birds), if I could figure out how to make it.

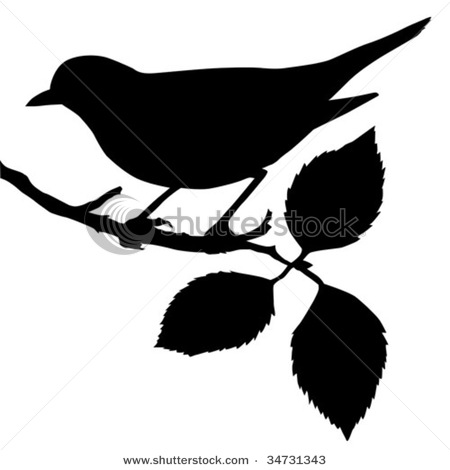
First I went online and did endless searching for a pretty bird silhouette. I decided that I wanted mine to have a prominent branch, unlike the inspiration. This is the image I found, although I actually ended up flipping the image, blowing it up, and cropping it so it fit nicely on my 8″ embroidery hoop.

Sorry, I have no progress photos…I didn’t think about it :(

Next I ventured out to the fabric store to get fabric and thread for the branch. I knew I wanted felt for the background and picked purple since Nate’s mom loves that color. I ended up finding a small piece of it at Michaels. I would have liked a lighter purple but ended up just going with lighter buttons instead.

Finally, I had to figure out where to get all those buttons. I ended up finding this button store on the Upper East Side in nyc called Tender Buttons, which admittedly was probably not the best place to go. The buttons were gorgeous, with a huge selection of colors, but also super expensive and mostly fancier than I was looking for. 100 something dollars later, I left with my purchases in hand :( I just told myself that since this was a present anyway, it was ok to spend a little more than I was expecting.

I also ended up going online and found some cheaper buttons to throw into the mix. I have to say that the pricey buttons were gorgeous and probably worth the $$ but it was nice to mix it up with different shapes/sizes/colors.

Ok, on to the actual process:

First I put the felt in the embroidery hoop and stretched it as much as I could. The hoop was really loose and I don’t know if it was because it was a cheap hoop or what, but at the very end I glued the felt to the sides of the hoop in the back to keep it from slipping. (I did this after the whole thing was complete). I can thank my mom for that wonderful idea :)

I had to figure out the best way to transfer the image. I ended up freehanding it with chalk. In the end it was hard to get all the chalk lines off the felt, but I don’t know what else I could have done.

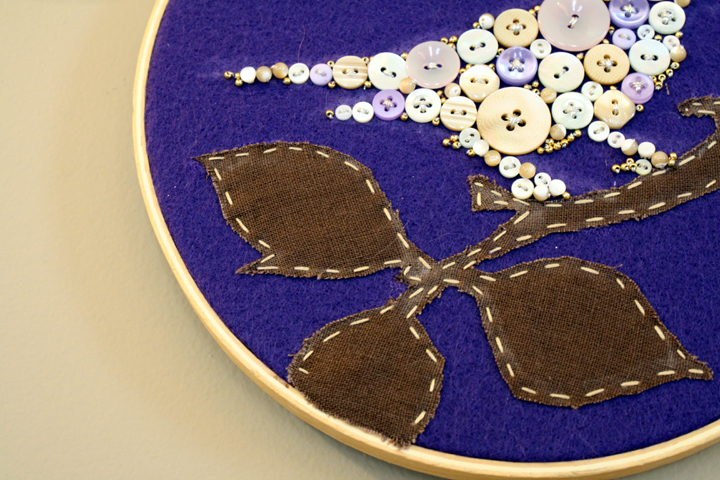
After transferring the image, I cut out the branch fabric to the appropriate shape and sewed it to the felt with contrasting stitching to give it a rustic look.

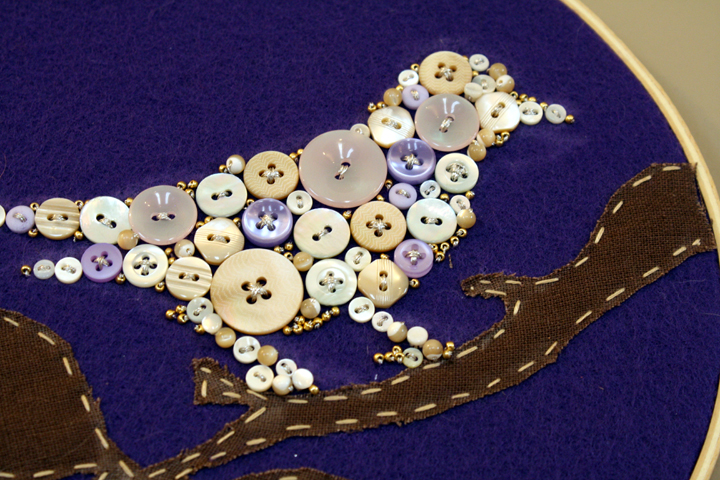
Next was the hardest part by far. I took all my buttons and placed them on the felt til I thought they best filled up the bird shape, making sure I got a good variation in colors, shapes, etc. I used pins that i stuck thru the button holes and then thru the felt to hold the buttons in place while I began my sewing.

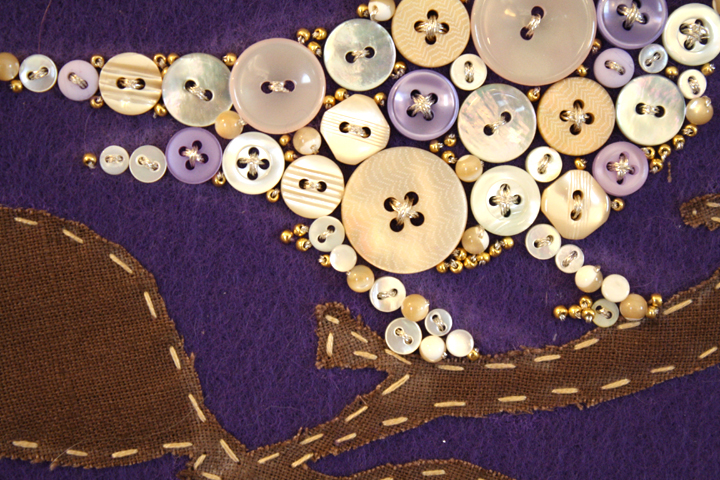
I chose a silvery thread and just started at one end, sewing each button on. I used the same thread for several buttons until I needed a new piece. In other words, I didn’t sew it off after each button.

The buttons shifted a lot while I was doing this and it was super frustrating to keep rearranging it, but again I don’t know what a better way to do it would have been.

In the end, to make it look more like a bird and less like a bird-like blob, I used little plastic and glass beads to fill in the empty areas that were too small for any buttons. It seems like the inspiration button bird lady did something similar.

This project was NOT easy. I definitely cursed the day I decided to attempt this multiple times during creation of my button bird. But in the end, I love how it came out. And Nate’s mom loved it too! I hung it in her bedroom over a little table she has and I think it looks great :)

Pin It

14. February 2012 · 13 comments · Categories: crafts, life · Tags: ,

One of my lovely blog readers saw one of my very first posts in which I showed a painting I made for Nate’s mom of one of her dogs (I should thank Kelly for that since it was all because she linked to a recipe  from that post!). Anyway, this woman liked it so much that she wrote to me asked if I could make one for her too!

I was/am so so flattered and honored to be commissioned to make a painting for someone. I was a little nervous since the ones I’ve made have usually been for gifts, and I felt like this one had to be even better.

Luckily, she got the painting in the mail the other day and was thrilled with the result :) So I present to you “Hannah:”

I told my customer to take some pics once it’s hanging on the wall so I’ll update the post with those soon.

If you know anyone looking to have a painting of their pet done, please sent them my way!

Nate and I went down to PA this weekend to visit his mom. We also went to an open house at the venue we wanted to possibly use for the wedding and loved it. So we put our deposit down and officially booked the venue and have a date! So exciting. I can’t believe we’re going to be married next October!

While there, we went pumpking picking because Nate had decided that I was going to carve a Where the Wild Things Are pumpkin. There were slim pickins at the pumpkin patch this year. I think maybe all the rain we got wiped out their supply?

I did a lot of walking around and comparing, assessing my canvas, until I found one that would be perfect for carving the image I wanted.

Nate found a good one too.

I spent a little while browsing pictures online til I found one I liked:

I then removed the pumpkin top and scraped it out. I saved the seeds and roasted them with some salt, paprika and garlic powder…taaasty! Totally reminds me of carving pumpkins when I was little because my mom would roast the seeds for us.

Next I sketched out the image freehand on the pumpkin with a pen.

Then I used some wood carving tools I got at Michaels to scrape away the image to the best of my ability. I realized that you have to kind of carve a reverse relief. The parts that you want to look the closest have to be the deepest, and hence the brightest. I found putting the pumpkin in my lap made the carving easiest.

And here’s the final product, all lit up on the front porch!…Nate chose to do a traditional Jack-O-Lantern :)

Now, what should I carve next year. Ideas?!

02. August 2011 · 10 comments · Categories: crafts · Tags: ,

If you’ve never heard of Pinterest, you’re missing out. I recently discovered it, though I don’t remember where and I’m constantly stumbling across it all over the interwebs. From the Pinterest website:

“Pinterest lets you organize and share all the beautiful things you find on the web. People use pinboards to plan their weddings, decorate their homes, and organize their favorite recipes.

Best of all, you can browse pinboards created by other people. Browsing pinboards is a fun way to discover new things and get inspiration from people who share your interests.”

It’s really a pretty cool site. Anyway, as I mention in my About Me, my interests do not lie solely in the culinary field. I love being crafty, both through painting, crocheting, and other various ways. One of my favorite things to do, when I have time, is to reproduce something I saw in a store for cheaper, or to create something I want that I can’t find in a store. This post is about the latter.

I’ve been wanting something to hold all my jewelry. I mean I don’t have that much, but I’m the kind of person that wears the same earrings, necklace and bracelets every day because I’m too lazy too switch (yep, I wear them in the shower and to bed too). But  sometimes when I head to work, I want to look a little nicer. However, with all my jewelry shoved in a case in my closet where I can’t see what I have, and with no counter space for a standing jewelry holder, I had to take matters into my own hands! I needed to make a jewelry holder that would hang on a wall…

I had seen a few ideas on Pinterest that caught my attention:

Inspiration #1Inspiration #2Inspiration #3

And so I got to work on my own little project. I knew that while I liked the idea of all three inspiration pieces, I needed mine to combine all parts. I wanted to interior of the frame to be able to hold earrings, and I pictured the necklaces hanging on the sides. I liked inspiration #3, but I felt it would hang too low if the necklaces were below so I’d put the hooks on the side. Also, I liked the fine mesh in #2 because it would give more options for where to hang things. So I started by finding a disgusting old wooden frame from my grandma’s. This isn’t the frame I used, because I forgot to take a before, but this was a similar one I found at grandma’s, since I wasn’t sure which would be better at the time:

I know, ugly, right?? I knew the frame needed to be real wood and have a thick side, so I would be able to screw the necklace hooks in. The frame I found had glass on it and something inside, both of which I promptly removed. I had an idea that I wanted this to look rustic and whitewashed. I took some white paint I had laying around and I got one of those foam brushes wet but squeezed out most of the water. I painted the whole frame in a watered down white, wiping down with a paper towel to keep the application light. Next, I bought some thin wire mesh and some small hooks at an art supply store. I cut the mesh to size and fit it in the back of the frame and secured with large metal tacks. I then screwed the hooks into either side, staggering them left and right so that the necklaces wouldn’t hang on each other.

Slightly staggered hooks to prevent necklaces from hanging on top of each other.

In the end, I was seriously impressed with my creation (if I don’t say so myself). In fact, I’m considereing making a few more and selling them on etsy…when i get some free time.

This whole craft project is part of the Pinterest Challenge, a nifty little idea I saw on the Young House Love site. Be sure to check out the hosts of this fun little idea: Sherry’sKatie’sEmily’s and Lana’s projects. Thanks for organizing the challenge, ladies! Can’t wait to see what everyone else came up with!