Ever since Nate’s last birthday, I’ve been plotting and planning a cake to top what I made him last year. He told me that his fave cake flavors are Red Velvet or Carrot Cake.

But I knew a Red Velvet Cake alone wouldn’t be special enough for his 30th birthday. So I thought bigger.

Nate told me that when he was younger, he loved rainbow sherbert and tye-dye, and basically all things colorful. So I knew when I was scoping the web and saw pictures of Rainbow Cakes, I’d have to do something similar.

However, I don’t have 6 separate pans for different colors, so I thought about putting all the colors in one pan, for more of a tye-dye effect, and only used 2 pans for 2 layers. I had seen that others had already tried this so I knew it would work out.

The only thing that worried me is that all of these were done with white cake, so the colors were very vibrant. I’d be using red velvet batter, though, which is already tinted slightly brown from the cocoa.

In the end, it certainly wasn’t as bright as it would have been with white cake, but it was pretty darn awesome.

But the best part was seeing everyone’s face when I cut the first slice. Nobody had a clue of what was inside that innocent looking white-frosted cake :)

Happy 30th Birthday, Nate! I can’t wait to celebrate many more with you…


Rainbow Velvet Cake with Raspberries and Blueberries
Adapted from Bon Appetit

Print this recipe!

Make one 9-in layer cake

Ingredients:

Cake
2 1/4 cups sifted cake flour (sifted, then measured)
2 tablespoons unsweetened cocoa powder
1 teaspoon baking powder
1 teaspoon baking soda
1/2 teaspoon salt
1 cup buttermilk
1 teaspoon distilled white vinegar
1 teaspoon vanilla extract
1 1/2 cups sugar
1/2 cup (1 stick) unsalted butter, room temperature
2 large eggs
Red, Orange, Yellow, Green, Blue, Violet food gels

Frosting
2 8-ounce packages cream cheese, room temperature
1/2 cup (1 stick) unsalted butter, room temperature
1 tablespoon vanilla extract
2 1/2 cups powdered sugar

3 1/2-pint baskets fresh raspberries
3 1/2-pint baskets fresh blueberries

Preparation:

Preheat oven to 350°F. Butter and flour two 9-inch-diameter cake pans with 1 1/2-inch-high sides.

Sift sifted flour, cocoa powder, baking powder, baking soda, and salt into medium bowl.

Whisk buttermilk, vinegar, and vanilla in small bowl to blend. Using electric mixer, beat sugar and butter in large bowl until well blended. Add eggs 1 at a time, beating until well blended after each addition. Beat in dry ingredients in 4 additions alternately with buttermilk mixture in 3 additions.

Divide batter evenly into 6 small bowls. Add food gel to each of 6 bowls, about 1/4 tsp each or until desired color is achieved.

Drop the colours, one by one, into the middle of the pan, in neat concentric blobs.

When you’re three colours in, start doing the reverse with the other pan. Since I’m going in rainbow order: red, orange, yellow, green, blue, purple, I got from red to yellow in the first pan, then purple, blue, green in the second. This is so that your two pans are equal if your measurements aren’t exact (and they’re not likely to be).

For a good visual of how to do this, view here.

Bake cakes until tester inserted into center comes out clean, about 25-30 min minutes. Cool in pans on racks 10 minutes. Turn cakes out onto racks; cool completely.

Beat cream cheese and butter in large bowl until smooth. Beat in vanilla. Add powdered sugar and beat until smooth.

Place 1 cake layer, flat side up, on platter. Spread 1 cup frosting over top of cake.

Arrange 1 basket raspberries and 1/2 basket blueberries atop frosting, pressing lightly to adhere.

Top with second cake layer, flat side down.

Spread remaining frosting over top and sides of cake. Arrange remaining berries decoratively over top of cake. (Can be made 1 day ahead. Cover and refrigerate. Let stand at room temperature 1 hour before serving.)

Cut into cake and watch the amazement on everyone’s faces!

Thank goodness the weather has been in the 80s lately instead of 90s. Unfortunately, I’m pretty tired of sweating within 5 minutes of stepping foot outdoors. I hate to say it, but I’m so ready for sweater weather.

Both Nate and my favorite season is fall. We love the crisp air, beautiful leaves, earthy smells and cooler temperatures! Plus, I love wearing sweaters.

So it would only seem appropriate that to celebrate our 1 year dating anniversary on Friday, we had a Cider Cake.

This actually came about because we had this bottle of TJ’s Cranberry Cider laying around for a while, and with the cold weather long gone, Nate had no desire to drink it. He also said that he had had it before and didn’t love it.

I hate wasting things or throwing them out, so I figured the cider would have to get used in some other form that we’d both enjoy. I scoured the internet for recipes that use cider and found quite a few, but I wanted our anniversary dessert to be something special.

So when I came across a recipe for a 3 layer cake with cider cake, cider filling and cider frosting, I knew that had to be it. Luckily, altogether it used 3+ cups of cider, but unfortunately that still leaves me with over half the bottle.

Next up I’m thinking of cider roasted pears, and maybe a cider vinaigrette.

This cake is part of the #cakelove bloghop!

you can see it here.


October Cider Cake
Taken from Oxmoor House

Print this recipe!

Makes one 3-layer cake 

3/4 cup shortening
1 1/2 cups firmly packed brown sugar
3 eggs
3 cups all-purpose flour
1 tablespoon baking powder
3/4 teaspoon salt
1 teaspoon ground nutmeg
1 teaspoon ground cinnamon
1/4 teaspoon ground cloves
1 cup apple cider
1 tablespoon lemon juice
Cider Filling (recipe below)
Creamy Cider Frosting (recipe below)
Chopped pecans (optional)

Cream shortening; gradually add sugar, beating well. Add eggs, one at a time, beating well after each addition.

Combine flour, baking powder, salt, nutmeg, cinnamon, and cloves; add to creamed mixture alternately with cider, beginning and ending with flour mixture. Stir in lemon juice.

Pour batter into 3 greased and floured 8-inch round cake pans. Bake at 350° for 25 minutes or until a wooden pick inserted in center comes out clean. Cool in pans 10 minutes; remove layers from pans, and cool completely in fridge.

Put a thin band of icing along the perimeter of each later, and then pool the Cider Filling inside. Put back in fridge to let it set completely or the filling will ooze out from the weight of the cake (trust me).

Spread top and sides with Creamy Cider Frosting. Garnish top of cake with pecans, if desired.


Cider Filling

1/2 cup sugar
3 tablespoons cornstarch
1/4 teaspoon salt
1 cup apple cider
2 tablespoons lemon juice
2 tablespoons butter or margarine

Combine sugar, cornstarch, and salt in a heavy saucepan; gradually stir in cider. Cook over medium heat, stirring constantly, until thickened.

Remove from heat. Stir in lemon juice and butter; cool in fridge.


Creamy Cider Frosting

1/2 cup butter or margarine
1/4 cup plus 1 tablespoon apple cider
1/4 teaspoon salt
About 4 1/2 cups sifted powdered sugar
1/2 cup chopped pecans

Combine first 3 ingredients in a heavy saucepan. Boil 1 minute, stirring constantly.

Remove from heat; cool. Gradually add sugar until spreading consistency; beat until smooth.

lemons brown bananas, make banana bread!

My mom recently decided to bestow 3 extremely brown bananas on me. I suppose not everyone would appreciate such a gesture, but I was ecstatic! It’s rare for me to remember to buy bananas, and even less likely for me to have ones ripe enough for a perfect banana bread.

If you’ve ever made banana bread with yellow bananas, you’re doing it wrong. Even ones heavily mottled with brown spots aren’t quite there. The best bananas for bread have to be brown and so soft that they’re falling apart. If you happen to have bananas in this state and don’t have time to be baking banana bread, remove the peel and put them in a ziploc in the freezer until you’re ready.


Please don’t forget to peel them before you freeze them. I made this mistake once, and that’s all it took. It’s literally impossible to remove the peel, and just messy after it defrosts. Trust me.

Anyway, I wanted to make some changes to my family’s absolute favorite banana bread recipe. I’m not one to alter perfection, but I had some buttermilk leftover from making baked chicken fingers, and didn’t want it to go to waste. I also, for some unknown reason, had the idea that I wanted to throw some polenta into the recipe to give it a little crunch.

When I first took the bread out of the oven and cut myself a slice, I wasn’t sure what to think. It wasn’t the bread I was used to, and I’m not big on change.

But when I had another taste the next day, I kind of liked the subtle, crunchier texture. I mean, it’s not the recipe from childhood, but that’s ok. I can always go back to the old recipe, but I think this one might stick around for a while.


Chocolate Chip Polenta Banana Bread

Recipe by Me

Print this recipe!

Makes 1 loaf

1 cup sugar
1 egg
3 ripe bananas, mashed
2 Tbsp unsalted butter, melted
1 cup flour
1 cup polenta
1/2 cup light buttermilk
1 1/2 tsp baking soda
1/4 tsp salt
1/2 cup mini chocolate chips

Preheat oven to 325. Grease bottom of a loaf pan.

Mix together sugar and egg, by hand or with mixer. Mix in bananas, butter, and buttermilk.

In a small bowl, mix together flour, polenta, baking soda, and salt. Gradually add to banana mixture.

Stir in chocolate chips. Pour into loaf pan.

Bake 50-60 minutes til golden, and toothpick comes out clean.

As you all know (or maybe not if you’ve only recently joined me), but I am a member of the Daring Bakers. Each month they host a challenge composed of a very complicated dessert that you must bake and post on the 27th of the month.

Unfortunately, last month I was in the midst of packing up my kitchen, so I wasn’t able to complete it. It’s too bad because the challenge was something I’ve always wanted to make, baklava.

But I’m back in the game this month with my brand new, much larger kitchen! It’s so nice to be cooking on the huge counters. I don’t even know what to do with all the space. You should see the mess I made in the process of cooking this. I used 4 bowls and two pots…just because I could!

Jana of Cherry Tea Cakes was our July Daring Bakers’ host and she challenges us to make Fresh Frasiers inspired by recipes written by Elisabeth M. Prueitt and Chad Robertson in the beautiful cookbook Tartine.

This recipe was randomly requested from someone at work who happens to be French, but I put off making it because I knew it would take a lot of time. Well who would have thought it would be the recipe for my Daring Bakers Challenge! At least it gave me a reason to dive in and conquer this many stepped recipe.

Me and Frenchie

Honestly, it wasn’t as bad as I thought, and even kind of fun. I got real satisfaction seeing the finished product and knowing that I made that.

I brought it into work and it got compliments. Personally, I thought it was good but probably not worth all the effort I put into it. Maybe it’s because I’m not a fan of cream-based desserts. But if you are, and you have a spare weekend to bake/whip/assemble, then by all means give this a shot! ;)

These recipes have been adapted from the cook book Tartine by Elisabeth M Prueitt and Chad Robertson, the chefs and owners of Tartine, a beloved San Francisco bakery.

Basic Chiffon Cake:

Ingredients:

1 cup + 2 tablespoons (270 ml) (5½ oz/155 gm) all-purpose flour
1 teaspoon (5 ml) (4 gm) baking powder
3/4 cups (180 ml) (6 oz /170 gm) sugar
1/2 teaspoon (2½ ml) (1½ gm) salt, preferably kosher
1/4 cup (2 fl oz/60 ml) vegetable oil
3 large egg yolks
⅓ cup + 1 tablespoon (3.17 fl oz/95 ml) water
1 teaspoon (5 ml) pure vanilla extract
3/4 teaspoon (3¾ ml) (3 gm) lemon zest, grated
5 large egg whites
¼ teaspoon (1¼ ml) (1 gm) cream of tartar

Preheat the oven to moderate 325°F (160°C/gas mark 3).

Line the bottom of an 8-inch (20 cm) spring form pan with parchment paper. Do not grease the sides of the pan.

In a large mixing bowl, stir together the flour and baking powder. Add in all but 3 tablespoons (45 ml.) of sugar, and all of the salt. Stir to combine.In a small bowl combine the oil, egg yolks, water, vanilla and lemon zest. Whisk thoroughly.

Combine with the dry ingredients and mix thoroughly for about one minute, or until very smooth.

Put the egg whites into a stand mixer, and beat on medium speed using a whisk attachment on a medium speed, until frothy. Add cream of tartar and beat on a medium speed until the whites hold soft peaks. Slowly add the remaining sugar and beat on a medium-high speed until the whites hold firm and form shiny peaks.

Using a grease free rubber spatula, scoop about ⅓ of the whites into the yolk mixture and fold in gently. Gently fold in the remaining whites just until combined.

Pour the batter into the prepared pan. Bake for 45 to 55 minutes or until toothpick inserted into the center comes out clean.

Removed the cake from the oven and allow to cool in the pan on a wire rack.

To unmold, run a knife around the sides to loosen the cake from the pan and remove the spring form sides. Invert the cake and peel off the parchment paper. Refrigerate for up to four days.

Simple Syrup

I chose to flavor by stirring in 1-2 teaspoons of almond extract.

Ingredients:
1/3 cup (2⅔ fl oz/80 ml) (2⅔ oz/75 gm) of sugar, flavored or white
1/3 cup (2⅔ fl oz/80 ml) of water
1-2 tsp flavored extract (optional)

Combine the water,sugar, and extract in a medium saucepan.

Bring the mixture to a boil and let the sugar dissolve. Stirring is not necessary, but will not harm the syrup.

Remove the syrup from the heat and cool slightly.

Transfer syrup to a lidded container or jar that can be stored in the refrigerator. Simple syrup can be stored for up to one month.

Fraisier Assembly

Components:

1 baked 8 inch (20 cm) chiffon cake
1 recipe pastry cream filling
⅓ cup (80 ml) simple syrup or flavored syrup
2 lbs (900 g) strawberries
confectioners’ sugar for dusting
½ cup (120 ml) (5 oz/140 gm) almond paste

Line the sides of a 8-inch (20 cm) spring form pan with plastic wrap. Do not line the bottom of the pan.

Cut the cake in half horizontally to form two layers.

Fit the bottom layer into the prepared spring form pan. Moisten the layer evenly with the simple syrup. When the cake has absorbed enough syrup to resemble a squishy sponge, you have enough.

Hull and slice in half enough strawberries to arrange around the sides of the cake pan. Place the cut side of the strawberry against the sides of the pan, point side up forming a ring.

Pipe cream in-between strawberries and a thin layer across the top of the cake. DO NOT USE UP PASTRY CREAM HERE.

Hull and quarter your remaining strawberries and place them in the middle of the cake. Cover the strawberries and entirely with the all but 1 tbsp. (15 ml) of the pastry cream.

Place the second cake layer on top and moisten with the simple syrup.

If desired, knead food gel into the almond paste to get desired color. Lightly dust a work surface with confectioners’ sugar and roll out the almond paste to an 8-inch round 1/16 inch (1.5 mm) thick. Spread the remaining 1 tablespoon (15 ml) of pastry cream on the top of the cake and cover with the round of almond paste.

Cover with plastic wrap and refrigerate for at least 4 hours.

To serve release the sides of the spring form pan and peel away the plastic wrap.

Serve immediately or store in the refrigerator for up to 3 days.

Have I told you how much I love long weekends? :) Nate and I took the 3-day weekend opportunity and headed down to PA to visit his mom and get some R&R.

One of the nice parts about vising Nate’s mom is that my childhood friend, Nicole, lives only about an hour drive from her. So when we get a long weekend, I can take half a day and go spend time with her, her husband and her new ADORABLE baby boy, Luc. He is a seriously cute baby.

Nicole loves to cook but told me that she hasn’t had that much experience with baking and was hoping to bake something with me. She’s been asking me this for a while but the last couple times I visited, we just didn’t have time.

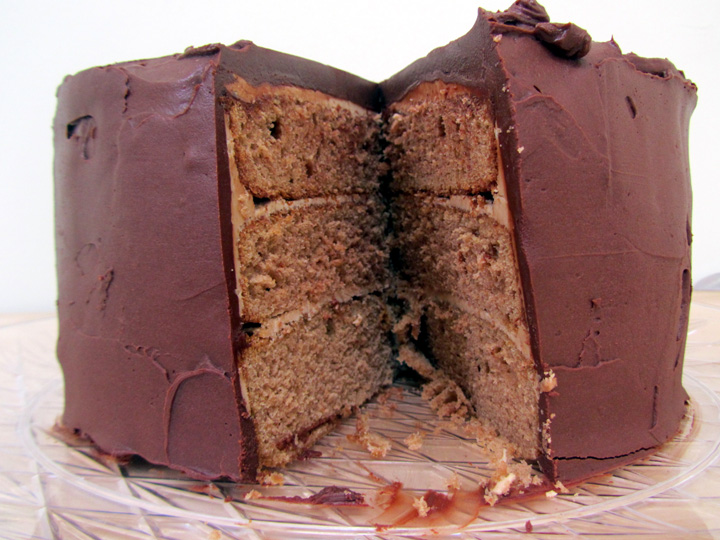
But this time we prepared ahead of time. She wanted to bake a big cake for her hubby. She said he loves dark chocolate and caramel, so I scoured the internet for some cakes that made use of this flavor combo and came across this recipe from the blog Sugar Pies.

I copied the recipe below exactly from their site. It was good…not the best cake I ever had. But I think it could get there with the following changes:

  1. Triple or quadruple the amount of Caramel Cream Frosting. It didn’t even make enough to go between the layers and on top and sides of cake. I think this is because it was supersweet and it would have been overkill with the ganache.
  2. Third or halve the Chocolate Ganache, and don’t spread it but simply allow it to cover the top and drip down the sides of the cake.
  3. Definitely pop the cakes in the freezer before icing them, and again before pouring on the ganache.
  4. Serve the cake at room temperature.

Personally, I think it would be perfect with the cake completely frosted with the Caramel Cream Frosting and then with a thin layer of ganache on the top and dripping down the sides.

I’ll give it this, though- it’s quite impressive/massive looking. I think it could look even more impressive with the changes I made with the ganache dripping down the sides :)

Caramel Cream Cake
Adapted from Sugar Pies Food

Print this recipe!

Makes one 9″ 3-layer cake

Caramel Cream Cake

1/2 pound unsalted butter, softened
2 1/2 cups sugar
5 large eggs, separated
3 cups all-purpose flour
1 tsp. baking soda
1 tsp. salt
4 tsp. cocoa powder
1 cup buttermilk
5 tsp. strong coffee
2 tsp. vanilla extract

Preheat oven to 350°. Cut parchment paper circles to fit bottoms of 3 9-inch round cake pans. Grease and flour bottoms and sides of pans.

In mixer fitted with whisk attachment beat the butter on medium speed until light and fluffy. Add the sugar and egg yolks and beat until incorporated. Sift together the dry ingredients and add to the mixture alternating with buttermilk, beginning and ending with dry ingredients. Add the coffee and vanilla and beat well.

In a clean bowl and with a clean whisk, beat the egg whites until they form stiff peaks. Gently fold into batter. (Note: If you have only one bowl for your mixer, beat the egg whites first and transfer them to another bowl while you mix the batter.)

Divide the batter evenly among the 3 pans and bake for 30 minutes or until a cake tester inserted in the center of the cakes comes out clean. Let the cakes cool in the pans for 10 minutes then remove from pans and allow to cool completely on wire racks. When completely cool, ice with Caramel Cream Frosting.

Caramel Cream Frosting

1 pound confectioner’s sugar
2 tsp. cocoa powder
1 egg yolk
8 tbs. unsalted butter, softened
1 tbs. strong coffee (liquid)
1 tsp. vanilla extract

Sift together sugar and cocoa. In a mixer fitted with the whisk attachment, beat the egg yolk until pale on low speed. Add the butter and beat well. Add the liquids and the sugar/cocoa mixture and beat until light and fluffy.

Spread frosting between layers of cake and on top and sides. Place cake in refrigerator or freezer to chill thoroughly and allow frosting to set.


Whipped Chocolate Ganache

2 cups heavy cream
16 oz. good bittersweet chocolate, chopped
1 tsp. instant coffee crystals

Place chopped chocolate and coffee in large heat proof bowl.

Heat heavy cream in saucepan until it begins to simmer. Pour over chocolate and allow to sit about 10 minutes to melt the chocolate. Stir with rubber spatula and then whisk chocolate until it is smooth.

Set bowl over another bowl filled with ice water and beat chocolate with electric mixture until about the consistency of sour cream (about 3-10 minutes depending on temperature). Be sure not to over beat the chocolate. You just want it nice and spreadable but not too liquid.

Remove cake from refrigerator and place on wire rack set over baking sheet. Pour chocolate over cake and using offset spatula spread the chocolate over top and sides of cake.

Return cake to refrigerator or freezer to allow the chocolate to set up then allow cake to come to room temperature to serve.