Originally I started this blog because I loved the idea of being able to share my favorite or newly-discovered recipes with others. I love that you can usually know that if a recipe is posted on a blog, it’s a good one and making it won’t be disastrous.

But in posting to my blog for the past 11 months (WOW, has it really almost been a year since I started this thing?!), I realized it has an even better purpose. It has become a place to which I can go to find my favorite recipes and keep things organized.

Before putting in fridge…

For the past couple years, I’ve started new traditions about things that I make on certain occasions. One of those occasions is Christmas Day when I bake cinnamon buns. Last year I scoured the internet searching for a bun that could be made the day before and simply baked in the morning. I combined several recipes, pulling the best parts of each: dough, filling, frosting. They came out perfectly.

So I was upset this year when I realized that I had printed out the recipe last year but hadn’t written it down to save anywhere. I, luckily, had an email trail of when I sent it to Nate and his mom to check it out.

This year, I wanted to share this amazing recipe with you…and now I know that next year when I go to bake these tasty treats again, I will be able to find the recipe in the spot where I now have all of my favorite recipes listed, my blog :)


Overnight Cinnamon Buns with Cream Cheese Frosting

Print this recipe!

makes 1 dozen rolls

Dough:
1 cup milk
1/3 cup butter
1 (.25 ounce) package active dry yeast
1/2 cup white sugar
4 1/2 cups all-purpose flour
1 teaspoon salt
3 eggs

Filling:
1/3 cup sugar
1/2 cup brown sugar
3/4 teaspoon cinnamon
1/4 teaspoon freshly grated nutmeg
2 Tablespoons butter, softened

Frosting:
4 oz.  cream cheese, softened (1/2 of an 8 oz container)
1/4 cup margarine, softened
1/2 teaspoon vanilla extract
1 1/2 cups confectioners’ sugar
1/2 Tbsp milk

Preparation:
Heat the milk in a small saucepan until it bubbles, then remove from heat. Add the butter and stir until melted; let cool until lukewarm.

In a large mixing bowl, dissolve the yeast in the milk mixture. Add the sugar, 3 cups of flour, salt and eggs; stir well to combine. Add the remaining flour, 1/2 cup at a time, stirring well after each addition. When the dough has pulled together, turn it out onto a lightly floured surface and knead until smooth and supple, about 8 minutes.

Lightly oil a large mixing bowl, place the dough in the bowl and turn to coat with oil. Cover with a damp cloth and let rise in a warm place until doubled in volume, about 1 hour.

Deflate the dough and turn it out onto a lightly floured surface and roll into a 10x 14 inch rectangle. Lightly brush the far edge with water. In a small bowl combine the filling ingredients and sprinkle/spread evenly over the dough. Roll up the dough into a log (it should have the length of the long side) and seal the seam.

Cut the dough into 12 equal pieces; place the pieces in a greased 9×13 inch baking pan, or 12 inch deep dish pizza pan. Cover with plastic wrap and place in the refrigerator to rise overnight. *note that they can be put in the fridge for longer than just overnight. I usually put mine in around 4pm.

The next morning, preheat oven to 375 degrees F (190 degrees C). Take the rolls out of the refrigerator and let stand at room temperature for 30 minutes-1.5 hrs. I think that they’re better if they sit out for longer than 30 min because they still have to rise a bit. Don’t expect them to rise a ton sitting out, as they do most of their puffing up while in the oven.

Bake the rolls for 25 to 30 minutes or until golden. Meanwhile, combine the frosting ingredients; set aside. Spread the frosting over the rolls when they come out of the oven. Enjoy hot out of the oven!

07. February 2011 · Write a comment · Categories: Baking, Bread · Tags:

Wow, my first real post. I’m not sure where to even begin. Part of me wants to tell you all about me, but I wouldn’t even know what to say. I suppose the real me will come across in my writing/pictures.  I want to start by telling you a few things though:

I’m not a photographer, although I do think I have the potential when I have the right environment. I have a crappy little point-and-shoot camera and there is NO natural light in my apt since the bedroom is the only area with windows. I think I’m going to make a light box soon, and bring it into my bedroom…but I’m hesitant to have food anywhere near my bed since I’m a complete klutz. I’m going to try to improve my photos but these first pictures were taken just for me, before I even had any idea to start a blog. They were mostly taken by my boyfriend who is so impressed by all cooking I do that he feels the need to document it.

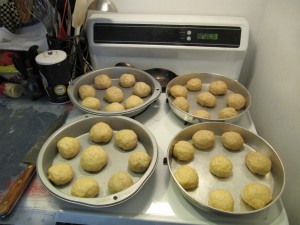
I’m also going to begin by posting things I made in the last few months, to catch you all up to today. I’m going to start with a Honey Wheat Dinner Rolls I made back in the fall.

before rising

I love grocery shopping. I don’t know if it’s just me, or anyone who likes food, but I could spend hours in the store. When I met Nate, I had only been to Trader Joe’s once or twice. I thought it was some high priced grocery store like Whole Foods. It was only after I met him that I realized it’s way cheaper than most markets…especially those in nyc.

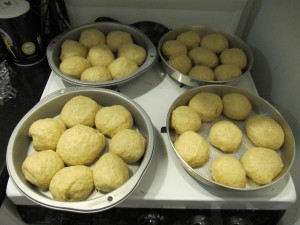
After rising

Nate is a creature of habit. Every week he buys the exact same items: whole wheat dinner rolls, turkey, apples, focaccia, peanut butter pretzels, baby carrots, and a couple other things. He would bring the dinner rolls over to my apt when I would make dinner for him. So I thought…maybe I can make him some homemade rolls.

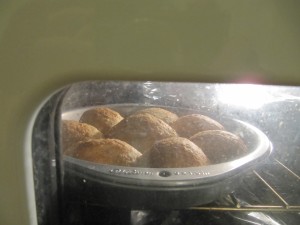
Almost done! (wow, my oven window is diiiirty)

I did some research online and came across a King Arthur Flour recipe with lots of good reviews. I have to say that they came out tasty, and Nate approved, but I think the effort it took wasn’t worth it when the rolls at TJs are suitable. I’d rather be making dessert ;)

Mmmm mmm. Fresh outta the oven rolls :)

Now listen…I know yeast and bread-baking is a complicated thing. I probably shouldn’t have started with a complicated recipe cuz you’ll get the wrong idea about me. I promise the things I usually make are way easier. But think of it this way…if it comes out crappy,  just keep it to yourself and no one has to know. At least you tried :)

King Arthur Flour Honey Wheat Rolls

Ingredients

  • 1 packet “highly active” active dry yeast, or 2 1/4 teaspoons active dry yeast, or 2 1/4 teaspoons instant yeast
  • 1 cup lukewarm water
  • 1/4 cup orange juice
  • 1/4 cup (1/2 stick) unsalted butter, cut into 6 pieces
  • 3 tablespoons honey
  • 1 cup King Arthur Unbleached All-Purpose Flour
  • 2 cups King Arthur Traditional Whole Wheat Flour or King Arthur White Whole Wheat Flour
  • 1 1/4 teaspoons salt
  • 2/3 cup instant mashed potato flakes
  • 1/4 cup nonfat dry milk
  • Directions

    1) If you’re using active dry or “highly active” yeast, dissolve it with a pinch of sugar in 2 tablespoons of the lukewarm water. Let the yeast and water sit at room temperature for 15 minutes, until the mixture has bubbled and expanded. If you’re using instant yeast, you can skip this step.

    2) Combine the dissolved yeast with the remainder of the water and the rest of the ingredients. Mix and knead everything together—by hand, mixer or bread machine set on the dough cycle—till you’ve made a smooth dough. If you’re kneading in a stand mixer, it should take about 5 to 7 minutes at second speed. In a bread machine (or by hand), it should form a smooth ball.

    3) Place the dough in a lightly greased bowl. Cover the bowl, and allow the dough to rise, at room temperature, till it’s quite puffy but not necessarily doubled in bulk, about 90 minutes to 2 hours. Rising may take longer, especially if you’ve kneaded by hand. Give it enough time to become quite puffy.

    4) While the dough is rising, lightly grease a 9″ x 13″ pan, or two 9″ round cake pans.

    5) Gently deflate the dough, and transfer it to a lightly greased work surface. Divide it into 16 pieces.

    6) Shape each piece into a rough ball by pulling the dough into a very small knot at the bottom (think of a balloon with its opening knotted), then rolling it under the palm of your hand into a smooth ball.

    7) Place the rolls in the 9″ x 13″ pan, or put eight rolls in each of the round cake pans, spacing them evenly; they won’t touch one another.

    8 ) Cover the pans with lightly greased plastic wrap, and allow the rolls to rise for 1 1/2 to 2 hours. They’ll become very puffy, and will reach out and touch one another. While the rolls are rising, preheat the oven to 350°F.

    9) Bake the rolls for 15 minutes, and tent them loosely with aluminum foil. Continue to bake until they’re mahogany-brown on top, but lighter colored on the sides, an additional 10 to 13 minutes.

    10) Remove the rolls from the oven, and after 2 or 3 minutes, carefully transfer them to a rack. They’ll be hot and delicate, so be careful. Serve warm, or at room temperature.