One of my dearest friends, Erica (and the one I’ve known the longest!), celebrated a special bday this past weekend- the big 3-0. Because I wasn’t able to make it to her bowling bday bash, I did what I always do and baked her a cake :)

It’s so nice to love cooking and baking, because it makes giving presents so easy, enjoyable and special (I also sometimes paint/draw/crochet my gifts). I mean who doesn’t love some homemade treats? Plus, it’s so nice to put some thought and effort into a present and give it that handmade touch rather than just picking up a random gift from the store because you’re “supposed to” give presents on bdays.

And I have to say, I think my gifts tend to be much more appreciated! So when it came time to get thinking about what type of cake Erica wanted, I went straight to the source. I like to be creative, but Erica wanted the basics: yellow cake with chocolate frosting. I suppose that IS the traditional bday cake combo.

Of course, I had to add my touch and make it a little different and more gourmet- adding white chocolate chips to the batter and making a sour cream chocolate frosting. But I also have been so busy  that I took a few shortcuts- using a boxed cake mix that I jazzed up.

Yes, Erica is wearing scrubs in those pics. She works in tv and is currently filming a show and is in the hospital all day long. I wish I could wear such comfy clothes to work!

Anyways, the cake result was nothing short of amazing…a birthday tradition from now on, to be sure.

Happy 30th Birthday, Erica!!!

I’m so happy to have you as my friend and I can’t wait to celebrate many more birthdays with you :)


Yellow Birthday Cake with White Chocolate Chips and Chocolate Sour Cream Frosting

Cake recipe by me, Frosting recipe taken from Smitten Kitchen adapted from The Dessert Bible

Print this recipe!

# of Servings-who cares, it’s your birthday! (Makes one 2 layer bday cake)

Cake:

1 box Classic Yellow Cake mix
1 cup water
1/3 cup oil
1 cup sour cream
1 tsp vanilla
3 eggs
1/2-1 cup white chocolate chips
1 recipe Chocolate Sour Cream Frosting, recipe below

Preheat oven to 350°F.

Butter two 9-inch round cake pans (or two 8-inch, depending on how high you want the cake to be) and line with circles of parchment paper, then butter parchment.

Place cake mix, water, oil, eggs, and vanilla in a bowl. Beat well. Add eggs and beat to incorporate, 2 min. Stir in 1/2-1 cup of white chocolate chips, depending on how much you like.

Spread batter evenly in cake pan, then rap pan on counter several times to eliminate air bubbles. Bake until golden and a wooden pick inserted in center of cake comes out clean, 30 min. Cool in pan on a rack 15 minutes. Invert onto rack and discard parchment, then cool completely, about 1 hour (put in fridge if you want them to cool faster. Sometimes they’re easier to frost when cold). Do not frost until cakes are completely cool.

Chocolate Sour Cream Frosting

15 ounces semisweet or bittersweet chocolate, chopped
1 1/4 teaspoons instant espresso (optional, but can be used to pick up the flavor of average chocolate)
2 1/4 cups sour cream, at room temperature
1/4 to 1/2 cup light corn syrup
3/4 teaspoon vanilla extract

Combine the chocolate and espresso powder, if using, in the top of a double-boiler or in a heatproof bowl over simmering water. Stir until the chocolate is melted. (Alternately, you can melt the chocolate in a microwave for 30 seconds, stirring well, and then heating in 15 second increments, stirring between each, until the chocolate is melted.) Remove from heat and let chocolate cool until tepid.

Whisk together the sour cream, 1/4 cup of the corn syrup and vanilla extract until combined. Add the tepid chocolate slowly and stir quickly until the mixture is uniform. Taste for sweetness, and if needed, add additional corn syrup in one tablespoon increments until desired level of sweetness is achieved.

Let cool in the refrigerator until the frosting is a spreadable consistency. This should not take more than 30 minutes. Should the frosting become too thick or stiff, just leave it out until it softens again.


Well, this was supposed to be a Cinqo de Mayo post, but Nate took the pictures I needed off of his camera and put them on his computer before I had a chance to get them. I was excited about being so blog-conscious, doing a mexican-inspired meal on Cinqo de Mayo, but he screwed it up :( (don’t worry, Nate, I forgive you, but you better not do it again) …so instead, I bring you dessert.

I decided on a whim the other day to reward Nate with some homemade brownies. I rarely make them from scratch, as I find the boxed ones to usually be superior. However, i thought I’d give them a shot.

Nate loves chocolate-mint, so my first inclination was to make an andes mint brownie. Sounds tasty, right? But then I remembered that we had tons of leftover, stale cookies that are basicaly the TJ’s version of Tagalongs. They were ok, but I thought that in a brownie, they’d taste much better :) To amp up the peanut butter flavor, I also decided to make a layer of pb swirl on top.

Let me tell you, these turned out totally delicious. You could definitely substitute another cookie  in here…although I happen to think that a chocolate covered cookie would work best so that it melts a little.

And you could easily omit the pb topping. But that would be stupid.

Enjoy!


Peanut Butter Tagalong-Wannabe Brownies

Recipe by Me

Print this recipe!

Makes 16

1/2 cup (1 stick) butter or margarine, melted + 2 Tbsp, butter melted
1 cup sugar
1 teaspoon vanilla extract
2 eggs
1/2 cup all-purpose flour + 2 Tbsp flour
1/3 cup Cocoa
1/4 teaspoon baking powder
1/4 teaspoon salt
12 Tagalong (or similar) cookies

1/2 cup peanut butter
1/4 cup confectioners sugar

Heat oven to 350°F. Grease 8-inch square baking pan.

Whisk together 1 stick melted butter, sugar and vanilla in bowl. Add eggs; whisk well. Stir together 1/2 cup flour, cocoa, baking powder and salt; gradually add to egg mixture, beating until well blended.

In a smaller bowl, microwave peanut butter and 2 Tbsp butter for 30 sec – 1 min or until melted. Whisk in confectioners sugar and 2 Tbsp flour.

Pour 1/3 of chocolate batter into pan and spread out. Place the 12 cookies evenly over the batter and press lightly down. Put rest of chocolate batter evenly over cookies and lightly spread without disturbing the cookies.

Put blobs of the pb batter on top of the chocolate. Don’t worry about it looking nice. Using a knife, drag it through the pb and chocolate batter, creating a marbling effect. Tap pan on counter to get all air bubbles out.

Bake 25-30 minutes or until brownies are set and a toothpick comes out clean. Cool completely in pan on wire rack before cutting.

A lot of people dread the week-long holiday of Passover because of its slightly restrictive dietary rules. In all honesty, it’s really not all that bad. Sure, if you eat a lot of matzo all week long, you may end up being so bloated you resemble a matzo ball. But in reality there are many foods that you’re still able to eat during the holiday, not involving the dreaded matzo.

The key is to find recipes that you make during the year that happen to involve all ingredients allowed on Passover. The fewer Passover substitutions, the better. For example, potatoes are fine, as are eggs, meat, fruits and veggies..or your favorite flourless chocolate cake recipe ;) If you have a recipe that involves a scant amount of flour, replacing it with matzo flour (see below for description) or potato starch is fine. Obviously trying to bake a regular cake wouldn’t work, as flour is a primary ingredient. Catch my drift?

For those of you who are unfamiliar with the holiday, Passover commemorates the story of the Exodus, in which the ancient Israelites were freed from slavery in Egypt.  When Pharaoh freed the Israelites, it is said that they left in such a hurry that they could not wait for bread to rise. In commemoration, for the duration of Passover no leavened bread is eaten. Matzo (flat unleavened bread) is the primary symbol of the holiday.

Thus, many passover foods revolve around this dry (and not very tasty) cracker. Although you can’t use flour during the holiday, the way of getting around this is to use something called Matzo Flour/Matzo Meal which is simply ground-up matzo in a powdered/coarsely ground form. Again, this is only recommended in recipes in which there is not a HUGE amount of flour, but for the most part, it should work.

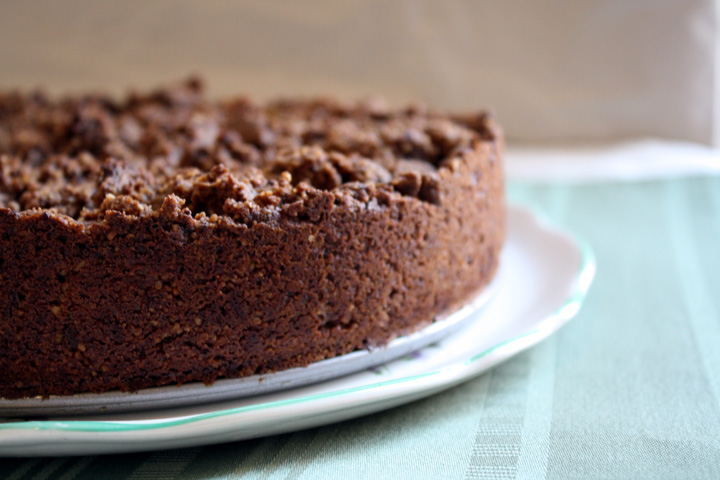
Which brings me to one of my favorite recipes ever: Apricot Chocolate Torte. This recipe actually calls for regular flour and is not a passover recipe at all, but when the simple matzo flour substitution is made, it tastes identical to real thing. This is one of my all time favorite desserts and I often find myself making it at Thanksgiving as well. My mom has been making this for years and I had no idea where it came from (and I’m not sure if she did either) but when I googled the title, it turns out she must have found it on the back of the apricot box :)


Apricot Chocolate Torte

Recipe adapted from the back of the apricot box!

Print this recipe!

Ingredients:

Filling

11 oz. dried apricots, chopped
1-1/2 cups sugar
3/4 cup water
3 Tablespoons matzo CAKE meal-not matzo meal (or regular flour)*
Juice from ½ fresh lemon

Crust
3 oz. Unsweetened chocolate
2 cups whole walnuts
1.5 cups matzo CAKE meal (or regular flour)
3/4 cup firmly packed light brown sugar
1/2 teaspoon salt
1/2 cup (1 stick) unsalted margarine, chilled, cut into pieces **
2 tablespoons cold water
2 teaspoon vanilla
1 oz. shaved semi-sweet chocolate for garnish

Directions:

Filling
Combine all ingredients in heavy saucepan. Bring slowly to a boil over low heat. Reduce heat & simmer, stirring frequently and mashing any large pieces of apricot, until mixture resembles thick jam – about 25 minutes.

Crust
Preheat oven 350°F

Place chocolate in bowl of processor and chop roughly. Add nut and chop coarsely. Add flour, sugar & salt then blend. (Bits of chocolate and walnut should be clearly visible). Add butter & process to blend. Add water and vanilla then mix, pulsing the on/off button of your food process until mixture is crumbly.

In an 8 or 9 inch Springform pan, pat 2/3 of dough into the bottom and 1 inch up the sides. Add filling. Crumble additional dough over the top to cover. Bake 40 minutes. Let cool.

Decorate top with shaved chocolate if desired.

*Feel free to use regular flour in place of the matzo flour and use this recipe all year long!
**Use butter in place of margarine when not making for Passover.

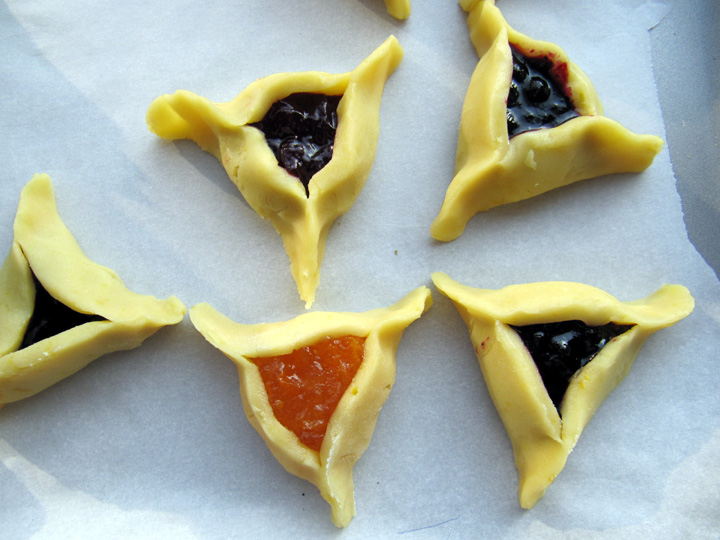
For those of you who don’t know, Hamantashen are Jewish cookies/pastries  recognizable by their three-cornered shape. The shape is achieved by folding in the sides of a circular piece of dough, with a filling placed in the center. They are traditionally eaten during the Jewish holiday of Purim (sorry this recipe is a little late, as Purim was on March 20th). Hamantaschen are made with many different fillings, including prunes, nut, poppy seed, date, apricot, apple, fruit preserves, cherry, chocolate, dulce de leche, halva, or even caramel or cheese.

Poppy seed, prune and jam are the most traditional of the fillings. In fact, I never even knew of those other combos, but Wikipedia informed me of them.

Wikipedia also taught me something else new…the singluar of hamantashen is actually hamantash. I think that’s a fact that few jews know, as you usually hear people say “I just ate a hamantashen.” Well, thanks Wikipedia!

These cookies are named as a reference to Haman, the villain of Purim, as described in the Book of Esther. In Hebrew school I always learned that they were shaped in a triangle because that is the shape of the hat that Haman wore. But in my research for this blog post, I found out that the pastries are actually supposed to resemble the “ears of Haman.” Personally, I think that hat story is better. Who wants to eat an ear?! Well, unless it’s an Elephant Ear ;)

I thought it would be fun to have my great (and oldest!) friend, Erica, bake these up with me. I’ve known her since I was just a wee 4 year old :) So the two of us baked up a storm this weekend and produced lots of Hamantashen, while chatting it up and having some girl time…in my opinion, the best way to bake!

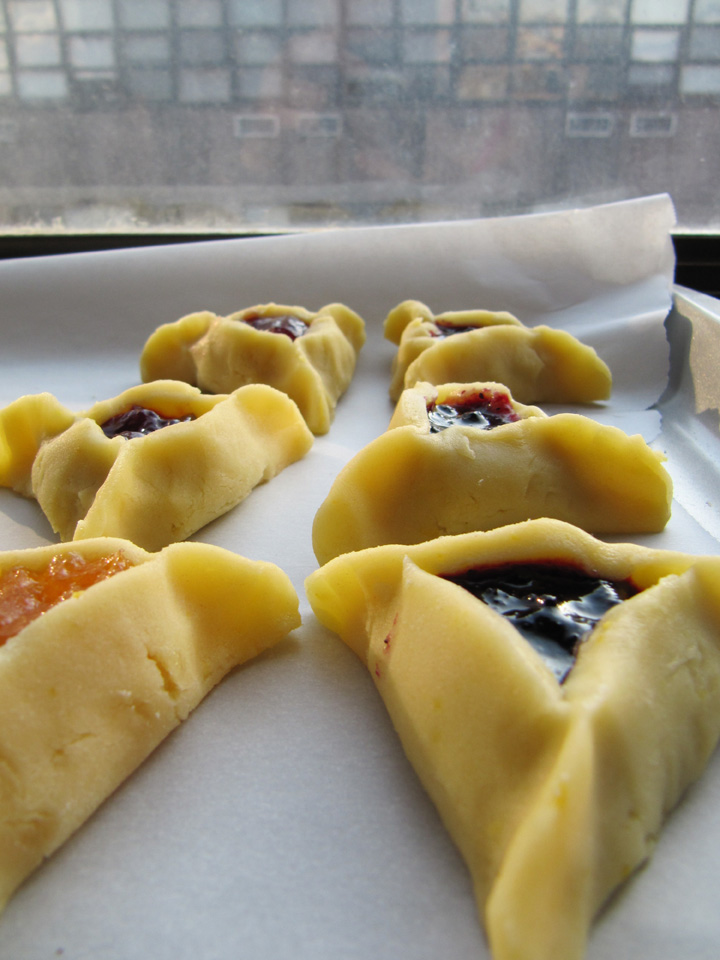
*Please note that all cookies shown are Erica’s. She made hers nice and pretty  and didn’t get greedy with the fillings and overfill them like I did. Hers came out cute and attractive while mine were ugly and messy.

In making this recipe there are some tips I learned:

1. DO NOT OVERFILL the cookies. If you do, they will explode and all the filling will ooze out. I teaspoon should be plenty for attractive cookies. If you don’t care how pretty they are, then fill as much as you want, because they still taste good :)

2. Do not roll the dough too thin or the cookies will not keep shape as well. 1/4″ is the perfect thickness.

3. Make sure the rolled-out and cut dough is cold before you try to form the cookies or they will stick to your hands and not to themselves.

4. Make sure the cookies are cold and firm before putting in the oven. Put them in the freezer for at LEAST 20 min. If you don’t, the cookies will spread way too much in the oven and the filling will ooze out.

5. Cool thoroughly after removing from oven.

Now, without further ado, the recipe :)


Hamantashen

Adapted from the New York Times
Yields about 20 cookies

1 cup confectioners’ sugar
2 large egg yolks
8 ounces unsalted butter at room temperature, in small pieces
Grated zest of 1 lemon
2 1/4 cups all-purpose unbleached flour
Dash of salt
1 large egg, beaten, for the glaze
Various fillings: jam, chocolate chips, nutella, or anything your heart desires

1. Put the confectioners’ sugar and the egg yolks in a food processor and blend. Add butter and lemon zest and process to blend. Gradually add the flour and the salt, pulsing until it forms a ball. Cover with plastic wrap and refrigerate for an hour or overnight. 2. Preheat the oven to 350 degrees. Line 2 pastry sheets with parchment paper. 

3. Roll out the dough to 1/4-inch thickness. If dough is too soft at this stage, refrigerate rolled-out dough for 20 min or until firm.

4. Use a round cookie cutter or glass to cut 2.5-inch circles. Put a heaping teaspoon of the filling in the center of each, and press up the sides to form triangles. Brush the tops with beaten egg. Put trays of cookies in freezer for about 20 min or until very firm.

5. Remove cookies from freezer and bake until golden and dough is delicately firm all the way through, about 20 minutes. If trays are on different racks, switch them after about 10 minutes.

I love baking for no reason. But I really love having an actual event to bake for…particularly because then I know the goods won’t be sitting in my kitchen, calling my name at all hours of the night. I only wish I was kidding about my abilities to communicate with cake.

Birthdays are the perfect reason to bake up something good. So I took this opportunity for Nate’s friend’s birthday to make a Chocolate Fudge Cheesecake I’ve been wanting to try.

The recipe said it made 2 cakes. Even with a celebration like a birthday, I’m not sure why anyone would want to make 2 cakes…or at least 2 of the same cake. Ridiculous. Plus, I didn’t have 2 springform pans. So I halved the recipe and hoped for the best.

It turned out beautifully, and delicious. And the birthday boy seemed to enjoy it, which is the real result you hope for on any birthday baking endeavor :)

cheesecake, pre-glazing


Now if you’ll excuse me, I think I hear something calling my name from the refrigerator.


Chocolate Fudge Cheesecake

Adapted from Southern Living
makes one 9-inch cheesecake

Cake

1/4 cup toasted, chopped pecans
2 (1-ounce) bittersweet chocolate baking squares
1/2 cup butter, softened
1 cup sugar
2 large eggs
1/2 cup all-purpose flour
1/2 teaspoon vanilla extract
1/2 cup semisweet chocolate morsels
2 (8-ounce) packages cream cheese, softened
3/4 cup sugar
3 large eggs
1 teaspoons vanilla

Sprinkle 1/4 cup pecans evenly over the bottom of each of 1 greased and floured 9-inch springform pan.

Microwave chocolate squares in a microwave-safe bowl at MEDIUM (50% power) 1 1/2 minutes, stirring at 30-second intervals until melted. Stir until smooth.

Beat butter and 1 cup sugar at medium speed with an electric mixer until light and fluffy. Add 2 eggs, 1 at a time, beating just until blended after each addition. Add melted chocolate, beating just until blended.

Add flour, beating at low speed just until blended. Stir in 1/2 teaspoon vanilla and chocolate morsels. Divide batter evenly between pans, spreading over chopped pecans.

Beat cream cheese at medium speed with an electric mixer until smooth; add 3/4 cups sugar, beating until blended. Add 3 eggs, 1 at a time, beating just until blended after each addition. Stir in 1/2 teaspoons vanilla. Divide cream cheese mixture evenly between each pan, spreading over brownie batter.

Bake at 325° for 1 hour and 15 minutes or until set. Remove from oven; cool completely on wire rack.

Spread top of cooled cheesecake with 1 recipe Chocolate Glaze (see below); cover and chill 8 hours. Remove sides of pans before serving. Garnish, if desired.

Chocolate Glaze

1 (12-ounce) package semisweet chocolate morsels
1/2 cup whipping cream

Melt 1 (12-ounce) package semisweet chocolate morsels and 1/2 cup whipping cream in a 2-quart microwave-safe bowl at MEDIUM (50% power) 2 1/2 to 3 minutes or until chocolate begins to melt. Whisk until chocolate melts and mixture is smooth.

*Note: The top glaze layer came out extremely thick and rich. I think if I were to make it again, I’d halve the amount.