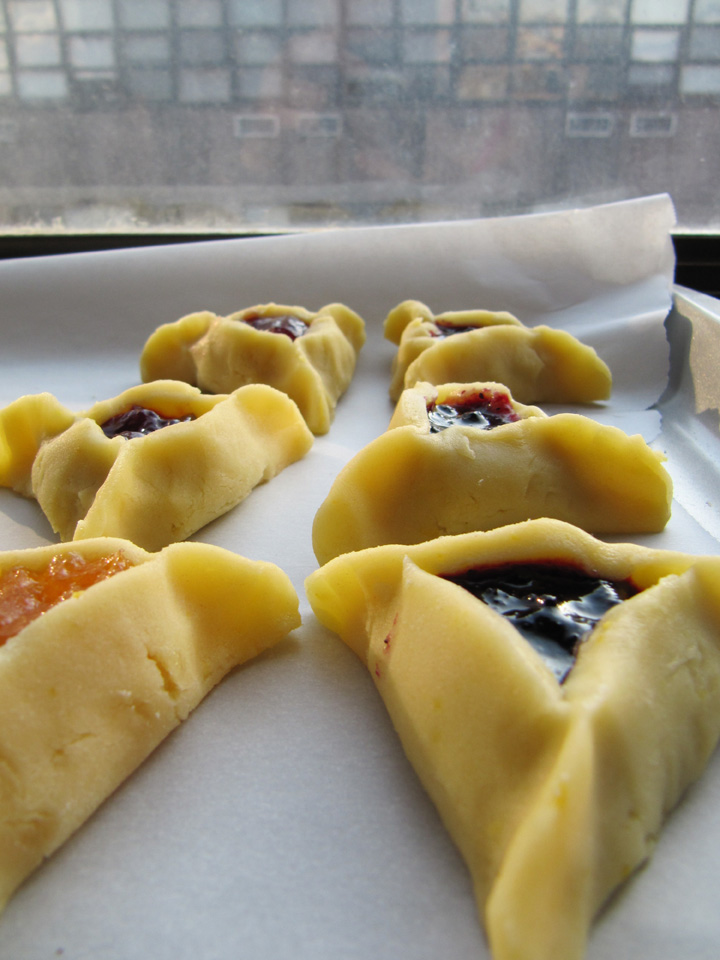
So I know I’m several weeks late for St. Patrick’s Day, but I was already late for Purim, so I was just trying to continue the trend.  Plus, since this recipe is very different from traditional soda bread anyway, it’s really just like a giant cheesy biscuit. The simplest of the simple to accompany any weeknight dinner.
This bread uses one bowl and you don’t even have to dirty your counter or get out your rolling pin!

Traditional soda bread contains sugar and usually raisins, but since I wanted it to go along with a savory dinner I wanted something a little different. I compared a bunch of recipes and kind of combined them all, plus added cheddar because everything’s better with a little cheese.


Cheesy Soda Bread
Recipe by Me

Print this recipe!

serves 4 people (or 1 Nate)

2 cups all-purpose flour
1 tsp salt
3/4 tsp baking soda
3/4 cup milk, or as needed
1 cup shredded cheddar cheese
1 egg

Preheat oven to 375. Line baking sheet with parchment paper.

In a bowl, mix the flour, salt and baking soda until well combined. Add in milk, several tablespoons at a time, until the mixture forms a soft dough (add additional milk if too dry).

The dough will be sticky. Add cheddar cheese and mix until you can handle dough without it sticking too much to your hands. Knead dough in bowl until cheese is fully incorporated.

Roll dough into a ball, flatten slightly. Put on baking sheet and brush with beaten egg. Slice dough in half,  pressing knife at least halfway through the loaf, but not completely severing. Repeat in other direction, forming loaf into 4 equal quarters, still connected on the bottom.

Bake in preheated oven until golden brown, 50 min. or longer if needed.


For those of you who don’t know, Hamantashen are Jewish cookies/pastries  recognizable by their three-cornered shape. The shape is achieved by folding in the sides of a circular piece of dough, with a filling placed in the center. They are traditionally eaten during the Jewish holiday of Purim (sorry this recipe is a little late, as Purim was on March 20th). Hamantaschen are made with many different fillings, including prunes, nut, poppy seed, date, apricot, apple, fruit preserves, cherry, chocolate, dulce de leche, halva, or even caramel or cheese.

Poppy seed, prune and jam are the most traditional of the fillings. In fact, I never even knew of those other combos, but Wikipedia informed me of them.

Wikipedia also taught me something else new…the singluar of hamantashen is actually hamantash. I think that’s a fact that few jews know, as you usually hear people say “I just ate a hamantashen.” Well, thanks Wikipedia!

These cookies are named as a reference to Haman, the villain of Purim, as described in the Book of Esther. In Hebrew school I always learned that they were shaped in a triangle because that is the shape of the hat that Haman wore. But in my research for this blog post, I found out that the pastries are actually supposed to resemble the “ears of Haman.” Personally, I think that hat story is better. Who wants to eat an ear?! Well, unless it’s an Elephant Ear ;)

I thought it would be fun to have my great (and oldest!) friend, Erica, bake these up with me. I’ve known her since I was just a wee 4 year old :) So the two of us baked up a storm this weekend and produced lots of Hamantashen, while chatting it up and having some girl time…in my opinion, the best way to bake!

*Please note that all cookies shown are Erica’s. She made hers nice and pretty  and didn’t get greedy with the fillings and overfill them like I did. Hers came out cute and attractive while mine were ugly and messy.

In making this recipe there are some tips I learned:

1. DO NOT OVERFILL the cookies. If you do, they will explode and all the filling will ooze out. I teaspoon should be plenty for attractive cookies. If you don’t care how pretty they are, then fill as much as you want, because they still taste good :)

2. Do not roll the dough too thin or the cookies will not keep shape as well. 1/4″ is the perfect thickness.

3. Make sure the rolled-out and cut dough is cold before you try to form the cookies or they will stick to your hands and not to themselves.

4. Make sure the cookies are cold and firm before putting in the oven. Put them in the freezer for at LEAST 20 min. If you don’t, the cookies will spread way too much in the oven and the filling will ooze out.

5. Cool thoroughly after removing from oven.

Now, without further ado, the recipe :)


Hamantashen

Adapted from the New York Times
Yields about 20 cookies

1 cup confectioners’ sugar
2 large egg yolks
8 ounces unsalted butter at room temperature, in small pieces
Grated zest of 1 lemon
2 1/4 cups all-purpose unbleached flour
Dash of salt
1 large egg, beaten, for the glaze
Various fillings: jam, chocolate chips, nutella, or anything your heart desires

1. Put the confectioners’ sugar and the egg yolks in a food processor and blend. Add butter and lemon zest and process to blend. Gradually add the flour and the salt, pulsing until it forms a ball. Cover with plastic wrap and refrigerate for an hour or overnight. 2. Preheat the oven to 350 degrees. Line 2 pastry sheets with parchment paper. 

3. Roll out the dough to 1/4-inch thickness. If dough is too soft at this stage, refrigerate rolled-out dough for 20 min or until firm.

4. Use a round cookie cutter or glass to cut 2.5-inch circles. Put a heaping teaspoon of the filling in the center of each, and press up the sides to form triangles. Brush the tops with beaten egg. Put trays of cookies in freezer for about 20 min or until very firm.

5. Remove cookies from freezer and bake until golden and dough is delicately firm all the way through, about 20 minutes. If trays are on different racks, switch them after about 10 minutes.


Sometime a couple weeks ago, I stumbled upon this website called Taste&Create. It’s a really cool site that pairs you with another food blogger and then you have to make any recipe you choose off of their site. I thought this would be a great way to start meeting some other bloggers :)

I got assigned a partner last week and her name is Michelle, from the blog On and Off My Plate. After reading through lots of her recipes, I came across one for a lovely looking turkey muffin and thought it would make a perfect simple dinner for my non-beef/pork/shrimp eating boyfriend. Let me tell you, trying to have variety in dinners that are composed exclusively of turkey/chicken/fish is pretty hard. I realize I have the option of cooking vegetarian too, and often do, but it’s nice to have some animal protein in the meal. This recipe on Michelle’s blog seemed perfect.

The recipe was simple enough. Michelle had adapted the recipe from the one she based it off of, and I liked a lot of her substitutions. So I made my own recipe combining hers with the original. It was delicious :)

On a side note, I didn’t win that contest on Food52 for my tart :( I really thought my recipe was creative and different…but the two finalists were both sweet tarts, and mine was savory, so maybe that had something to do with it. Also, the judges commented on how easy the finalists’ tarts were to make…though it didn’t say anywhere in the rules that they preferred tarts with few ingredients. If I’d known that the judges were looking for that, I wouldn’t have made something so complex! I could have easily come up with something else. Anyway, sorry to vent but I was totally disappointed :( This was my first contest really, though, so I’m gonna keep trying!


Mini Curried Turkey Loaves

Adapted from On and Off My Plate
makes 9 mini loaves (serves 4-5)

1 egg, beaten
1/3 cup milk/milk substitute
1/2 cup quick oats
1 garlic clove, minced
1-2 tsp curry powder
1 tsp ground cumin
1 tsp salt
1/2 tsp pepper
1 cup raw spinach, roughly chopped
1 medium onion, chopped
1.3 lbs lean ground turkey (or whatever size it comes in)

Preheat oven to 350. Grease 2 muffin pans or a loaf pan.

In a large bowl, combine egg, milk, oats, garlic, curry powder, cumin, salt, pepper, spinach and onion. Mix well. Add Turkey and mix til thoroughly combined.

Divide meat mixture among 9 muffin cups. Fill remaining cups with water so they don’t burn while cooking.

Bake for 30 min if making muffins (40-50 for a loaf). Serve with Tsatziki sauce (recipe below).


Tzatziki Sauce
Recipe by Me

7 oz. 2% Fage (or other) Greek yogurt
2 Tbsp fresh lemon juice
1-2 Tbsp fresh mint, chopped
1/2 cup cucumber, peeled, seeded and chopped
1/2 tsp salt

Mix all ingredients in bowl til combined. Serve with Mini Curry Loaves, above.


**You can now subscribe to get my new posts sent to you by email! Simply scroll down til you see the box on the right titled “Email Subscription” and sign up :)**

For those who don’t know me, my background is as a civil engineer. While this gives me some very useful real world skills, the ability to stray from black-and-white thinking isn’t one of them. As all who know me will attest, I like to be given explicit directions and I follow them to a T. There’s no gray area for this girl.

As you might imagine, this means that I prefer to have a recipe to follow rather than making things up, and I tend to favor baking over cooking because there isn’t much room for ad-libbing.

However, I’m happy to report that since beginning this blog and reading about recipe contests that require creativity, I’ve been much more open to switching things up. I’m starting to create my own flavor combos and recipes!

I’ve found that the easiest way to begin the process of creating a “new” recipe is to rework an existing one by swapping one or more ingredients for other similar ones, or others that go equally well with the rest of the ingredients called for.

Last week my coworker sent me a recipe for a potato-wrapped fish. It involved slicing super thin slices of potato and actually wrapping the fish with it, then frying it, creating a beautiful little package.

I’m really not too fond of changes in general. I mean, I know my mom always told me that changes are usually for the best, but let me just tell you that in this particular cooking experiment, this was not the case.

My first change was to use sweet potato instead of potato…just make it a little more gourmet and colorful. These thin slices of potato were meant to be sliced with a mandoline because a knife wouldn’t get thin enough slices to have them flexible enough to wrap around the fish fillet.

I don’t own a mandoline so I attempted to do it with a cheese slicer. FAIL. Not only did it take me forever, but as careful as I was, I still managed to slice open my finger. I bandaged myself up and managed to salvage enough slices to cover four fillets. Lesson learned: DO NOT MAKE THIS WITHOUT A MANDOLINE!

I had some leftover rosemary from my tart the other day, so I made a sort of rosemary, parsley, olive pesto/tapenade to spread between the potato and the fish. It was a yummy choice. My mom warned me that sweet potato might not crisp up as well as a regular potato. In this instance, Mom, I know you may not believe your eyes as you read this but you were right. It got kind of brown but when I went to flip it, it just stuck to the pan and shredded. I could have left it to brown more, but it was already sticking a lot so I was afraid to. I mean it wasn’t horrible but certainly wasn’t as presentable as I would have liked. I served it along with a simple beet salad.

Nate enjoyed the fish, but he pretty much likes anything I make.  I, however, think I would benefited from some sort of balsamic reduction to serve over it because the pesto/sweet potato/fish combo was slightly rich and I would have liked something acidic to cut it (or maybe add more olives to to pesto?). I squeezed lemon on top but it wasn’t enough.

When I had it for leftovers the next day, I decided it was better than I had thought. That being said, by all means give it a try and make your own changes to my recipe…they might just be for the best :)


Sweet Potato-Wrapped Cod with Rosemary Tapenade
Recipe by Me
Serves 4

1 Tbsp rosemary
1/4 cup parsley
2 Tbsp fresh lemon juice (from about 1/2 lemon)
1/4 cup pine nuts
1/3 cup pitted kalamata olives
1-2 cloves garlic

4- 5 oz. cod fillets
1 large sweet potato, the longer the better

Put rosemary, parsley and lemon juice in food processor and blend til finely chopped. Add rest of tapenade ingredients and blend til it becomes a paste.

Peel the sweet potato. Using a mandoline, cut sweet potato into thin slices lengthwise. You will need at least 8 slices per fish fillet.

Pat fish dry; sprinkle with salt and pepper. Place a large piece of saran wrap on work surface. Set 4 to 5 slices of sweet potato on saran in row, overlapping long sides. Make another row that overlaps short ends of first row, forming 6×5-inch rectangle (see photos above). Sprinkle rectangle with salt and pepper. Set 1 fillet across overlapped short ends of slices. Spread 1-2 Tbsp of the tapenade evenly over the top of the fillet.

Fold short end of rectangle over fish one side of fish. While holding potatoes to fish with one hand, use saran to help to pull other side of potatoes up and over the fillet and wrap the fish fairly tightly in saran (see photos above). Repeat with other 3 fillets. Put fish “packets” in fridge and chill 1 hr.

Heat 3 tablespoons oil in each of 2 large skillets over medium-high heat. Remove saran and set the wrapped fish fillets, seam side down, in each skillet. Cook until golden on bottom, about 3 minutes. Turn; cook until fish is opaque in center, 2 to 3 minutes longer.


Simple Beet Salad
Adapted from Martha Stewart
makes 3-4 side dish portions

3 Tbsp olive oil
1 Tbsp white wine vinegar
1 tsp dijon mustard
salt and pepper to taste
2 tablespoons finely chopped fresh parsley
3 medium beets, roasted and peeled
1/3 cup crumbled blue cheese
1/4 cup toasted pecan pieces

Combine oil thru pepper and whisk to blend.
Toss beets with dressing and parsley.
Before serving, sprinkle beets with blue cheese and pecans.


Whew, that title was a long one! I never really know what to put for my blog post titles. Sometimes I want to be creative, but I feel like I need to be descriptive and tell you exactly what recipe the post contains. I guess I’ll just see how it goes. But for this one, I knew the name of the recipe itself was enough to draw you in ;) Sounds tasty, right?

Lately I’ve been trying to enter as many recipes contests as I can in an effort to get my blog out there. The other day I saw this contest on Food52, a website that hosts weekly themed contests, and this one’s winner would get to be on the Martha Stewart Show! I know she gets a bad rap sometimes, but ever since I was little, I’ve been kind of obsessed with her. I want to be her (well, not including the jail time, and maybe with a little bit more of a sense of humor). Martha, if you’re reading this, I’m just kidding- I love you!

I believe this recipe came to me by divine inspiration. No, I wasn’t sitting in bed reading cookbooks when it happened. I had just stumbled across the contest mentioned above and it got me brainstorming. I was on another long walk home and so I started to think. I knew I wanted to use the flavors of the bruschetta I made a month ago but somehow incorporate it into a tart. I was trying to figure out what type of crust to use when it came to me: Rosemary Cornmeal. I was also thinking I wanted some sort of jam to make it more tart-like so I decided to turn the figs I had used in the bruschetta into a jam.

I had all the flavor components in mind but wanted to alternate salty and sweet layers. I thought I’d make the crust have some sweetness to it, and I had the fig jam, prosciutto and pears, but I needed something else salty. I decided to spread a thin layer of blue cheese between the crust and jam. I also added a touch of balsamic vinegar to the fig jam to make it sweet, but tangy too.

Now, I don’t like to toot my own horn, but I’m going to make a bold statement and say, this could be the best food I’ve EVER eaten. Like so good I’d eat it instead of dessert!

Yep, you heard me right. This tart is better than dessert. You may be asking yourselves, “Has Amy gone off the deep end?” Well, I thought you would have noticed that happened long ago, but I promise this recipe is that good.

The rosemary in the crust is aromatic and shines through, the crust itself and sweet and crumbly, the tanginess of the jam pairs perfectly with the saltiness of the cheese and ham and the juicy sweetness of the pears, and the honey on top makes it truly decadent. Try it and see for yourself.

P.S. See my entry in the Food52 contest HERE.

Fresh Pear, Fig, and Prosciutto Tart with Rosemary Cornmeal Crust

Recipe by Me
8-10 appetizer portions

Crust:

1 1/2 cups all-purpose flour
1/2 cup yellow cornmeal (not stone-ground)
2 Tbsp sugar
1/4 tsp salt
1 stick (1/2 cup) cold unsalted butter, cut into pieces
1 1/2 Tbsp fresh rosemary
4 to 5 Tbsp ice water

Filling:

1 3/4 oz blue cheese crumbles (about 1/3 cup + 1 Tbsp)
1 recipe Fig Spread (see previous post)
4 oz. Prosciutto, roughly chopped
1 juicy fresh pear, cut in half, cored and then very thinly sliced
1-2 Tbsp honey

Put rosemary in food processor and process til chopped. Add flour, cornmeal, sugar, and salt to food processor and pulse. Add butter and pulse until mixture resembles course meal with some small (roughly pea-size) butter lumps. Drizzle evently with 4 Tbsp ice water and pulse until just incorporated. Gently squeeze a small handful. If it doesn’t hold together, add more water, 1/2 Tbsp at a time, pulsing after each addition and continuing to test.

Press dough evenly onto bottom and up sides of 9 1/2 inch tart pan. Chill crust until firm, about 30 min.

Preheat oven to 400. Bake crust in middle of oven until center and edges are golden, 25-30 minutes. Remove from oven and sprinkle with blue cheese. Leave cheese to soften on warm crust for 1-2 min. After softened, spread cheese around crust (small offset spatula works best). Cool crust in pan on rack or in fridge until reaches room temperature.

When crust is cooled, spread Fig Spread evenly over crust. Sprinkle chopped Proscuitto evenly over tart. Arrange pear slices in 2 concentric circles over tart. Drizzle with honey and garnish with rosemary sprig if desired. Serve immediately.

Note: Tart will not be good served after refrigeration as pears will turn brown and crust will be too hard.