Raise your hand if you have subscriptions to Bon Appetit, Food & Wine,  Cooking Light or some other cooking/food magazine.

Raise your hand if you tear out recipes and then hoard them, never actually making them.

Yeah, I’m guilty. I always think the recipes sound so good and then I put the clippings somewhere never to be found again. Or sometimes I get the urge to file them somewhere, where they then sit without being touched.

This mostly happened when I was single because I really don’t enjoy cooking for just myself. Since I’ve started dating Nate, however, I find myself cooking for us most days of the week. This has gotten me on the search for new recipes to try out. That’s when I realized…I could finally put my recipe stash to good use!

I pulled all the recipes out the other day and went searching through them. I’ve put aside a few, but one in particular caught my eye.I had mostly been avoiding it in the past because it looked complicated, but when I took a deeper look it wasn’t really too bad- Eggplant, Tomato, & Smoked Mozarella Tart.

I made a few shortcuts revisions so the recipe wouldn’t take all day. One of these included microwaving the eggplant. This was also because I hate how it soaks up so much oil when you roast it. I basically steamed it instead and then baked it quickly to dry it out so as not to get my dough all soggy.

I was also wary of the “dough” since it contained no yeast. I didn’t want this to be a tart and was hoping for something more like pizza. I happened to have some Sweet Rice Flour leftover, so I combined it with regular flour create a more elastic dough (which can usually only be achieved with yeast) rather than a flaky tart shell.

It definitely wasn’t like a pizza dough, since it didn’t rise, but it was a good substitution if you’re short on time and want the same flavor. I also subbed whole wheat flour for the wheat germ since I really didn’t feel like going out and buying a jar just for this recipe, left the fresh mint out, and replaced dried oregano for the fresh.

Nate and I both agreed that it tasted very fresh and the flavors were yummy. I was in such a rush to get it all cooked that I forgot to parbake the crust. I left it in for an extra 10 min, but I assume that had I made it the way I was supposed to, the crust wouldn’t have been as soggy as it came out for me. Oh well, it was still a quick and delicious addition to dinner! *Note that the recipe below is as the recipe was intended, not with my changes.


Eggplant, Tomato & Smoked Mozzarella Tart

Taken from Cooking Light

Print this recipe!

Serves 4 (2 wedges each)

Crust:
1 cup all-purpose flour
1 tablespoon toasted wheat germ
1 teaspoon baking powder
1/2 teaspoon freshly ground black pepper
1/4 teaspoon salt
1/4 cup water
1 tablespoon olive oil
Cooking spray

Filling:
1 (1-pound) eggplant, cut crosswise into 1/4-inch-thick slices
3/4 teaspoon salt, divided
1/2 teaspoon olive oil
4 garlic cloves, thinly sliced
1 tablespoon chopped fresh basil
1 1/2 teaspoons chopped fresh oregano
1 1/2 teaspoons chopped fresh mint
2 plum tomatoes, thinly sliced (about 6 ounces)
1/2 cup (2 ounces) shredded smoked mozzarella cheese, divided
2 tablespoons grated fresh Parmesan cheese

Preheat oven to 400°.

To prepare crust, lightly spoon flour into a dry measuring cup; level with a knife. Combine flour and next 4 ingredients (flour through 1/4 teaspoon salt) in a large bowl, stirring with a whisk; make a well in center of mixture. Add water and 1 tablespoon oil, stirring to form a soft dough. Turn dough out onto a lightly floured surface; knead lightly 4 times. Gently press dough into a 4-inch circle on plastic wrap; cover and chill 15 minutes.

Slightly overlap 2 sheets of plastic wrap on a slightly damp surface. Unwrap dough, and place chilled dough on plastic wrap. Cover with 2 additional sheets of overlapping plastic wrap. Roll dough, still covered, into an 11-inch circle. Remove top sheets of plastic wrap. Fit dough, plastic-wrap side up, into a 10-inch round removable-bottom tart pan coated with cooking spray. Remove remaining plastic wrap. Press dough against bottom and sides of pan. Pierce bottom and sides of dough with a fork; bake at 400° for 10 minutes. Cool completely on a wire rack.

To prepare filling, arrange eggplant on several layers of heavy-duty paper towels. Sprinkle eggplant with 1/2 teaspoon salt; let stand 15 minutes. Pat dry with paper towels; brush eggplant with 1/2 teaspoon oil. Arrange eggplant in a single layer on a baking sheet coated with cooking spray. Bake at 400° for 20 minutes. Stack eggplant slices on a plate; cover with plastic wrap. Let eggplant stand 7 minutes to steam.

Heat a large nonstick skillet coated with cooking spray over medium heat. Add garlic; cook 1 minute, stirring constantly. Remove from heat; stir in 1/4 teaspoon salt, basil, oregano, mint, and tomatoes.

Sprinkle 2 tablespoons smoked mozzarella on bottom of baked crust. Layer eggplant and tomato mixture in crust; sprinkle with 6 tablespoons smoked mozzarella and Parmesan. Bake at 400° for 10 minutes or until cheese melts. Cut into 8 wedges.

The weather in nyc has been so nice lately (aside from all the rain). It finally feels like spring is here to stay :)

On nice weekends, Nate and I like to get out and walk as much as possible. Most people in nyc take the subway if their destination is more than 20 blocks away, but we look at that as a great opportunity to sneak in some extra exercise while getting to where we want to go (and saving $ to boot!).

We’re always looking for fun stuff to do on the weekends and this week I came across an ad for the James Beard Foundation’s Bi-Annual Cookbook Sale. Nate and I laced up our sneakers and headed downtown.

The sale said it was supposed to start at 10am. By the time we got there at 10 on the dot, there was a line of about 5 people. Apparently, the sale takes place in James Beard’s one-time residence- a historic townhouse in the west village. The books are scattered on tables in one little room and it can only hold so many people, so they limit how many people can be in there at once.

Check out that line!

While waiting in line, Nate and I had a discussion to determine whether bi-annual means twice a year, or every two years. I finally pulled out my phone and looked it up, and apparently it means both definitions…how stupid is that?! The two guys in line in front of us must have heard our somewhat ridiculous conversation and informed us that this sale only occurs every 2 years…good thing we didn’t miss it!

I’m not sure where the cookbooks come from, but it’s a sale of used cookbooks that range between $1 and $20. Because I like to think I’m rather frugal, I jumped at the opportunity. I always have the urge to buy cookbooks but never want to spend the money when I know I’ll probably forget I even have them. This was the perfect solution.

After about a 20 min wait, we finally got in. There were hundreds of cookbooks! It was kind of hard to really take your time and look through them since there were so many people and the books were scattered on tables in no particular order. I made my way to the back where the $1 books were. We browsed for about 15 min and finally selected 5 cookbooks. I had no idea if they’d be any good, but at that price I couldn’t resist. I got all 5 books for $14!

When we left the building, the line was all the way down the block. I couldn’t believe so many people knew about this thing and came to it. We walked all the way home (6 miles roundtrip) with a stop off at this awesome spice shop, Kalustyan’s, to pick up some Indian spices for what I was going to make for dinner.  When I finally got home and assessed my goods I was quite pleased with my thrifty purchases :)

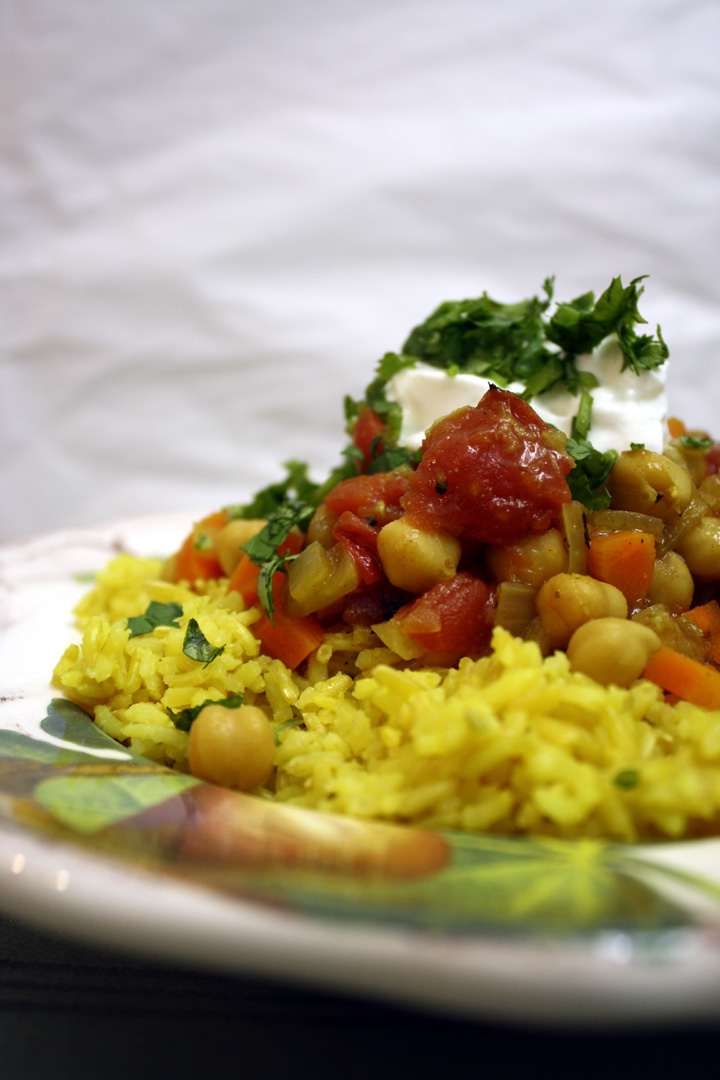
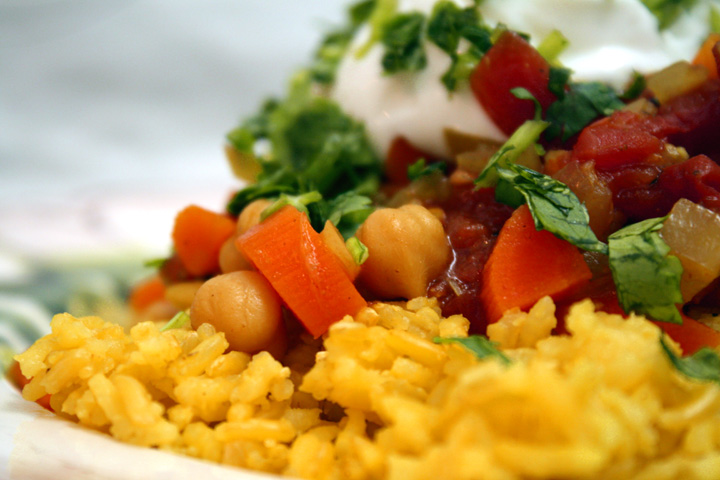
When I arrived home I got to work on dinner: Curried Chickpea Stew with Spiced Rice. I had been wanting to make Indian food for so long (although this recipe was adapted from Cooking Light so I’m not sure how authentic it is) but kept putting off going to the spice store since it’s not exactly around the corner. I didn’t want to get the spices at the regular supermarket, thought, because if they even had the ones i wanted, they were sure to be ridiculously priced.

At the spice store I had picked up a big bag of cardamom pods, and some tumeric, neither of which I’ve ever used before. As soon as I opened the cardamom pods, the fragrant, almost floral aroma wafted out. They smelled SO good. I’m definitely going to put the rest to use in some dessert since this recipe only used 3 of them.

*Please do not be turned off by the extensive ingredient list for the chickpeas. They turned out so delicious and now I have all the spices on hand for next time.

I’m also throwing a bonus recipe into this post since the few dark, crappy pics don’t warrant a post of their own. I made a simple and delicious Israeli Couscous with Peas and Mint the other day…just in time for the wonderful spring weather. Nate later informed me that he doesn’t actually like peas (oops!) but he ate it anyway, indicating how delicious this dish really is.

Ugly picture. Yummy food.


Curried Chickpea Stew with Spiced Brown Rice

Adapted from Cooking Light

Print this recipe!

serves 4

Rice:
1 cup uncooked brown rice
1/2 tsp ground tumeric
3 cardamom pods, crushed
1 cinnamon stick
1 2/3 cups water
1 bay leaf

Stew:
1 Tbsp vegetable oil
2 cups chopped onion
1 Tbsp grated peeled fresh ginger
2 tsp garam masala (or 1 tsp cumin, 1 tsp coriander, 1 cinnamon stick)
3/4 tsp ground tumeric
1/4 tsp ground red pepper
4 garlic cloves, minced
3 cardamom pods, crushed
2.5 cups water
1 cup diced carrot
1/4 tsp salt
1- 15 oz can chickpeas, rinsed and drained
1- 14.5 oz can fire-roasted crushed/diced tomatoes, undrained
1 Tbsp cornstarch, if needed
1/2 cup Fage 2% Greek yogurt
1/2 cup chopped fresh cilantro

Rice:
Put all ingredients in Rice cooker and stir. Cook til done. Or you could could it in the normal rice way in a pot.

Stew:
Heat a large dutch oven over medium-high heat. Add 1 Tbsp oil and swirl to coat. Add 2 cups onion; saute for 6 min or until golden. Add ginger through the cardamom; cook for 1 minute, stirring constantly.

Add 2.5 cups water, carrot, 1/4 tsp salt, chickpeas, and tomatoes; bring to a boil. Cover, reduce heat, and simmer 20 min or until carrots are tender and sauce is slightly thick. If stew still isn’t thick, take out some broth, whisk the cornstarch into broth until dissolves, then mix back into pot. Continue cooking and stirring for 1-2 min or until thicker.

Discard cardamom.

Place rice mixture into each of 4 bwols; spoon chickpeas over rice. Top with yogurt and cilantro.

*To cut carbs, I served my portion over spaghetti squash. I baked it for an hour at 375. After letting it cool, i cut it in half and scraped the strands out with a fork. Then I mixed in some salt, pepper and garlic powder.


Israeli Couscous with Mint and Peas

Adapted from Martha Stewart

Print this recipe!

serves 4

1 cup Israeli couscous (or orzo)
2 Tbsp unsalted butter
1 shallot, minced (about 2 Tbsp)
Zest and juice of 1 lemon
1 lb fresh peas, shelled, or 2 cups frozen peas
salt and pepper
2 Tbsp chopped mint

Cook couscous according to package directions. Melt butter in a medium saucepan over medium heat. Add shallot and lemon zest, and saute until translucent.

Add peas and lemon juice, and cook until bright green and tender, adding a little water if shallots brown before peas are tender.

Add cooked couscous, season with salt and pepper, and toss to combine. Remove from heat and stir in mint.

This past weekend I helped Nate out. Technically, I guess I was employed by him (he didn’t pay me for my services, but I’m just nice like that). You see, Nate went to NYU film school and has aspirations of being a writer/producer in film or tv. His jobs haven’t really given him the opportunity to do any writing, so to keep his creative juices flowing and build up a “reel” (as they call it in the entertainment world) he has been writing some short films just for fun. This weekend he has actually gathered some friends in the same industry into a crew to shoot this short- it included a camera guy, assistant camera guy, sound guy, Nate and me.

Nate was both the director and the actor…such a talented boyfriend I have! I told Nate he should do acting more often because he’s so funny…he makes the best faces and is so good at keep a straight face and not cracking up when he says something funny. I’m hopeless at that. He just has to give me one look and I burst into laughter.

I’m so excited because I got to be the person who slams the thing together (which Nate has told me is called a slate) and yells “take 3!”

But in addition, I was given the more important task of catering lunch for his crew. Since I was working on the set both of those days and had to make it ahead of time, it couldn’t be anything too fancy, but at the same time I didn’t want it to be ordinary.

I pulled out a few of my fave recipes for portability and came up with a menu for the two days of lunch I needed to provide. Day 1’s menu included our family favorite recipe for Chilled Chinese Noodles, a yummy Hoisin Chicken, and some fresh fruit salad with mint and lime. For dessert I made the secret recipe that I can’t give out yet because I’m entering it in the Pillsbury Bakeoff next week. This was my fifth batch and after much tweaking I think I finally have a winner…well let’s hope! Day 2 will recycle the chicken into one of my all-time favorites- Curried Chicken Salad, which i usually make low fat, along with hoagie rolls, leftover fruit and dessert. No crazy complex recipes, but definitely enough to satisfy some hungry men.

After watching these guys shoot for two days, I have a much greater appreciation for all that goes into film making. I could never be in that business though, because honestly, I lack the patience. Having to shoot the same scene 4 times is tedious. But I’m totally pysched to see the finished product :)

Below is the recipe for the Chilled Chinese Noodles that is, in my opinion, the best of the bunch. They’re all delicious though, or I wouldn’t put them on the blog. The rest of the recipes will be posted over the next week, so…

“Cut!”


Chilled Chinese Noodles

I have no idea where this recipe came from, but my mom’s been making it forever!

Print this recipe!

serves 8-10 hungry people, as a side dish

1 lb. angel hair pasta, cooked and drained
1/3-1/2 cup peanut oil
4 cloves garlic, minced
6 scallions, whites & green separated, chopped fine
1/2 cup soy sauce
4 Tbsp cider vinegar
2 Tbsp sesame oil
1/2 tsp pepper
4 cups mung bean sprouts (you can leave them out if you can’t find them, or add something similar)

Drizzle noodles with 2 Tbsp peanut oil, toss well.

In skillet, heat 6 Tbsp. peanut oil. Add garlic & whites of scallions. Stir on high 1 min. Remove from heat.

Stir in soy sauce, vinegar, sesame oil, pepper. Pour over noodles. Stir in sprouts and greens of s callions.

Cover and refrigerate at least 2 hrs.


Call me crazy, but I love cold weather. The first brisk day in autumn when I get to wear a sweater makes me the happiest girl. Sure, when the temps dip into the teens come winter, I try to avoid being outside for extended periods of time, but something about the frigid air is so refreshing.

But by mid-january, I’m kinda over all the layering. I’m over having to remember to take my scarf, hat, and gloves out the door every day (and freezing my face off on the days when I forget).  So when the weather hit the 50s the other day, I got a little giddy. I guess maybe I like spring more than I’d let on.

With the milder temperature days slowing creeping in, and the holidays approaching, I’ve been trying to come up with a recipe that just screams spring. I knew that in order to encompass this season completely, it had to be bright, fresh, warm, refreshing, light and airy. I wanted something that could be served at any spring holiday meal.

I was going to make something with squash but my mom told me that’s too wintry and suggested carrots. I knew right when she said it that I’d have to make some sort of carrot pudding/souffle.

The orange color is so bright it reminds me of all the beautiful flowers that start popping up at this time of year. I added a touch of orange zest and juice to give it a citrusy and fresh aroma.  The orange/carrot combo is a delicious one.

I wasn’t sure how it would turn out when it was in the oven, but as soon as I took it out I knew it was exactly what I wanted. Fluffy and delicious, it was everything I’d hoped.

I made this recipe with matzo meal instead of flour, and margarine instead of butter to be sure that it could translate well for Passover (not all recipes do), but obviously using flour and butter would work equally well, if not better and could be served for Easter brunch/dinner.


Carrot Orange Pudding Souffle

Recipe by Me

Print this recipe!

serves 6-8

1 3/4 lbs carrots, peeled and chopped
1 Tbsp fresh orange juice
1/2 cup margarine/butter, softened
1/2 cup sugar
zest of 1 orange (about 1 Tbsp)
3 eggs, beaten
1 1/2 tsp baking powder
1/4 tsp salt
2 Tbsp matzo meal/flour
Powdered sugar for garnish

Preheat oven to 350.

Bring a large pot of water to a boil. Add carrots and cook til tender, about 30 min. Drain and transfer to a medium bowl. Mash with a potato masher or fork. Add orange juice and mix. Cool to room temp.

Using an electric mixer, beat margarine/butter til creamy. Beat in sugar and zest til blended. Add eggs and beat til blended and slightly more voluminous. Mixture may look curdled but that’s ok.

Add carrots to egg mixture and blend.

In a small bowl, combine salt, baking powder and matzo meal/flour. Stir completely to blend. Pour into a 2 quart baking dish.

Bake 1 hr 15 min or until top is golden brown. Best served at room temperature or cold. Dust with powdered sugar before serving if desired.

*Note, I double checked and baking powder IS kosher for Passover :)


Note: I’m still working on another Passover recipe or two, so check back next  week!

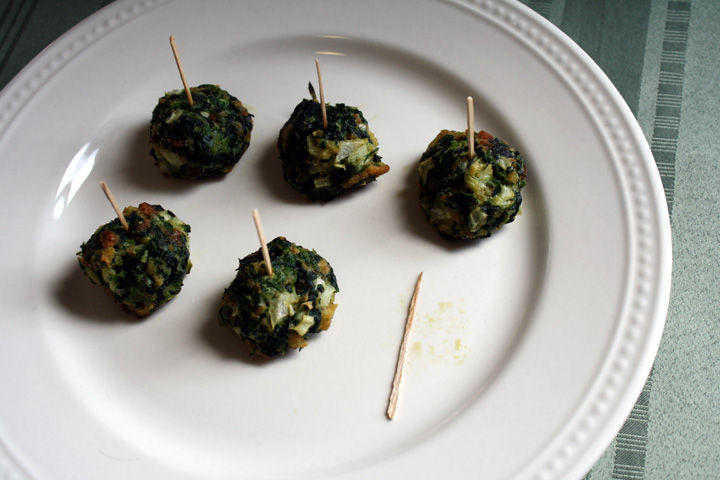
When I was growing up, my mom used to have company over fairly often. Whether it was a casual dinner party, a holiday meal, or small catering job, there were certain foods that were her entertaining staples. One of her favorites was a pass-around spinach ball hors d’oevure, both because of its simplicity and its popularity.

My brother and I were usually given the task of rolling the mixture into balls before putting them in the oven, and then later arranging the cooked ones on a platter and sticking a decorative toothpick in each one for serving. I don’t think that there was ever a time during this process that my brother and I didn’t eat at least 2 spinach balls ourselves for every dozen we nicely arranged on the tray.

Whenever I smell them baking in the oven, I am instantly transported back to those special occasions. Start making these now and I bet they’ll soon be making memories for you as well.


Spinach Balls

Print this recipe!

Makes 32 pieces

6 eggs, beaten
2- 10 oz. pkg frozen cooked chopped spinach, thawed & well drained
2 medium onions, minced
1/2 cup fresh parmesan cheese, grated
1 1/2 sticks butter, melted
1/2 tsp or more salt, to taste
1/2 tsp dried thyme
1/4 tsp pepper
2 cups herb stuffing mix

Combine all but stuffing, mix well. Add stuffing, mix, and set aside for 1/2 hour.

Form heaping teaspoonfuls into balls. Bake at 350 for 20 min on a greased baking pan. Serve hot.

*Can be frozen raw
**I didn’t feel like rolling them ALL into balls, so I put about half in a small casserole dish and just cooked it for a little longer and it came out just as good, although a little greasier since the oil couldn’t run off anywhere. But if you get lazy, this is another option.