Pasta Salad with Feta, Broccoli, Capers, and Chickpeas ~ ElephantEats.com

Before I share my recipe with you today, I have a couple cute things to show you.

First, since I know you all wanted to see- Here’s a picture of our house!

House

Totally adorable, right? It definitely needs a new coat of paint, among other things. And I can’t wait to get my hands on the front yard for some pretty landscaping. I’ve never gotten to do that before so I’m so excited! Now I just have to figure out what we should do.

I’ll share more pics once we actually close on the house in a few months.

Being Elephant Eats, the second cute thing I want to show you is this video Nate sent me of a baby elephant’s first time in the ocean. All I can say is O.M.G. If our apartment weren’t so tiny, I’d be getting one of these as a pet:

And as for this meal, it’s a rare one that Nate actually helped pick out. You see, we have this routine every day where, before I leave work, I ask him what he’s in the mood for, and every day he says “I don’t know.”

I don’t know if most food bloggers are good about coming up with stuff, but I’m not. I absolutely hate trying to decide what to make for dinner. I have a million recipes pinned to my Pinterest boards, but when it’s actually time to choose something, nothing looks good.

Pasta Salad with Broccoli, Feta, Capers,and Chickpeas 2 ~ ElephantEats.com

But on this particular day, without my even asking what he wanted for dinner, Nate actually told me he was in the mood for a cold pasta salad (it was really hot out!). I wasn’t one to deny the man his craving, when he was actually giving me dinner ideas, so I looked up some pasta salad recipes using feta since I already had it in my fridge.

Pasta Salad with Broccoli, Feta, Capers,and Chickpeas 2 ~ ElephantEats.com

I came across this one that has all our favorite things in it and it sounded delicious. I doubled it, swapped blanched broccoli for the zucchini, and adjusted the quantities of the ingredients slightly and it was SO good. It helped that I was completely famished at dinner time.

Nate said he really liked it too, so this one’s a winner! Plus it was fairly quick to make. It will definitely be going into our usual rotation.

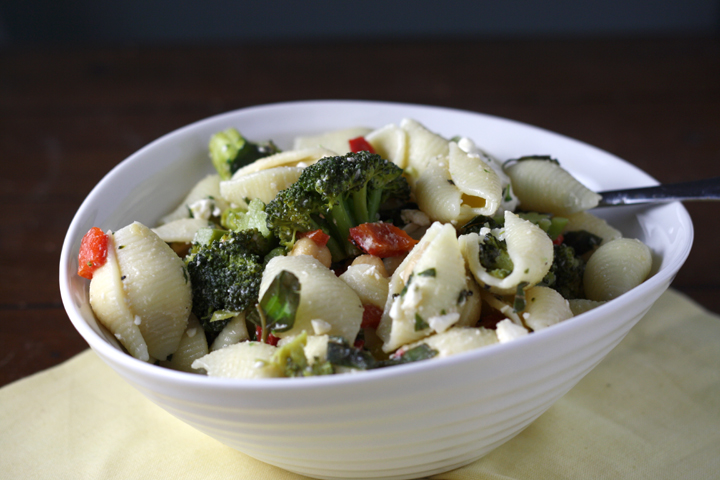
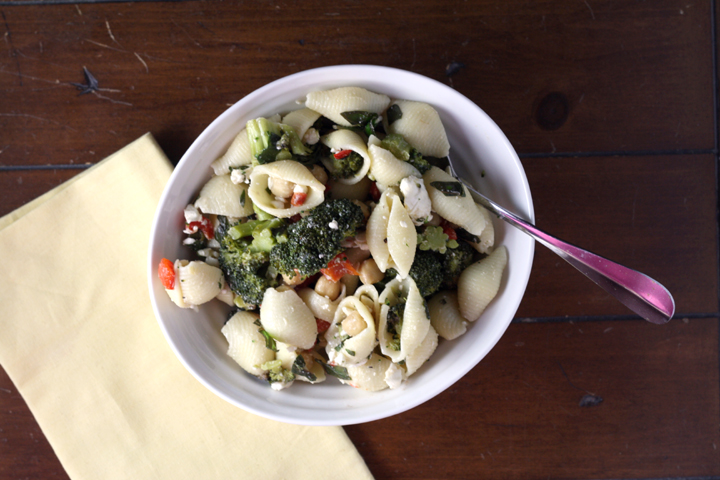
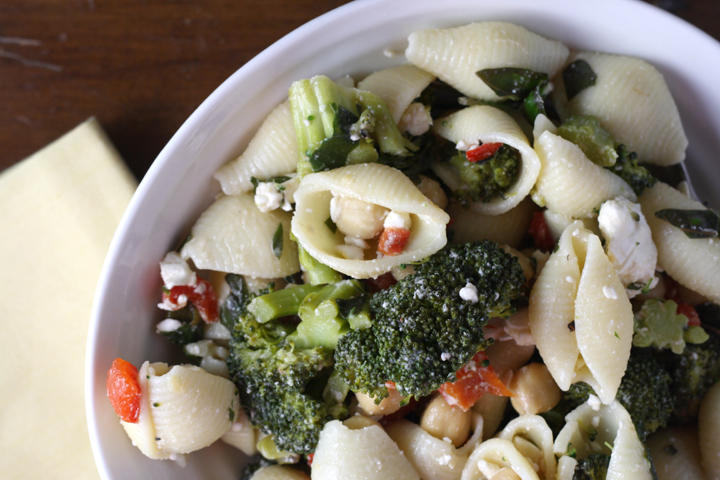
Pasta Salad with Broccoli, Feta, Capers and Chickpeas

Adapted from Cinnamon Spice and Everything Nice

Print this recipe!

Serves 6-8 as an entree

16 ounces pasta- I used medium shells
1 bunch of broccoli crowns, coarsely chopped
1/3 cup extra virgin olive oil
4 Tbsp red wine vinegar
1 Tbsp Dijon mustard
1 cup feta cheese, crumbled
12 oz roasted red pepper, cut in small strips
2 cans (14 oz) chickpeas, drained
3 fl oz. capers, drained
1/3 cup fresh basil, chopped
salt and pepper

Boil water and put pasta in. 2 min before the pasta is al dente, throw the broccoli in with it. Drain pasta/broccoli and rinse in cold water to stop cooking and cool down the pasta.

In a large bowl, whisk vinegar and dijon. Whisk in olive oil.

Add pasta/broccoli, feta, peppers, chickpeas, capers and basil. Toss well and season to taste with salt/pepper. Serve room temperature or cold.

Goat Cheese, Chard and Herb Pie ~ ElephantEats.com

I forgot to tell you guys last week, but Nate actually has never seen the house we bought. It all happened so quickly. After our offer got accepted, I asked him to come to the inspection with me figuring he’d want to see it, but when he found out it would take a couple hours, he said “no, thank you.” Can you believe that!? Such a guy thing to do. He kind of doesn’t want to see it til the renovations are all done, but I don’t think I’m going to allow that.

Goat Cheese, Chard and Herb Pie ~ ElephantEats.com

In the meantime, our inspector never tested for lead, and the more I’m reading up on it, the more freaked out I am. Apparently it’s pretty much ok if you just paint over it and there are no areas of chipping paint. But if you’re planning to do renovations, like we are, the lead dust can get into the air and you have to hire a contractor that’s certified in dealing with that. I’m getting slightly paranoid now so I think I’m going to call in someone to test so we can take any necessary precautions.

I read that most homes built before 1960 are pretty much guaranteed to contain heavily leaded paint. This house was built in 1920 something so I’d say there’s a very good chance it has lead paint. Have any of you ever had to deal with this? What did you do?

Oh, and don’t worry, pics of the house will come soon! I’m going to try to do a drive-by this wknd and snap a pic :)

Goat Cheese, Chard and Herb Pie ~ ElephantEats.com

On another note, you know how I said I walk by the Today Show every morning? Well today I was walking by and I saw the tv screens outside showing it live, and you couldTOTALLY see me on the screen! So if you watch the Today Show (Shannon, i’m talking to you!!), watch around 8:10 every morning. I’m usually holding a pink/red bag. You can only see me on days they sit with their backs to the window. Let me know if you see me! (ok ok, i know i’m such a dork)

So I made this recipe a few weeks ago. It was really tasty, almost like a Spanakopita but in a pie. You could easily sub some other green (kale, spinach, etc) for the chard. It comes together pretty quickly because you use premade phyllo dough.

I had seen my mom work with phyllo when I was younger, and I remember she always said you had to work quickly because it dries out. She was SO right. It was a pain to work with but luckily this pie is supposed to have a rustic look so it was fine in the end.

I served this as dinner but honestly, it should really be an appetizer or side dish. It wasn’t filling at all. Nate and I ended up eating it in like 2 sittings.

Goat Cheese, Chard and Herb Pie ~ ElephantEats.com


Goat Cheese, Chard and Herb Pie in a Phyllo Crust

From the NY Times

Print this recipe!

Serves 6-8 as a side-dish

1 generous bunch Swiss chard (about 3/4 pound), stemmed and washed
Salt to taste
8 sheets phyllo (4 ounces)
3 eggs
6 ounces goat cheese (I used 4 oz goat cheese and the rest feta because that’s what i had)
3/4 cup low-fat milk
2 garlic cloves, pureed or put through a press
1/2 cup chopped fresh herbs, such as parsley, dill, chives, tarragon, marjoram (I used dill which was great!)
Salt and freshly ground pepper
2 tablespoons extra virgin olive oil, or 1 tablespoon olive oil and 1 tablespoon melted unsalted butter

Bring a large pot of water to a boil while you stem and wash the Swiss chard. If the stems are wide and meaty set them aside for another purpose. If they are thin and sinewy, discard. When the water comes to a boil salt generously and add the chard leaves. Fill a bowl with cold water. Blanch the chard for 1 minute, just until tender, and transfer to the bowl of cold water. Drain, take up the chard by the handful and squeeze out excess water. Chop medium-fine. You should have about 1 cup chopped cooked chard.

Preheat the oven to 350 degrees. Blend together the eggs and goat cheese, either in an electric mixer or in a food processor fitted with the steel blade. Add the milk and the garlic and blend until smooth. If using a processor, scrape into a bowl. Stir in the blanched chopped chard, the herbs, and salt and pepper to taste.

Brush a 9- or 10-inch tart pan or cake pan with olive oil and place on a baking sheet for easier handling. Open up the package of phyllo and unfold the sheets of dough. Remove 8 sheets of phyllo and fold the remaining dough back up. Wrap tightly in plastic, return to the box if you wish and either refrigerate or freeze. Lay a sheet of phyllo in the pan, tucking it into the seam of the pan, with the edges overhanging the rim. Brush it lightly with olive oil (or melted butter and oil) and turn the pan slightly, then place another sheet on top, positioning it so that the edges overlap another section of the pan’s rim. Continue to layer in 6 more sheets of phyllo, brushing each one with oil – both the bottom and the sides and edges that overhang the pan — and staggering them so that the overhang on the rim of the pan is evenly distributed and covers the entire pan.

Pour the goat cheese and chard filling into the phyllo-lined pan, scraping all of it out of the bowl with a rubber spatula. Scrunch the overhanging phyllo in around the edges of the pan to form an attractive lip. Brush the scrunched rim with olive oil. Place in the oven and bake 40 minutes, until the filling is puffed, set and lightly colored on the surface. Remove from the heat (if it puffed up it will settle) and allow to sit for at least 10 minutes before cutting. Serve hot, warm or at room temperature.

Advance preparation: You can keep this in the refrigerator for a day or two but you will have to rewarm in a 300-degree oven to re-crisp the phyllo.

Nutritional information per serving (6 servings): 268 calories; 17 grams fat; 8 grams saturated fat; 1 gram polyunsaturated fat; 7 grams monounsaturated fat; 118 milligrams cholesterol; 17 grams carbohydrates; 1 gram dietary fiber; 396 milligrams sodium (does not include salt to taste); 13 grams protein

Warm Wheatberry, Brussels Sprout Salad with Feta and Crispy Tofu ~ ElephantEats.com

Well, it’s been another whirlwind week. We put an offer on a house on Tuesday, got it accepted (!!!), and did an inspection on Saturday (because it’s an 85 year old house that they’re selling “as-is”). We were mainly concerned about finding a buried oil tank or major structural issues.

Thankfully, there was no below-ground oil tank, and the house was in pretty darn good shape for such an old geezer. There were some issues we’ll have to fix but overall it’s a well-built house.

Our attorney told ust that today should be the end of attorney review, so before the end of the day, we should be under contract!

Warm Wheatberry, Brussels Sprout Salad with Feta and Crispy Tofu ~ ElephantEats.com

It’s a funny story, this house. Basically my realtor was visiting her daughter at college last weekend, so she told me to just go to all the open houses that I wanted to. I had a list in hand and since I only had from 1pm-4pm, I had to quickly go through each of the 8 or so houses. Some I was more interested in than others, but I figured I should at least check out the ones I wasn’t sure of, since I’m totally fine with doing some renovations (then I could really customize the home the way I want it). This house was one of those.

I went in and there were already 2 or 3 families walking through it. Since a 96 year old woman currently lives there (who I met and she seriously looks maybe 75!), it’s decorated as you’d think it would be. I’m pretty sure it hasn’t been updated since the 50s and the first floor is covered in carpet…even in the dining room.

Anyway, to say I got a bad impression was an understatement. I’m really good at looking past the decorating in a house and just looking at the “bones,” but I was in a rush and I just didn’t look very hard. I took one look at the first floor, briefly glanced at the second, and didn’t even think to go in the basement or attic.

Warm Wheatberry, Brussels Sprout Salad with Feta and Crispy Tofu ~ ElephantEats.com

It wasn’t until I finished all my house hunting and came home to assess everything, that I really started to think about this house that I had pretty much dismissed. When I found out there were already several interested parties in it, I had to really think about what I wanted quickly, and realized that this house really had everything I was looking for- great neighborhood, walk to train, not too big or too small, needs updating so I could customize to my liking, character. Basically, it was kind of perfect. And so we decided to put an offer in!

I was so excited to go back to the house on Saturday for the inspection since I didn’t really remember it too well (I had the realtor go back and check it out before we put our offer in). Honestly, it was sooo much better than I remembered. It has gorgeous wood moldings, a beautiful newel post and staircase, hardwood floors, a cute front porch, and an awesome walk-up attic that can totally be finished down the line. So basically, I’m psyched!

Warm Wheatberry, Brussels Sprout Salad with Feta and Crispy Tofu ~ ElephantEats.com

Anyway, with all this mental exertion and stress I’ve had this week, I’ve been craving some hearty, healthy REAL food. I had bought wheatberries the other day at Whole Foods because I love them but don’t think I’ve ever bought them. I figured I’d just come up with some random salad based on what inspired me. I decided on brussels sprouts for the veggie and the rest just came together from there.

It was really delicious and totally just what I needed to make it through the week!

Warm Wheatberry, Brussels Sprout Salad with Feta and Crispy Tofu ~ ElephantEats.com

Warm Wheatberry Brussels Sprout Salad with Feta cheese and Crispy Tofu

Recipe by me

Print this recipe!

Makes 4-5 large servings

1 1/3 cup hard wheatberries, uncooked
12 oz. extra firm tofu, drained well, squeezed with paper towels, and cut into bite-sized pieces
10 oz. brussels sprouts, bottoms cut off and thinly sliced
1-2 Tbsp olive oil
1 large onion, thinly sliced
2 Tbsp white sugar
3 garlic cloves, minced
2 Tbsp sugar
1/4 cup cider vinegar
1/2 cup pitted kalamata olives, drained and halved
1/2 cup crumbled feta cheese (plus more for garnish)
salt and pepper to taste.

Preheat oven to 425.

Bring 4 1/2 cups well-salted water to a boil. Add wheatberries and cook uncovered on a low simmer for 45 min or until soft but chewy.

While wheatberries are cooking, spray a foil-lined baking sheet with cooking spray. Add tofu and spray again or toss with olive oil. Season with salt and pepper and cook flipping the pieces halfway, about 30-40 minutes or until golden brown and crispy.

Heat olive oil over med-hi heat in a medium saute pan. Add onion, and cook til soft. Add the sugar and cook, stirring for 1 minute.

Add garlic and cook 2 minutes. Do not let garlic burn. Add vinegar and brussels and cook, stirring occassionally, until brussels are soft but not mushy.

Remove from heat and add the olives. Drain wheatberries and toss with brussels mixture and feta. Salt and pepper to taste, toss in tofu and serve warm.


Braised Chicken with Artichokes and Olives ~ ElephantEats.com

Whelp, I’m back. I know I disappeared for a bit, but so much has been going on.

This past weekend I saw a few of my childhood friends (you might remember them from my visit to Cleveland), and I got to give two of them, who happen to be married, a blanket I made for their second child who’s due in June. It was my first time sewing a blanket, as opposed to crocheting, and it definitely came out a little crooked. I realize you can’t tell unless you really stare at it though, so whatever.

IMG_7638sm

I order these little tags to sew into the lining. On one side it says “Handmade by Amy Carota <3” and on the back it has washing instructions. So cute, right?! The blanket is a white fleece on one side and just a cute fabric on the other, with a satin trim. I’m excited to try to make another one soon, so hopefully another of my friends will get preggo :)

IMG_7637sm

Today, I officially had my last day at work! I said my goodbyes to everyone, and they even got a Carvel ice cream cake for me. Yum :)

I spent Wednesday morning looking at a couple houses, because I could. It was the last time I could really take off part of a weekday, since I start my new job on Monday. Saturday I’m going to look at MORE houses (10 I believe). I think I must be setting a record with the amount of houses I’ve seen in the last 3 weeks. I definitely know the things I do and don’t want, though, which makes it extra hard since I’m picky!

Braised Chicken with Artichokes and Olives ~ ElephantEats.com

As you might imagine, I haven’t had much time to cook, and thus to share yummy recipes with you. I did manage to make us this meal last night. It was something I pinned a few weeks ago and finally got around to making.

I loved the combination of flavors and ingredients. They definitely aren’t ones I find myself eating often. It had the perfect balance of protein and veggies  (and carbs since I served it over brown rice). The spices are really delicious and unique.

Braised Chicken with Artichokes and Olives ~ ElephantEats.com

I made this after I got home from work, so unlike the Tomato Quiche, you could easily make this for a weeknight meal ;)

Hopefully I’ll be back soon with a cookie recipe I baked up this week too!

Braised Chicken with Artichokes and Olives ~ ElephantEats.com

Braised Chicken with Artichokes and Olives

From The Longevity Kitchen via Epicurious

Print this recipe!

Serves 4-6

8 boneless, skinless chicken thighs- about 1.5 pounds (you MUST use thighs or they’ll dry out)
salt
Freshly ground black pepper
3 tablespoons extra-virgin olive oil
1 yellow onion, diced
3 cloves garlic, thinly sliced
1 teaspoon turmeric
1/2 teaspoon ground cumin
1/2 teaspoon ground coriander
Generous pinch red pepper flakes
1 cinnamon stick, or 1/4 teaspoon ground cinnamon
1 bay leaf
2 cups chicken broth
2 teaspoons grated lemon zest
3 tablespoons freshly squeezed lemon juice
1 cup canned chickpeas, drained, rinsed, and mixed with a spritz of lemon juice and a pinch of salt
8 thawed frozen or jarred artichoke hearts (see note), quartered
1/2 cup pitted green olives, such as picholine or manzanilla (I used pimento stuffed ones because that’s all I could find)
2 teaspoons lemon zest
2 tablespoons chopped fresh mint or cilantro (I used mint)

Pat the chicken dry and season salt and pepper. Heat the olive oil in a Dutch oven or heavy soup pot over medium-high heat. Add the chicken, working in batches if necessary, and cook until well browned on each side, about 3 minutes per side. Transfer to a plate.

Decrease the heat to medium. Add the onion and a pinch of salt and sauté until soft and slightly golden, about 5 minutes. Add the garlic and sauté for 1 minute. Add the turmeric, cumin, coriander, red pepper flakes, cinnamon stick, and bay leaf and cook, stirring constantly, until fragrant, about 1 minute.

Pour in 1/4 cup of the broth to deglaze the pot, stirring to loosen any bits stuck to the pot. Stir in a pinch of salt and cook until the liquid is reduced by half. Stir in the remaining 1 3/4 cups of broth, the lemon zest, and 2 tablespoons of the lemon juice. Decrease the heat to medium-low, cover, and simmer for 15 minutes.

Add the chicken, chickpeas, artichoke hearts, and olives and stir gently to combine. Increase the heat to medium-high and simmer uncovered, stirring occasionally, until the chicken is heated through, about 5 minutes. Stir in the remaining tablespoon of lemon juice. Taste; you may want to add another squeeze of lemon juice or pinch of salt.

Garnish with the mint.

Note:
The artichokes hearts can be fresh, frozen and thawed, or packed in water in a jar. Whichever type you use, rinse them well. If using fresh artichoke hearts, add them right after adding the garlic.

Variation: This dish would work well using a firm white fish, such as 1 pound halibut, cut into 4 ounces pieces, in place of the chicken. Begin the recipe by sautéing the onion. Proceed as directed, but substitute vegetable broth, homemade or store-bought, for the chicken broth. Add the fish during the last 5 minutes of cooking.

Tomato Quiche~ ElephantEats.com

As I mentioned in my last post, Nate and I have had quite a lot happening around here lately.

Some of you may have already know based on my comments on other blogs, but I officially got a new job offer! I was kind of passively looking because while my current job wasn’t horrible, it also wasn’t ideal. I’m so so excited for this new opportunity! There seems like there will be more room for growth. Althought I’m still working at my “old” job for another couple weeks, I have a new hire appt tomororw and I get my new ID badge and stuff!

Tomato Quiche ~ ElephantEats.com

This new job is the first place I’ll have worked where the people there will only know me by my married name :) At my current job they still refer to me by my old name, and it’s kind of annoying me at this point that they can’t remember. Although maybe I shouldn’t be so harsh because I was initialling a document the other day and used my old initials and totally didn’t even notice…it even took me another minute to realize after Nate said “oh, come on, Amy!”

Tomato Quiche ~ ElephantEats.com

So what does this all have to do with this recipe? Well, just that if you’re busy you shouldn’t assume because a recipe’s title contains the word “quiche” that it will be quick to make. I mistakenly went to prepare this at around 7pm the other night thinking I could whip it right up. It wasn’t until I actually read the recipe (after having already started it) that I realized you have to essentially make a homemade tomato sauce before assembling the quiche. And if I had made a homemade crust it would have been even more effort.

I will say however, that if you take into account the correct amount of time it will take, it’s TOTALLY worth it. Nate and I both thought this was outstanding. The tomato sauce, while incredibly basic, was so delicious. I kind of want to make it again to just put over pasta. What’s great about this quiche is that you can make it in the winter with canned tomatoes or in the summer with fresh and it’s delicious both ways. It’s fancy and tasty enough that you could definitely make it for company. It would be great to serve at brunch as well as dinner!

Tomato Quiche ~ ElephantEats.com

This is one of the recipes Nate sent me in the morning during his breakfast perusal of the New York Times. As I’ve mentioned before, I find their recipes highly reliable.

I thought to make this quiche because I’ve had a premade pie-crust in my freezer forever. I don’t know why I bought it. If I’m going to make a pie, I would totally make the crust from scratch, so I think I actually bought it to make a quiche. With a store-bought crust, a typical quiche is a great weeknight meal. This one requires slightly more effort but please do it!!

P.S. You can make the tomato sauce ahead of time and then it’s really not bad for a weeknight dinner :)

Tomato Quiche ~ ElephantEats.com

Winter Tomato Quiche

From NY Times with some shortcuts by me

Print this recipe!

 Serves 6-8

1 9- or 10-inch whole wheat Mediterranean pie crust, gluten-free whole grain
Mediterranean pie crust, or yeasted whole wheat olive oil pastry (*I used a regular old frozen pie crust in pan)
1 tablespoon extra virgin olive oil
1/2 medium onion, finely chopped
2 to 3 garlic cloves (to taste), minced
1 14.5-ounce can chopped tomatoes in juice, with juice (*I used the ones with rosemary and oregano)
1 tablespoon tomato paste
Pinch of sugar
Salt to taste
1 sprig fresh basil or rosemary
1 teaspoon fresh thyme leaves or 1/2 teaspoon dried thyme
Freshly ground pepper
2 eggs
2 egg yolks
3/4 cup low-fat (1 or 2 percent) milk
2 ounces Gruyère cheese, grated (1/2 cup, tightly packed)
1 ounce Parmesan cheese, grated (1/4 cup, tightly packed)

If making crust, roll out the crust and line a 9- or 10-inch tart pan. Refrigerate uncovered (place in freezer if using the yeasted crust) while you make the filling. If using a premade frozen crust in pan, defrost in fridge and don’t take it out until you’re ready to use it.

Heat the olive oil over medium heat in a wide, heavy saucepan and add the onion. Cook, stirring, until it begins to soften, 2 to 3 minutes. Add a pinch of salt and continue to cook, stirring often, until tender, about 5 minutes. Meanwhile pulse the tomatoes in a food processor fitted with the steel blade or in a mini-processor.

Add the garlic to the onions and cook, stirring, until fragrant, about 30 seconds. Add to the canned tomatoes and turn up the heat slightly. Add the tomato paste, sugar, salt, basil or rosemary spring and thyme and simmer briskly, stirring often, until the tomatoes have cooked down and smell fragrant, about 15 minutes. Taste and adjust salt, and add pepper. Remove from the heat. Remove the basil or rosemary sprig and, if you used rosemary, remove any rosemary needles that may have detached from the sprig. Allow to cool slightly. You should have about 1 cup of the sauce.

Preheat the oven to 350 degrees. Beat the eggs and egg yolks in a large bowl. Brush the bottom of the crust with a small amount of the beaten egg and pre-bake for 10 minutes. Remove from the oven and allow to cool for 5 minutes.

Beat the milk into the eggs. Add 1/2 teaspoon salt, freshly ground pepper to taste and beat together. Stir in the cheeses and the tomato sauce and combine well. Scrape into the crust, using a rubber spatula to scrape out every last bit from the bowl. Place the tart on a sheet pan for easier handling and place in the oven. Bake for 30 to 35 minutes, until set. Remove from the heat and allow to sit for at least 15 minutes before cutting.

Advance preparation: The tomato sauce can be made through Step 3 up to three days ahead and refrigerated uncovered. It can also be frozen. Allow to come to room temperature before making the tart. The tart will keep for a couple of days in the refrigerator. Reheat gently in a low oven or serve at room temperature.