I usually like to keep our apartment stocked with at least something home-baked, whether it be breakfast goodies or dessert. But since moving, I haven’t really done any baking.

Because Nate likes to have dessert after dinner every night, we always have an assortment of cookies in the house. He runs 4 days a week (5 when he’s training for a marathon), and I feel like he doesn’t eat enough to support all the exercise he gets. So I encourage his dessert habit nightly. However, he hasn’t really been in the “mood” for the cookies lately, so I knew I had to bake him something good so he doesn’t whither away to nothing. I only wish I had to eat dessert every night to maintain my figure!

Anyway, it’s been so hot out that I wanted to give him something refreshing. That’s when i decided on ice cream sandwiches. I asked him some flavor cookie/ice cream combos he likes and he said chocolate cookies with mint chocolate chip ice cream, so that’s what i gave him!

You wouldn’t think it would be so hard to find a chocolate cookie recipe, but it was. I ended up just looking for chocolate chip cookie recipes and figured i could just add cocoa powder.

However, because this was a last-minute idea, I needed one that didn’t require softening the butter ahead of time. I searched for ones with oil instead of butter. The only one I could find that didn’t need softened butter used melted butter instead.

So I guessed how much cocoa powder to flour I’d need. The batter was really wet and I crossed my fingers as I slid the first batch into the oven. But you know what? They were PERFECT! I shoved a couple in the freezer to cool them off and made Nate one tasty ice cream sandwich. Nate certainly didn’t refuse dessert that night :)


Chocolate Cookies with White and Dark Chocolate Chips

Recipe by Me

Print this recipe!

Makes about 18 large cookies

1.75  cups all purpose flour
.5 cups dutch processed cocoa powder
1/2 tsp baking soda
1/2 tsp salt
12 tbl (1.5 sticks) unsalted butter – melt & cool it until warm
1 cup packed lt or dk brown sugar
1/2 cup granulated sugar
1 lg egg + 1 egg yolk
2 tsps vanilla extract
1 cup chocolate chips
1/2 cup white chocolate chips

Heat oven to 325 degrees and have racks on upper & lower middle positions. Put parchment paper on 2 oversized cookie sheets (or do it in batches with smaller cookie sheets).

Whisk together flour, salt & baking soda in medium size bowl. Set aside.

Mix butter & sugars until thoroughly blended by hand or with electric mixer. Beat in egg, egg yolk and vanilla until combined.

Add flour, cocoa powder, salt & baking soda mixture to butter, sugar, egg & vanilla mixture and beat at low speed until just combined. Stir in chips to taste.

Roll scant 1/4 cup dough into ball. Put ball on cookie sheet leaving 2.5 inches between each ball.

Bake about 15 – 18 minutes, switching sheets halfway through reversing sheets front to back and top to bottom. cookies should be light golden brown and outer edges should start to harden, but centers are soft & puffy. Cool cookies on cookie sheets. When cool, peel from parchment.

Make into an ice cream sandwich!


As you all know (or maybe not if you’ve only recently joined me), but I am a member of the Daring Bakers. Each month they host a challenge composed of a very complicated dessert that you must bake and post on the 27th of the month.

Unfortunately, last month I was in the midst of packing up my kitchen, so I wasn’t able to complete it. It’s too bad because the challenge was something I’ve always wanted to make, baklava.

But I’m back in the game this month with my brand new, much larger kitchen! It’s so nice to be cooking on the huge counters. I don’t even know what to do with all the space. You should see the mess I made in the process of cooking this. I used 4 bowls and two pots…just because I could!

Jana of Cherry Tea Cakes was our July Daring Bakers’ host and she challenges us to make Fresh Frasiers inspired by recipes written by Elisabeth M. Prueitt and Chad Robertson in the beautiful cookbook Tartine.

This recipe was randomly requested from someone at work who happens to be French, but I put off making it because I knew it would take a lot of time. Well who would have thought it would be the recipe for my Daring Bakers Challenge! At least it gave me a reason to dive in and conquer this many stepped recipe.

Me and Frenchie

Honestly, it wasn’t as bad as I thought, and even kind of fun. I got real satisfaction seeing the finished product and knowing that I made that.

I brought it into work and it got compliments. Personally, I thought it was good but probably not worth all the effort I put into it. Maybe it’s because I’m not a fan of cream-based desserts. But if you are, and you have a spare weekend to bake/whip/assemble, then by all means give this a shot! ;)

These recipes have been adapted from the cook book Tartine by Elisabeth M Prueitt and Chad Robertson, the chefs and owners of Tartine, a beloved San Francisco bakery.

Basic Chiffon Cake:

Ingredients:

1 cup + 2 tablespoons (270 ml) (5½ oz/155 gm) all-purpose flour
1 teaspoon (5 ml) (4 gm) baking powder
3/4 cups (180 ml) (6 oz /170 gm) sugar
1/2 teaspoon (2½ ml) (1½ gm) salt, preferably kosher
1/4 cup (2 fl oz/60 ml) vegetable oil
3 large egg yolks
⅓ cup + 1 tablespoon (3.17 fl oz/95 ml) water
1 teaspoon (5 ml) pure vanilla extract
3/4 teaspoon (3¾ ml) (3 gm) lemon zest, grated
5 large egg whites
¼ teaspoon (1¼ ml) (1 gm) cream of tartar

Preheat the oven to moderate 325°F (160°C/gas mark 3).

Line the bottom of an 8-inch (20 cm) spring form pan with parchment paper. Do not grease the sides of the pan.

In a large mixing bowl, stir together the flour and baking powder. Add in all but 3 tablespoons (45 ml.) of sugar, and all of the salt. Stir to combine.In a small bowl combine the oil, egg yolks, water, vanilla and lemon zest. Whisk thoroughly.

Combine with the dry ingredients and mix thoroughly for about one minute, or until very smooth.

Put the egg whites into a stand mixer, and beat on medium speed using a whisk attachment on a medium speed, until frothy. Add cream of tartar and beat on a medium speed until the whites hold soft peaks. Slowly add the remaining sugar and beat on a medium-high speed until the whites hold firm and form shiny peaks.

Using a grease free rubber spatula, scoop about ⅓ of the whites into the yolk mixture and fold in gently. Gently fold in the remaining whites just until combined.

Pour the batter into the prepared pan. Bake for 45 to 55 minutes or until toothpick inserted into the center comes out clean.

Removed the cake from the oven and allow to cool in the pan on a wire rack.

To unmold, run a knife around the sides to loosen the cake from the pan and remove the spring form sides. Invert the cake and peel off the parchment paper. Refrigerate for up to four days.

Simple Syrup

I chose to flavor by stirring in 1-2 teaspoons of almond extract.

Ingredients:
1/3 cup (2⅔ fl oz/80 ml) (2⅔ oz/75 gm) of sugar, flavored or white
1/3 cup (2⅔ fl oz/80 ml) of water
1-2 tsp flavored extract (optional)

Combine the water,sugar, and extract in a medium saucepan.

Bring the mixture to a boil and let the sugar dissolve. Stirring is not necessary, but will not harm the syrup.

Remove the syrup from the heat and cool slightly.

Transfer syrup to a lidded container or jar that can be stored in the refrigerator. Simple syrup can be stored for up to one month.

Fraisier Assembly

Components:

1 baked 8 inch (20 cm) chiffon cake
1 recipe pastry cream filling
⅓ cup (80 ml) simple syrup or flavored syrup
2 lbs (900 g) strawberries
confectioners’ sugar for dusting
½ cup (120 ml) (5 oz/140 gm) almond paste

Line the sides of a 8-inch (20 cm) spring form pan with plastic wrap. Do not line the bottom of the pan.

Cut the cake in half horizontally to form two layers.

Fit the bottom layer into the prepared spring form pan. Moisten the layer evenly with the simple syrup. When the cake has absorbed enough syrup to resemble a squishy sponge, you have enough.

Hull and slice in half enough strawberries to arrange around the sides of the cake pan. Place the cut side of the strawberry against the sides of the pan, point side up forming a ring.

Pipe cream in-between strawberries and a thin layer across the top of the cake. DO NOT USE UP PASTRY CREAM HERE.

Hull and quarter your remaining strawberries and place them in the middle of the cake. Cover the strawberries and entirely with the all but 1 tbsp. (15 ml) of the pastry cream.

Place the second cake layer on top and moisten with the simple syrup.

If desired, knead food gel into the almond paste to get desired color. Lightly dust a work surface with confectioners’ sugar and roll out the almond paste to an 8-inch round 1/16 inch (1.5 mm) thick. Spread the remaining 1 tablespoon (15 ml) of pastry cream on the top of the cake and cover with the round of almond paste.

Cover with plastic wrap and refrigerate for at least 4 hours.

To serve release the sides of the spring form pan and peel away the plastic wrap.

Serve immediately or store in the refrigerator for up to 3 days.

When I visited my friends in Cleveland and was planning the menu I’d make for the evening, I knew a dessert had to be on the list.

I asked Sarah what she’d like, hoping for something fruity or fresh for summer…but Sarah was very specific: brownies :) Her dad was visiting also and she said that brownies are one of his favorite desserts.

However, being me, I couldn’t bear to make plain brownies. I’d been eyeing a lot of recipes on the web lately, and stumbled upon one for a Sweet and Salty Brownie from Brown-Eyed Baker.

I dunno if you’ve heard, but salted caramel is all the rage these days. From chocolate bars to desserts, people can’t seem to get enough.  And while I don’t typically like to follow trends, I figured just this one time wouldn’t hurt anyone.

I don’t really know by looking at a recipe if a brownie will be the consistency I like. For this purpose, I rely on the photos. And Brown-Eyed Baker had lovely photos indeed. Fudgy, rich, amazing.

I didn’t feel like going all out and making a homemade caramel (although I know that would have been even tastier), so I went the semi-homemade route by buying caramel ice cream topping as a substitute. I was hoping for one of those gourmet brands that’s super thick, but all the supermarket had was the syrupy Smuckers brand. So that’s what I used.

The result was very gooey, and very delicious. We ate these warm in a bowl, topped with vanilla ice cream. Now if you’re looking for brownies that are portable and able to be eaten with your hands, this isn’t the recipe for you. But if you have access to a bowl and spoon, dig in!


Salted Caramel Brownies
Adapted from Brown Eyed Baker

Print this recipe!

Makes 24 large brownies

1¼ cups all-purpose flour
1 teaspoon table salt
2 tablespoons dark unsweetened cocoa powder
11 ounces dark chocolate, coarsely chopped
1 cup unsalted butter, cut into 1-inch cubes
1½ cups granulated sugar
½ cup light brown sugar
5 eggs, at room temperature
2 teaspoons vanilla extract
1 small jar caramel topping (about 1 cup)

For the Topping:
1½ teaspoons fleur de sel
1 teaspoon coarse sugar

1. Preheat oven to 350 degrees F.

2. Butter the sides and bottom of a glass or light-colored metal 9×13-inch pan. Butter/spray the pan well.

3. In a medium bowl, whisk together the flour, salt and cocoa powder.

4. Place the chocolate and butter in the bowl of a double boiler set over a pan of simmering water, and stir occasionally until the chocolate and butter are completely melted and combined. Turn off the heat, but keep the bowl over the water of the double boiler, and add both sugars. Whisk until completely combined and remove the bowl from the pan. The mixture should be at room temperature.

5. Add three eggs to the chocolate mixture and whisk until just combined. Add the remaining eggs and whisk until just combined. Add the vanilla and stir until combined. Do not overbeat the batter at this stage, or your brownies will be cakey.

6. Sprinkle the flour mixture over the chocolate. Using a spatula, fold the dry ingredients into the wet ingredients until there is just a trace amount of the flour mixture still visible.

7. Assemble the brownies: Pour half of the brownie mixture into the pan and smooth the top with a spatula. Drizzle about ¾ cup-1 cup of the caramel sauce over the brownie layer in a zigzag pattern, making sure the caramel doesn’t come in contact with the edges oft he pan or it will burn. Use an offset spatula to spread the caramel evenly across the brownie layer, leaving about a ½-inch border around the edges. In heaping spoonfuls, scoop the rest of the brownie batter over the caramel layer. Smooth the brownie batter gently to cover the caramel layer.

7. Bake the brownies for 30 minutes, rotating the pan halfway through the baking time, and check to make sure the brownies are completely done by sticking a toothpick into the center of the pan. The brownies are done when the toothpick comes out with a few moist crumbs.

9. Remove the brownies from the oven and sprinkle with the fleur de sel and coarse sugar.

10. Cool the brownies completely before cutting and serving.

11. The brownies can be stored, tight wrapped at room temperature, for up to 4 days. Best served warm with vanilla ice cream!

…I know that’s a bold claim. And perhaps it’s just because these fresh, citrusy cookies were just what I was in the mood for, but I still think I’d venture to say that these cookies are without a doubt AMAZING.

I guess it really depends on what kind of cookies you like. These are chewy, crispy, sweet, tangy, buttery and delicious. I think that includes an adjective for everyone’s tastes :)

I first decided to make these cookies because we ran out of desserts in my apt, and Nate MUST have a dessert after dinner each night. I wanted to make a cookie, but didn’t want to buy any new ingredients because a) I was lazy and b) we’re moving soon and I’m trying to purge my pantry/fridge/freezer.

These cookies were perfect on all accounts. I just about used up my sugar and flour, and in addition, I got rid of two lemons on the verge of going bad, and a lime I happened to have laying around.

Although I don’t recommend doubling the recipe, as I did (it made so many cookies I was rolling little cookie balls and taking pans in/out of the oven for over an hour!), these are super easy. These are perfect to make and take along to your next cookout.


Chewy Lemon Lime Sugar Cookies

Adapted from My Baking Addiction

Print this recipe!

makes 24-30 cookies

Ingredients:
2 3/4 cups all-purpose flour
1 teaspoon baking soda
1/2 teaspoon baking powder
1/2 teaspoon salt
1 cup butter, softened
1 1/2 cups white sugar
1 egg
1/2 teaspoon vanilla extract
Zest of one large lemon (or 2-3 limes, or a combo), finely minced
4 tbsp fresh lemon juice (or 1/2 lime juice)
1/2 cup sugar for rolling cookies

 Preheat oven to 350 degrees. Line cookie sheets with parchment paper.

In a small bowl, stir together flour, baking soda, baking powder and salt. Set aside.

Using a mixer, beat together the butter and sugar until smooth and very fluffy.

Beat in egg, vanilla extract, juice and zest.

Gradually blend in the dry ingredients. Refrigerate until stiff.

Roll rounded teaspoonfuls of dough into balls, and roll in sugar. Place on lined cookie sheets about 1 1/2 inches apart.

Bake 8 to 10 minutes in the preheated oven, or until lightly browned.

Let stand on cookie sheet two minutes before removing to cool on wire racks.

Have I told you how much I love long weekends? :) Nate and I took the 3-day weekend opportunity and headed down to PA to visit his mom and get some R&R.

One of the nice parts about vising Nate’s mom is that my childhood friend, Nicole, lives only about an hour drive from her. So when we get a long weekend, I can take half a day and go spend time with her, her husband and her new ADORABLE baby boy, Luc. He is a seriously cute baby.

Nicole loves to cook but told me that she hasn’t had that much experience with baking and was hoping to bake something with me. She’s been asking me this for a while but the last couple times I visited, we just didn’t have time.

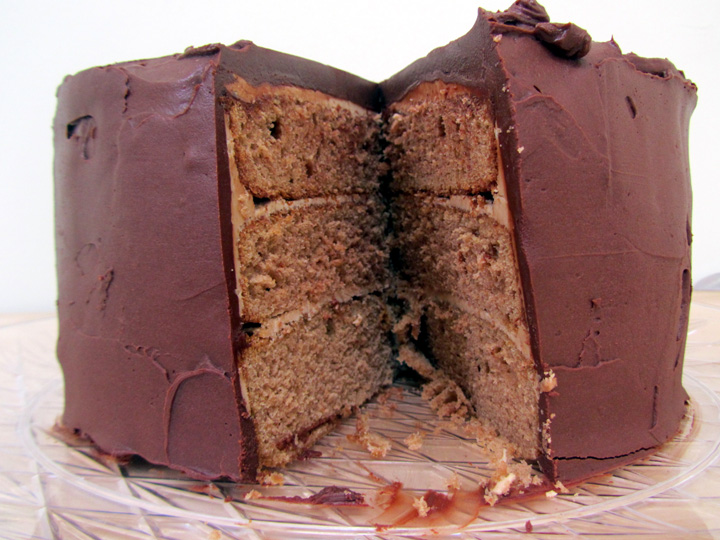
But this time we prepared ahead of time. She wanted to bake a big cake for her hubby. She said he loves dark chocolate and caramel, so I scoured the internet for some cakes that made use of this flavor combo and came across this recipe from the blog Sugar Pies.

I copied the recipe below exactly from their site. It was good…not the best cake I ever had. But I think it could get there with the following changes:

  1. Triple or quadruple the amount of Caramel Cream Frosting. It didn’t even make enough to go between the layers and on top and sides of cake. I think this is because it was supersweet and it would have been overkill with the ganache.
  2. Third or halve the Chocolate Ganache, and don’t spread it but simply allow it to cover the top and drip down the sides of the cake.
  3. Definitely pop the cakes in the freezer before icing them, and again before pouring on the ganache.
  4. Serve the cake at room temperature.

Personally, I think it would be perfect with the cake completely frosted with the Caramel Cream Frosting and then with a thin layer of ganache on the top and dripping down the sides.

I’ll give it this, though- it’s quite impressive/massive looking. I think it could look even more impressive with the changes I made with the ganache dripping down the sides :)

Caramel Cream Cake
Adapted from Sugar Pies Food

Print this recipe!

Makes one 9″ 3-layer cake

Caramel Cream Cake

1/2 pound unsalted butter, softened
2 1/2 cups sugar
5 large eggs, separated
3 cups all-purpose flour
1 tsp. baking soda
1 tsp. salt
4 tsp. cocoa powder
1 cup buttermilk
5 tsp. strong coffee
2 tsp. vanilla extract

Preheat oven to 350°. Cut parchment paper circles to fit bottoms of 3 9-inch round cake pans. Grease and flour bottoms and sides of pans.

In mixer fitted with whisk attachment beat the butter on medium speed until light and fluffy. Add the sugar and egg yolks and beat until incorporated. Sift together the dry ingredients and add to the mixture alternating with buttermilk, beginning and ending with dry ingredients. Add the coffee and vanilla and beat well.

In a clean bowl and with a clean whisk, beat the egg whites until they form stiff peaks. Gently fold into batter. (Note: If you have only one bowl for your mixer, beat the egg whites first and transfer them to another bowl while you mix the batter.)

Divide the batter evenly among the 3 pans and bake for 30 minutes or until a cake tester inserted in the center of the cakes comes out clean. Let the cakes cool in the pans for 10 minutes then remove from pans and allow to cool completely on wire racks. When completely cool, ice with Caramel Cream Frosting.

Caramel Cream Frosting

1 pound confectioner’s sugar
2 tsp. cocoa powder
1 egg yolk
8 tbs. unsalted butter, softened
1 tbs. strong coffee (liquid)
1 tsp. vanilla extract

Sift together sugar and cocoa. In a mixer fitted with the whisk attachment, beat the egg yolk until pale on low speed. Add the butter and beat well. Add the liquids and the sugar/cocoa mixture and beat until light and fluffy.

Spread frosting between layers of cake and on top and sides. Place cake in refrigerator or freezer to chill thoroughly and allow frosting to set.


Whipped Chocolate Ganache

2 cups heavy cream
16 oz. good bittersweet chocolate, chopped
1 tsp. instant coffee crystals

Place chopped chocolate and coffee in large heat proof bowl.

Heat heavy cream in saucepan until it begins to simmer. Pour over chocolate and allow to sit about 10 minutes to melt the chocolate. Stir with rubber spatula and then whisk chocolate until it is smooth.

Set bowl over another bowl filled with ice water and beat chocolate with electric mixture until about the consistency of sour cream (about 3-10 minutes depending on temperature). Be sure not to over beat the chocolate. You just want it nice and spreadable but not too liquid.

Remove cake from refrigerator and place on wire rack set over baking sheet. Pour chocolate over cake and using offset spatula spread the chocolate over top and sides of cake.

Return cake to refrigerator or freezer to allow the chocolate to set up then allow cake to come to room temperature to serve.