Chocolate and mint make a really good pair.  Kind of like Nate and I do, but without the occassional bickering ;)

My dad once told me that he likes mint chocolate, but not chocolate mint. I’m not even sure what that means. But I think he’d make an exception for these brownies…I know I would.

These came about after I made some mint-filled chocolates for the Daring Bakers Challenge and had a LOT of leftover mint filling. The recipe I had for the mint filling wasn’t part of the recipe for the chocolates themselves, so I ended up having a ridiculous amount left. I think that the amount I used in the candies was like 1/16th of it.

When I made these, they had a bit too much mint filling. This would normally be fine with me, but the filling is so sweet that too much of it literally hurts your teeth. I ate too much when I was taking them out of the pan, and then all I wanted was salty foods. Does that ever happen to you?

So I’m pretty sure this should be just the right amount. You can easily roll out the filling thinner if you don’t want as much.

In the end, these were super rich and totally delicious. Even Nate, who can eat a giant piece of cake in one sitting, could only have a small piece of these brownies. They’re even better warm. For some reason it cuts the sweetness. Or maybe they’d be good topped with some cold and creamy vanilla ice cream!


Mint-filled Brownies
Recipe by Me

Print this recipe!

Makes 24 large brownies

Mint Filling:
1/2 cup of sweetened condensed milk
2 oz. softened margarine, unsalted
1 1/4 lbs powdered sugar
1/2-1 tsp mint extract (taste to determine how minty you want it)

Brownie:
1¼ cups all-purpose flour
1 teaspoon table salt
2 tablespoons dark unsweetened cocoa powder
11 ounces unsweetened chocolate, coarsely chopped
1 cup unsalted butter, cut into 1-inch cubes
2 cups granulated sugar
½ cup light brown sugar
5 eggs, at room temperature
2 teaspoons mint extract

1. Preheat oven to 350 degrees F.

2. Combine filling ingredients and mix until well blended and forms a “dough.” Can be done in a stand mixer or by hand, kneading well.

3. Roll out filling “dough” until it is slightly smaller than a 9×13-inch rectangle. Set aside.

4. Butter the sides and bottom of a glass or light-colored metal 9×13-inch pan. Butter/spray the pan well.

5. In a medium bowl, whisk together the flour, salt and cocoa powder.

6. Place the chocolate and butter in the bowl of a double boiler set over a pan of simmering water, and stir occasionally until the chocolate and butter are completely melted and combined. Turn off the heat, but keep the bowl over the water of the double boiler, and add both sugars. Whisk until completely combined and remove the bowl from the pan. The mixture should be at room temperature.

7. Add three eggs to the chocolate mixture and whisk until just combined. Add the remaining eggs and whisk until just combined. Add the mint extract and stir until combined. Do not overbeat the batter at this stage, or your brownies will be cakey.

9. Sprinkle the flour mixture over the chocolate. Using a spatula, fold the dry ingredients into the wet ingredients until there is just a trace amount of the flour mixture still visible.

10. Assemble the brownies: Pour half of the brownie mixture into the pan and smooth the top with a spatula. Carefully lift the mint filling and place on the brownie batter. You can do it in two pieces if it’s easier.

11. In heaping spoonfuls, scoop the rest of the brownie batter over the mint layer and smooth to cover.

11. Bake the brownies for 40 minutes, rotating the pan halfway through the baking time, and check to make sure the brownies are completely done by sticking a toothpick into the center of the pan. The brownies are done when the toothpick comes out with a few moist crumbs.

12. Remove the brownies from the oven and cool the brownies completely before cutting and serving. These are easiest to cut at room temp rather than after refrigerated.

11. The brownies can be stored, tight wrapped at room temperature, for up to 4 days. Best served warm with ice cream!

When I visited my friends in Cleveland and was planning the menu I’d make for the evening, I knew a dessert had to be on the list.

I asked Sarah what she’d like, hoping for something fruity or fresh for summer…but Sarah was very specific: brownies :) Her dad was visiting also and she said that brownies are one of his favorite desserts.

However, being me, I couldn’t bear to make plain brownies. I’d been eyeing a lot of recipes on the web lately, and stumbled upon one for a Sweet and Salty Brownie from Brown-Eyed Baker.

I dunno if you’ve heard, but salted caramel is all the rage these days. From chocolate bars to desserts, people can’t seem to get enough.  And while I don’t typically like to follow trends, I figured just this one time wouldn’t hurt anyone.

I don’t really know by looking at a recipe if a brownie will be the consistency I like. For this purpose, I rely on the photos. And Brown-Eyed Baker had lovely photos indeed. Fudgy, rich, amazing.

I didn’t feel like going all out and making a homemade caramel (although I know that would have been even tastier), so I went the semi-homemade route by buying caramel ice cream topping as a substitute. I was hoping for one of those gourmet brands that’s super thick, but all the supermarket had was the syrupy Smuckers brand. So that’s what I used.

The result was very gooey, and very delicious. We ate these warm in a bowl, topped with vanilla ice cream. Now if you’re looking for brownies that are portable and able to be eaten with your hands, this isn’t the recipe for you. But if you have access to a bowl and spoon, dig in!


Salted Caramel Brownies
Adapted from Brown Eyed Baker

Print this recipe!

Makes 24 large brownies

1¼ cups all-purpose flour
1 teaspoon table salt
2 tablespoons dark unsweetened cocoa powder
11 ounces dark chocolate, coarsely chopped
1 cup unsalted butter, cut into 1-inch cubes
1½ cups granulated sugar
½ cup light brown sugar
5 eggs, at room temperature
2 teaspoons vanilla extract
1 small jar caramel topping (about 1 cup)

For the Topping:
1½ teaspoons fleur de sel
1 teaspoon coarse sugar

1. Preheat oven to 350 degrees F.

2. Butter the sides and bottom of a glass or light-colored metal 9×13-inch pan. Butter/spray the pan well.

3. In a medium bowl, whisk together the flour, salt and cocoa powder.

4. Place the chocolate and butter in the bowl of a double boiler set over a pan of simmering water, and stir occasionally until the chocolate and butter are completely melted and combined. Turn off the heat, but keep the bowl over the water of the double boiler, and add both sugars. Whisk until completely combined and remove the bowl from the pan. The mixture should be at room temperature.

5. Add three eggs to the chocolate mixture and whisk until just combined. Add the remaining eggs and whisk until just combined. Add the vanilla and stir until combined. Do not overbeat the batter at this stage, or your brownies will be cakey.

6. Sprinkle the flour mixture over the chocolate. Using a spatula, fold the dry ingredients into the wet ingredients until there is just a trace amount of the flour mixture still visible.

7. Assemble the brownies: Pour half of the brownie mixture into the pan and smooth the top with a spatula. Drizzle about ¾ cup-1 cup of the caramel sauce over the brownie layer in a zigzag pattern, making sure the caramel doesn’t come in contact with the edges oft he pan or it will burn. Use an offset spatula to spread the caramel evenly across the brownie layer, leaving about a ½-inch border around the edges. In heaping spoonfuls, scoop the rest of the brownie batter over the caramel layer. Smooth the brownie batter gently to cover the caramel layer.

7. Bake the brownies for 30 minutes, rotating the pan halfway through the baking time, and check to make sure the brownies are completely done by sticking a toothpick into the center of the pan. The brownies are done when the toothpick comes out with a few moist crumbs.

9. Remove the brownies from the oven and sprinkle with the fleur de sel and coarse sugar.

10. Cool the brownies completely before cutting and serving.

11. The brownies can be stored, tight wrapped at room temperature, for up to 4 days. Best served warm with vanilla ice cream!

Have I told you how much I love long weekends? :) Nate and I took the 3-day weekend opportunity and headed down to PA to visit his mom and get some R&R.

One of the nice parts about vising Nate’s mom is that my childhood friend, Nicole, lives only about an hour drive from her. So when we get a long weekend, I can take half a day and go spend time with her, her husband and her new ADORABLE baby boy, Luc. He is a seriously cute baby.

Nicole loves to cook but told me that she hasn’t had that much experience with baking and was hoping to bake something with me. She’s been asking me this for a while but the last couple times I visited, we just didn’t have time.

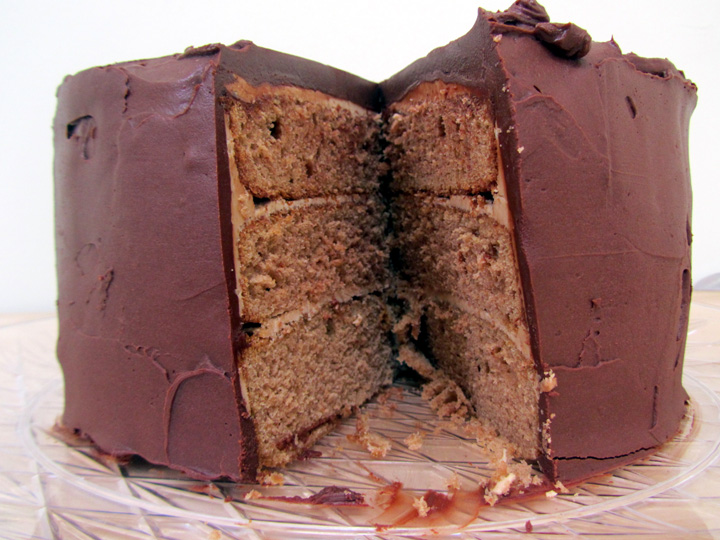
But this time we prepared ahead of time. She wanted to bake a big cake for her hubby. She said he loves dark chocolate and caramel, so I scoured the internet for some cakes that made use of this flavor combo and came across this recipe from the blog Sugar Pies.

I copied the recipe below exactly from their site. It was good…not the best cake I ever had. But I think it could get there with the following changes:

  1. Triple or quadruple the amount of Caramel Cream Frosting. It didn’t even make enough to go between the layers and on top and sides of cake. I think this is because it was supersweet and it would have been overkill with the ganache.
  2. Third or halve the Chocolate Ganache, and don’t spread it but simply allow it to cover the top and drip down the sides of the cake.
  3. Definitely pop the cakes in the freezer before icing them, and again before pouring on the ganache.
  4. Serve the cake at room temperature.

Personally, I think it would be perfect with the cake completely frosted with the Caramel Cream Frosting and then with a thin layer of ganache on the top and dripping down the sides.

I’ll give it this, though- it’s quite impressive/massive looking. I think it could look even more impressive with the changes I made with the ganache dripping down the sides :)

Caramel Cream Cake
Adapted from Sugar Pies Food

Print this recipe!

Makes one 9″ 3-layer cake

Caramel Cream Cake

1/2 pound unsalted butter, softened
2 1/2 cups sugar
5 large eggs, separated
3 cups all-purpose flour
1 tsp. baking soda
1 tsp. salt
4 tsp. cocoa powder
1 cup buttermilk
5 tsp. strong coffee
2 tsp. vanilla extract

Preheat oven to 350°. Cut parchment paper circles to fit bottoms of 3 9-inch round cake pans. Grease and flour bottoms and sides of pans.

In mixer fitted with whisk attachment beat the butter on medium speed until light and fluffy. Add the sugar and egg yolks and beat until incorporated. Sift together the dry ingredients and add to the mixture alternating with buttermilk, beginning and ending with dry ingredients. Add the coffee and vanilla and beat well.

In a clean bowl and with a clean whisk, beat the egg whites until they form stiff peaks. Gently fold into batter. (Note: If you have only one bowl for your mixer, beat the egg whites first and transfer them to another bowl while you mix the batter.)

Divide the batter evenly among the 3 pans and bake for 30 minutes or until a cake tester inserted in the center of the cakes comes out clean. Let the cakes cool in the pans for 10 minutes then remove from pans and allow to cool completely on wire racks. When completely cool, ice with Caramel Cream Frosting.

Caramel Cream Frosting

1 pound confectioner’s sugar
2 tsp. cocoa powder
1 egg yolk
8 tbs. unsalted butter, softened
1 tbs. strong coffee (liquid)
1 tsp. vanilla extract

Sift together sugar and cocoa. In a mixer fitted with the whisk attachment, beat the egg yolk until pale on low speed. Add the butter and beat well. Add the liquids and the sugar/cocoa mixture and beat until light and fluffy.

Spread frosting between layers of cake and on top and sides. Place cake in refrigerator or freezer to chill thoroughly and allow frosting to set.


Whipped Chocolate Ganache

2 cups heavy cream
16 oz. good bittersweet chocolate, chopped
1 tsp. instant coffee crystals

Place chopped chocolate and coffee in large heat proof bowl.

Heat heavy cream in saucepan until it begins to simmer. Pour over chocolate and allow to sit about 10 minutes to melt the chocolate. Stir with rubber spatula and then whisk chocolate until it is smooth.

Set bowl over another bowl filled with ice water and beat chocolate with electric mixture until about the consistency of sour cream (about 3-10 minutes depending on temperature). Be sure not to over beat the chocolate. You just want it nice and spreadable but not too liquid.

Remove cake from refrigerator and place on wire rack set over baking sheet. Pour chocolate over cake and using offset spatula spread the chocolate over top and sides of cake.

Return cake to refrigerator or freezer to allow the chocolate to set up then allow cake to come to room temperature to serve.