I’m actually posting a recipe!!!

Banana Snack Cake ~ ElephantEats.com

Apparently leg cramps are a common symptom of pregnancy. I’ve been getting so many of them that I wake up in the middle of the night in agony. Any time I flex my foot or calf in the slightest it cramps up.

I’ve long known that potassium can help with leg cramps, so I figured it couldn’t hurt to start eating a banana every day. Now whenever I go to the market, I buy a big bunch, figuring that the ones that don’t get eaten can get turned into something delicious- it helps that I’m loving cooking in my new kitchen :)

Banana Snack Cake ~ ElephantEats.com

The first week I had leftovers, I made our favorite chocolate chip banana bread recipe (which I totally need to share with you guys some time). Then last week I decided a banana snack cake would be a tasty treat. 

In addition to trying a new recipe, I decided to experiment with White Whole Wheat flour. Monica had first told me about this flour and has been touting it as awesome, especially if you want the whole grains from whole wheat flour but don’t love the dry and gritty texture it adds.

I had never heard of white whole wheat flour so I decided to research it a bit and give it a try. The Whole Grains Council explains it as the following:

“White wheat is a different type of wheat that has no major genes for bran color (unlike traditional “red” wheat which has one to three bran color genes). An easy way to think of it is as a sort of albino wheat. The bran of white wheat is not only lighter in color but it’s also milder in flavor, making whole white wheat more appealing to many people accustomed to the taste of refined flour.

The term “white flour” has often been used to mean “refined flour,” so “whole white wheat flour” sounds like a contradiction in terms. But it is simply WHOLE flour – including the bran, germ and endosperm – made from WHITE wheat.”

Banana Snack Cake ~ ElephantEats.com

The one thing I was skeptical about was how it compares nutritionally to regular whole wheat flour, but the council goes on to say that experts consider these two kinds of whole wheat to be the same, nutritionally. I was sold!

I bought King Arthur Flour brand. Usually, if subbing whole wheat for all-purpose flour in a recipe, you would only substitue part of the all-purpose for whole wheat, lest you dry out your baked goods. Since I was using a lighter whole wheat flour and had the moisture from the bananas, I decided to use 100% of the white whole wheat flour.

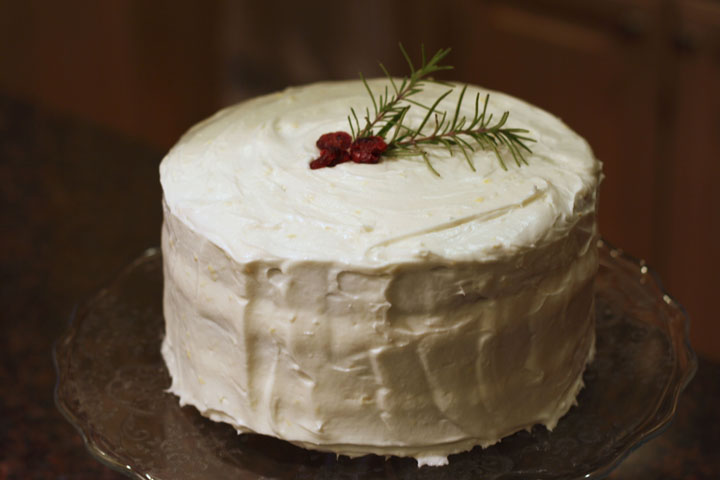
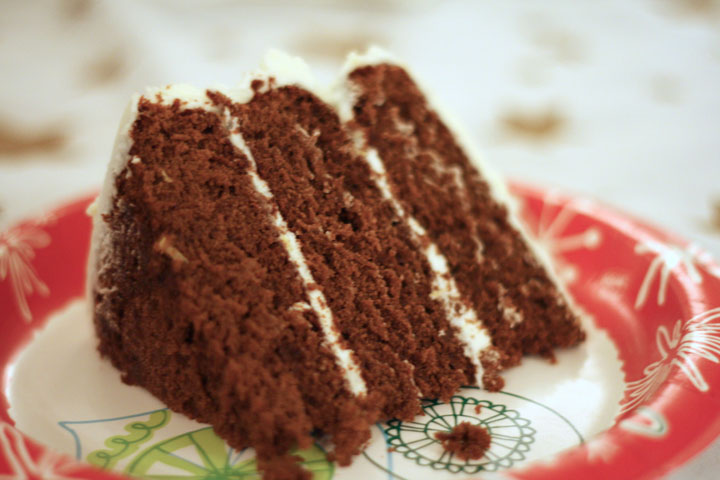
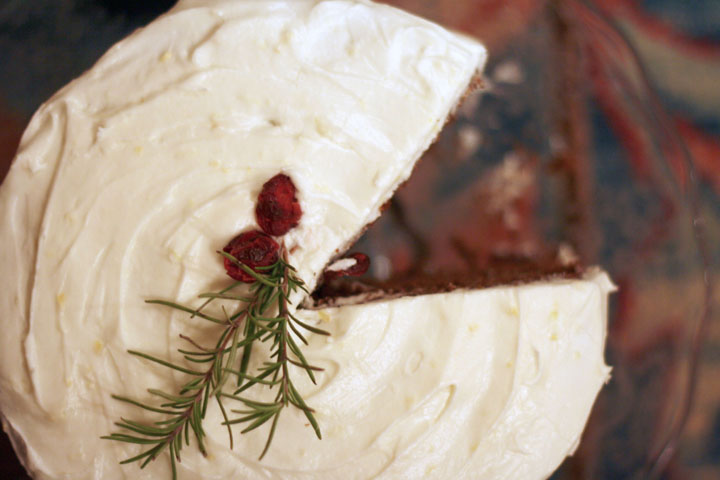
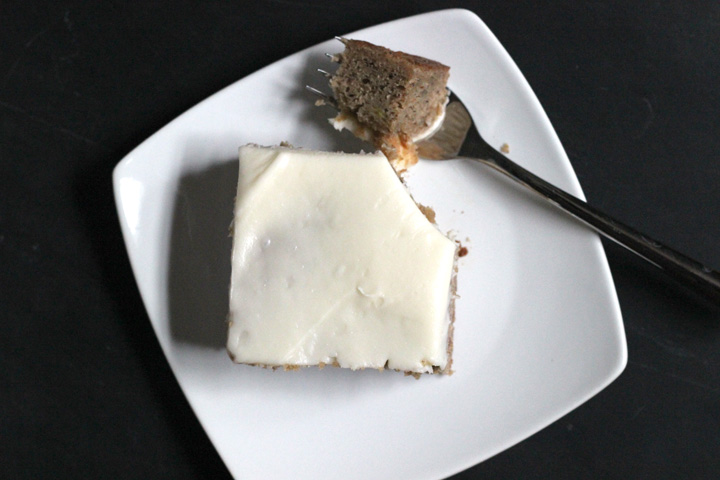
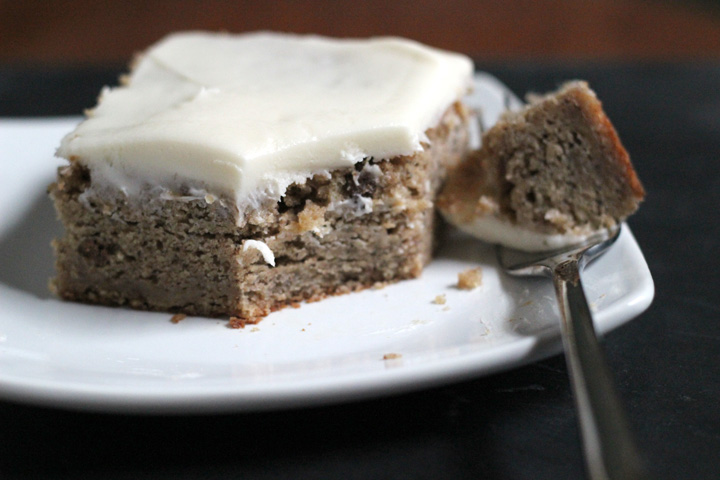
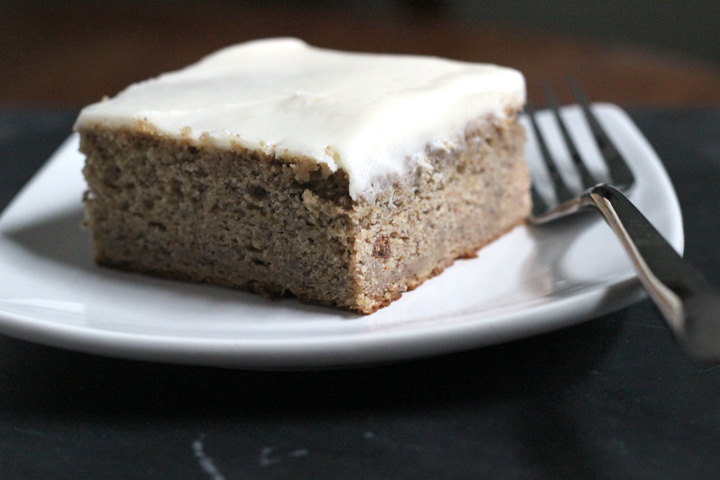
Honestly, the result was amazing! It definitely helped that the bananas already added moisture, plus I upped the sour cream amount from the original recipe. And it never hurts to have a creamy cream cheese frosting on top.

I could feel the texture of the whole wheat in the cake, but I thought it went perfectly with the bananas and made even a small piece extremely filling! It also totally made this cake ok to eat for breakfast ;)

Banana Snack Cake ~ ElephantEats.com 

Whole Wheat Banana Spice Snack Cake with Cream Cheese Frosting
Serves 12
A really moist, spiced snack cake made healthier with the addition of white whole wheat flour!
Write a review
Print
Cake
  1. 2 cups White Whole Wheat flour
  2. 1 teaspoon baking soda
  3. 1/2 teaspoon baking powder
  4. 1/2 teaspoon salt
  5. 2 teaspoons cinnamon
  6. 1 teaspoon allspice
  7. 1/2 teaspoon nutmeg
  8. Pinch cloves
  9. 1/2 cup (1 stick) unsalted butter, room temperature
  10. 1 1/2 cups granulated sugar
  11. 1 1/2 cups mashed ripe bananas (about 3 large)
  12. 1 1/4 cup sour cream
  13. 2 large eggs
Cream Cheese Frosting
  1. 1 8 ounce block light or regular cream cheese, room temperature
  2. 3 tablespoons unsalted butter, room temperature
  3. 2 cups powdered (confectioner's) sugar
  4. 1/2 teaspoon vanilla
  5. Pinch salt
  6. Milk (only if needed for thinning the icing to a spreading consistency)
Instructions
  1. Preheat the oven to 350 degrees Fahrenheit. Butter and flour a 13-inch x 9-inch baking pan.
  2. In a medium bowl, stir together the flour, baking soda, baking powder, salt, cinnamon, nutmeg, allspice, and cloves. Set aside.
  3. In the bowl of a stand mixer fitted with the beater blade attachment or in a large bowl using an electric mixer, beat together the butter and sugar on medium speed until pale and fluffy, about 1 - 2 minutes. Add the eggs one at a time and mix until well incorporated. Mix in the sour cream and the bananas.
  4. Pour in the flour mixture, a little bit at a time, beating continuously until well-incorporated.
  5. Spread batter into the prepared pan.
  6. Bake for about 40-45 minutes, or until the top of the cake is golden and a toothpick or tester inserted into the center comes out clean. Remove the cake from the oven and place on a wire rack to cool completely.
  7. To make the frosting, fit a stand mixer with the beater attachment or use a large bowl and an electric hand mixer. On medium speed, beat together the cream cheese and butter until smooth. Turn the mixer to low and gradually add the powdered sugar. Once all the powdered sugar has been added, increase the speed to medium and beat for another 30 seconds. Add the vanilla and pinch salt; beat for another minute or so until smooth. Add a little milk (a couple of teaspoons at a time) if the frosting seems too stiff to spread.
  8. Spread frosting onto completely cooled cake. Cut into 12 pieces and serve. Cover and store leftover cake in the refrigerator. The cake stays moist even straight out of the fridge!
Adapted from Kitchen Treaty
https://elephanteats.com/

Blackberry Clafoutis ~ ElephantEats.com

While down at Nate’s mom’s for Memorial Day, I managed to find the energy to make us a dessert in addition to that yummy pasta salad. Nate has been sending me a lot of NYTimes recipes and this one for a berry clafoutis sounded pretty tasty.  

It ended up being really easy and delicious. It was low on the sweetness scale, making the leftovers perfect for breakfast. I’d definitely make it again and maybe try switching up the type of fruit inside. I also think it could have been tasty with some vanilla ice cream on top…but then what isn’t? ;)

Blackberry Clafoutis ~ ElephantEats.com

I’ve been doing some cooking in our new kitchen. Our house is now preeeeetty much done (pics to come when we finish unpacking boxes). The kitchen island has been installed, finally, which gives me another cooking surface (and another area to make a mess on). LC has decided that this is her newest lookout point. I think she’s the kitchen supervisor. 

Blackberry Clafoutis ~ ElephantEats.com

For a Pregnancy Update:

I’m now 26 1/2 weeks. Baby boy is kicking a ton! It’s the weirdest feeling when you feel him actually kick your hand while it’s on your stomach. Sometime I feel his foot (or maybe his fist) swirl around. It’s so surreal and it makes me smile every time :)

26 weeks ~ ElephantEats.com

I had Nate put his hand on my belly to feel the kicking a few times. Now when I ask him to feel it, he says that if he’s felt it a few times, he’s felt it enough. Can you believe him?! I guess it’s different when you’re not the one with a living thing inside your abdomen. 

26 week collage ~ ElephantEats.com

I haven’t been great about keeping up with the weekly photos, mainly because they’d been sanding and then painting the outside of the house and had all our windows covered with a plastic film. Not great for photo lighting, as you might imagine. But painting is almost done and I’ve decided the new belly photo location is the nursery! So you get to see a green background now since the walls in there are a light sage green. 

When I find time in the next month or so, I’m going to be painting some birch trees on the wall, as I want a Woodland nursery theme. 

And just for fun, here’s a couple pics Nate took over the last couple weeks.

Memorial Day Belly ~ ElephantEats.com

 Walk in the Park 26 wks ~ ElephantEats.com 

Blackberry Clafoutis
Serves 8
A not-too-sweet treat, perfect for dessert or brunch!
Write a review
Print
Ingredients
  1. 3 cups blackberries, rinsed and drained on paper towels
  2. 2 tablespoons kirsch, eau de vie de myrtille, or crème de cassis (optional)
  3. 7 Tbsp sugar
  4. 1/3 cup unbleached all-purpose flour
  5. 1/3 cup almond flour
  6. 3 eggs
  7. 1 teaspoon vanilla extract
  8. Pinch of salt
  9. 2/3 cup low-fat plain yogurt (not greek style)
Instructions
  1. Toss berries in a medium bowl with the kirsch, eau de vie or crème de cassis and 2 tablespoons of the sugar, and let sit for 30 minutes. Meanwhile, mix together all-purpose flour and almond flour.
  2. Preheat oven to 375 degrees. Butter a 9- or 10-inch ceramic tart pan or clafoutis dish.
  3. In a medium bowl, beat eggs with remaining sugar, vanilla, and salt. Place a strainer over the bowl and drain berries, allowing the liquid from the berries to run into the egg and sugar mixture. Whisk to combine. Arrange drained berries in the buttered baking dish.
  4. Beat the flours into the egg mixture and whisk until smooth. Add yogurt and combine well. Pour over fruit, scraping out all of the batter with a rubber spatula.
  5. Bake in the preheated oven for 35 minutes, or until the top is browned and the clafoutis is firm and puffed. Press gently on the top in the middle to see if it’s firm. If it isn’t, return to the oven for 5 minutes. Remove from the oven and cool on a rack. Serve warm or at room temperature.
Adapted from NY Times
https://elephanteats.com/

Chocolate Almond Waffles ~ ElephantEats.com

I’m not always the easiest person to live with.

I know you all probably find that very hard to believe ;)

Chocolate Almond Waffles ~ ElephantEats.com

Although Nate often purposefully annoys me (though he’ll deny it), he also does a lot of sweet things on a regular basis. He’s extremely thoughtful and emotionally expressive. He will randomly buy me little “tasty treats” if he sees a dessert or something that he thinks I might like. He definitely knows the way to my heart!

While I do cook dinner for Nate weekly, I think that it’s not so special anymore since I do it all the time. To mix things up and show him that I appreciate him, I decided to make him a special breakfast. 

Chocolate Almond Waffles ~ ElephantEats.com

These waffles are chocolatey, but they’re not overly sweet. They’re totally appropriate for breakfast as opposed to dessert. The tart and sweet raspberry sauce is the perfect accompaniment and both have a subtle hint of almond flavor. 

This is the perfect breakfast to surprise your special someone with on Valentine’s Day!

Chocolate Almond Waffles ~ ElephantEats.com

In other news, LC and my painting of her made it onto a buzzfeed list (she’s #10)! That sadly is probably the coolest thing that has ever happened, and probably every will happen, to me (and her). 

Buzzfeed 21 Signs You’re A Cat Lady In Training ~ ElephantEats.com


Chocolate Almond Waffles with Raspberry Sauce
A not too sweet chocolate waffle with a sweet and tart raspberry sauce that's perfect for a special breakfast!
Write a review
Print
Waffles
  1. 1 cup all purpose flour
  2. 1/4 cup unsweetened cocoa powder
  3. 1 1/4 teaspoons baking powder
  4. 1/4 teaspoon baking soda
  5. 1/8 teaspoon salt
  6. 1/4 cup sugar
  7. 1/4 cup almond paste
  8. 2 1/4 ounces semisweet chocolate chips
  9. 3 tablespoons butter
  10. 2 large eggs
  11. 1 cup 2% milk
  12. 1/2 teaspoon almond extract
Raspberry Sauce
  1. 2 cups frozen raspberries, thawed
  2. 2 Tbsp almond paste
  3. 2-3 Tbsp water.
Waffles
  1. Preheat oven to 300.
  2. Mix first 5 ingredients into large bowl.
  3. In a small food processor or blender, blend sugar and almond paste. Add to flour mixture.
  4. Heat chocolate and butter in a small microwave-safe dish in the microwave at 30 second intervals, stirring in between, until completely melted.
  5. Pour chocolate into medium bowl. Whisk in eggs, then milk, and almond extract. Gradually whisk milk mixture into dry ingredients.
  6. Following manufacturer's instructions, make waffles with batter (waffles will be somewhat soft when removed from pan).
  7. Place finished waffles on baking sheet in oven as you make the rest to keep them hot and crispy.
Raspberry Sauce
  1. Blend raspberries and 1 Tbsp water in a food processor. Strain raspberry mixture through a fine sieve into a bowl, running a spoon back and forth over inside of sieve until all that's left in the sieve is seeds. Frequently scrape bottom of sieve, where strained pulp is coming out, into the bowl. Discard seeds.
  2. Add raspberry puree back into food processor. Add almond paste and 1-2 Tbsp water and blend until sauce is to your liking. Serve over waffles.
Adapted from Bon Appetit
https://elephanteats.com/

Gingerbread Layer Cake with Cream Cheese Frosting ~ ElephantEats.com

I mentioned that amongst our changes from our usual Christmas feast, this year I made dessert. I had seen a recipe for a gingerbread layer cake with cream cheese frosting online some weeks before Christmas. 

Of course when I went to actually find said recipe, I hadn’t marked it down anywhere. Does that ever happen to you? So frustrating!

Gingerbread Layer Cake with Cream Cheese Frosting ~ ElephantEats.com

Well, I commenced a new search and was pleased to find this recipe from Good Housekeeping that seemed to be exactly like the original. The result was the most delicious, moist gingerbread cake, with a lemony cream cheese frosting that was a perfect complement. I had to even out the tops of the cake layers so they would lay flat and I couldn’t stop myself from eating the pieces I cut off- they were so good I made myself sick. 

Gingerbread Layer Cake with Cream Cheese Frosting ~ ElephantEats.com

I wanted a wintry garnish, but wasn’t sure if a holly branch was toxic or something, so I put a sprig of rosemary and some dried cranberries :)

Gingerbread Layer Cake with Cream Cheese Frosting ~ ElephantEats.com

I just realized that this picture kind of looks like a Christmas Pac-Man.

My mom made this a couple days ago and she said she used orange instead of lemon zest and she said that it was yummy as well!

Gingerbread Layer Cake with Cream Cheese Frosting
Serves 10
Write a review
Print
Gingerbread Cake
  1. 3 cup(s) all-purpose flour
  2. 1 tablespoon(s) ground ginger
  3. 1 1/2 teaspoon(s) ground cinnamon
  4. 3/4 teaspoon(s) baking soda
  5. 3/4 teaspoon(s) salt
  6. 1 jar(s) (12 ounces) light (mild) molasses, 1 1/2 cups
  7. 3/4 cup(s) (1 1/2 sticks) margarine, softened, substitute butter
  8. 3/4 cup(s) granulated sugar
  9. 2 large eggs
Cream Cheese Frosting
  1. 1 package(s) (16 ounces) confectioners' sugar
  2. 1 package(s) (8 ounces) cream cheese, softened
  3. 4 tablespoon(s) margarine, softened, substitute butter
  4. 2 teaspoon(s) freshly grated lemon peel
Gingerbread Cake
  1. Preheat oven to 350 degrees F. Grease three 8-inch round cake pans. Line bottoms with waxed paper; grease paper. Dust pans with flour.
  2. In medium bowl, mix flour, ginger, cinnamon, baking soda, and salt. In 4-cup glass measuring cup, whisk molasses with 1 cup water.
  3. In large bowl, with mixer at low speed, beat margarine with granulated sugar until blended. Increase speed to high; beat until creamy, about 2 minutes, scraping bowl often with rubber spatula.
  4. Reduce speed to medium-low; add eggs, 1 at a time, beating well after each addition. At low speed, alternately add flour mixture and molasses mixture, beginning and ending with flour mixture; beat until blended.
  5. Pour batter into pans and spread evenly. Stagger pans on 2 oven racks, so layers are not directly above one another. Bake 25 to 30 minutes, until toothpick inserted in center of each layer comes out clean.
  6. Cool layers in pans on wire racks 10 minutes. Run small knife around sides of pans to loosen layers. Invert layers onto wire racks to cool completely; discard waxed paper.
Cream-Cheese Frosting
  1. In large bowl, with mixer at low speed, beat frosting ingredients just until blended. Increase speed to medium; beat until frosting is smooth and fluffy, about 2 minutes, constantly scraping bowl with rubber spatula. Makes about 2 1/2 cups frosting.
To assemble cake
  1. Place 1 cake layer, rounded side down, on cake plate; spread with 1/3 cup frosting. Top with second layer; spread with another 1/3 cup frosting, then top with remaining layer. Frost top and side of cake with remaining frosting. Refrigerate if not serving right away.
Notes
  1. -I find that it's best to shave off the top of the cake layers to make them flatter on top if they're too domed.
  2. -It's easiest to frost the cake layers if they've been chilled in the fridge or freezer.
https://elephanteats.com/

Rainbow Cookies ~ ElephantEats.com

I don’t know if you guys remember, but about a year ago, Nate’s family friend Henny passed away unexpectedly. It’s been weird trying to come to terms with the fact that we won’t ever see him again. We didn’t see him on a regular basis, so it didn’t sink in right away. He used to invite us to his Brooklyn apartment for delicious home-cooked meals every few months so when we hadn’t been there in a while, it hit us that we’d never go there again.

Aside from Henny’s dinner parties, the one tradition we shared was including him in Nate’s mom’s Christmas dinner. I’m not sure when this started as it was before I entered the picture, but he always played a part at Christmas. Henny was Jewish so he didn’t have his own Christmas to celebrate and since Nate’s Christmas is just his immediate family, another guest was always welcome. 

Rainbow Cookies ~ ElephantEats.com

Henny was in charge of cooking the main course, beef and he also brought dessert. This usually consisted of some sort of chocolate cake and his famous rainbow cookies! He used to only make these rainbow cookies at Christmas and we always looked forward to them. He always made enough for us to take leftovers home with us since Nate loves them, and they’re one of my favorites too.

Rainbow Cookies ~ ElephantEats.com

When Christmas was approaching this past year we already knew it was going to be different since Henny wouldn’t be there. Rather than trying to recreate the past and have a crucial part absent, we decided to revamp it. Since none of us actually liked eating beef (we never told Henny this), we decided to go with a vegetarian menu with plenty of sides. Dessert was a Gingerbread Cake with Cream Cheese Frosting (recipe coming soon). But the one tradition we couldn’t omit was Henny’s Rainbow Cookies- it just wouldn’t be Christmas without them.

We emailed Henny’s girlfriend and after some searching through his old recipe collection, she sent us the recipe she thought was the one he used. It was a recipe from a 1999 edition of Gourmet magazine and I followed it to a T. The cookies came out exactly like Henny’s and I know he would be proud. I guess he really was there with us this year in spirit :)

Rainbow Cookies ~ ElephantEats.com

 Since I didn’t change a thing, you can find the recipe online here. I just have a few helpful notes:

  1. Don’t worry about having the right size pans. These cookies don’t spread at all so you can just line with parchment and draw on the parchment so you know where to spread the batter to.
  2. Use a small offset spatula to spread. It will be really hard to spread it since it’s so thin but just do the best you can. 
  3. Wait to trim the cookies until after you’ve assembled the layers with the jam and they’ve set in the refrigerator. I didn’t do this and the layers shifted so I ended up having to trim then twice. Not a big deal but just figured I’d mention it.