I don’t want our wedding to look like anyone else’s. Is that so much to ask? I don’t think so.

I really want to make a statement on the tables and so I decided a while back that I wanted the napkin to have a pretty print on it. Do you know how hard it is to find printed rental napkins in my color scheme that are exactly what I want? Harder than it should. Actually, impossible.

Anyway, I finally convinced my mom that I could find a fabric cheap enough that we could get napkins made for the same price as renting would be…AND we could keep some and sell the rest after.

This way I got a gorgeous fabric that was exactly what I wanted, and no one else could  possible have it!

But in my fruitless search for the perfect napkin and tablecloth, I came across this one and showed it to Nate:

source

Have I mentioned that Nate LOVES dinosaurs?

This was the IM conversation that ensued:

Nate:  oh my god
MAKE THOSE THE TABLE CLOTHS
me:  we could do it just for our table
tell you what
we’ll make our first child’s bday a dino theme
Nate:  obviously
im gonna groom them
to become a paleontologist
me:  haha
Nate:  and then they will create the first real jurassic park
me:  as long as they make enough money to support their folks
Nate: well if my son/daughter creates the first real jurassic park that will be our family business
i’ll work there
and with any luck, at a ripe old age, be eaten by a dinosaur
by far the way i want to go

So there you have it. Nate’s chosen way to go is death by dinosaur. Probably not a bad way, in fact, assuming there isn’t too much chewing involved.

That also solves the mystery of who on earth would rent dinosaur tablecloths. But luckily Nate is not involved in making wedding-related decor decisions, or it would be a dino-themed wedding…and he’d probably serve these ribs.

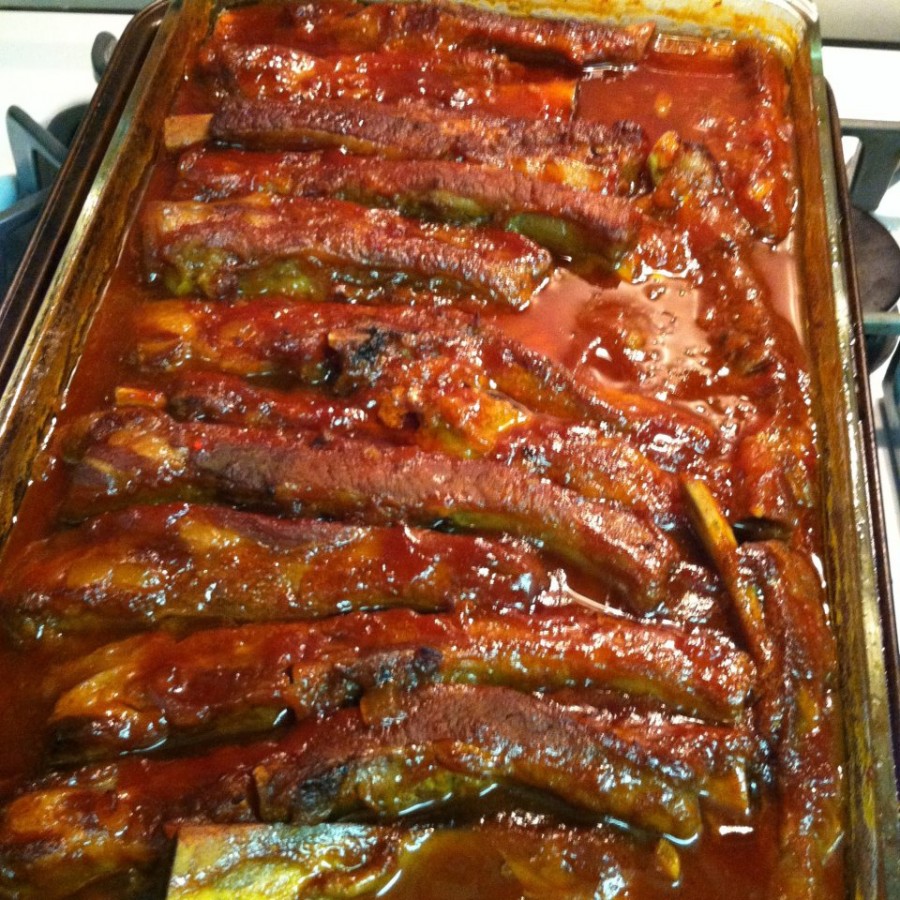
These aren’t dinosaur ribs, but they’d certainly go with a paleontology-themed event. And I can’t say I’d be upset if someone served them to me.

Unfortunately, the only photo I have to prove I made these ribs is one from my iphone, since Nate somehow deleted the others before I got them off the camera.

We, unfortunately, don’t have a grill, but this is better than ribs you could ever make on a grill. Yeah, take that, grill!

You give them a quick boil beforehand and then shove them in the oven for an hour and a half.

I’m a fan of saucy, succulent meat. I know this is definitely possible on the grill, but I hate dry things. These ribs get braised in the oven, mixing with the homemade tangy bbq sauce you add, creating their own, absolutely delicious sauce. I could eat it with a spoon.

Even if you have a grill, you NEED to make these this summer.

I served it up with some baked beans and corn on the cob. Felt like summer for sure!

Too bad the caterer doesn’t offer them….

Oh and here’s another photo for you since I don’t have any more of the ribs. Here’s the ring bearer pillow I made for the wedding :)
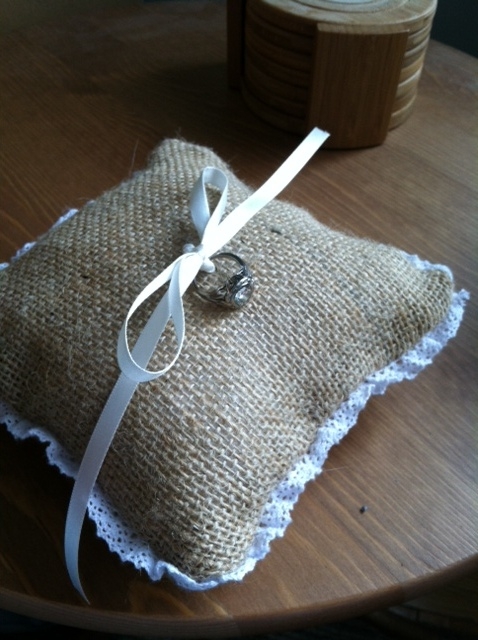
burlap ring pillow


Saucy Country-Style Oven Ribs

from Gourmet 

Print this recipe!

serves 6-8

4 lb boneless country-style pork ribs
1 large onion, finely chopped (2 cups)
4 garlic cloves, minced (2 tablespoons)
2 tablespoons vegetable oil
1 1/2 cups ketchup (12 oz)
2/3 cup honey
1/2 cup cider vinegar
1/2 cup Worcestershire sauce
6 tablespoons fresh lemon juice (from 2 lemons)
2 tablespoons plus 1 teaspoon dry mustard
2 teaspoons drained bottled horseradish
1 teaspoon black pepper
Put oven rack in middle position and preheat oven to 350°F.

Put ribs in a 6- to 8-quart pot and cover with water by two inches. Bring to a boil, reduce heat and simmer, uncovered, skimming froth, 30 minutes (I only cook for 15 and it’s completely fine).

Meanwhile, cook onion and garlic in oil in a 3- to 4-quart heavy saucepan over moderate heat, stirring occasionally, until onion is tender, about 15 minutes.

Stir in remaining ingredients and simmer, stirring occasionally, 15 minutes.

Drain pork in a colander and pat dry, then arrange in 1 layer using tongs in a 13- by 9-inch baking dish. Pour sauce over pork to coat evenly, then cover dish tightly with foil.

Bake 1 hour, then remove foil and carefully turn pork over with tongs and cook, uncovered, until very tender, about 30 minutes. Skim fat from sauce if desired.

(**note that I don’t normally cut the ribs apart before cooking as in the above pic, but that’s how this particular batch came. Usually I put the whole rack in the pan in one long piece, only cutting off the ribs that don’t fit the length and putting them along the side)

Nate loves corn bread. Who doesn’t.

Unfortunately for my waistline, I love all bread. But I do find cornbread to be one of the tastier varieties.

There are so many different types, though. I used to think I preferred the slightly sweet ones to the savory ones, but this recipe changed my mind.

Nate, his brother, and I headed down to his mom’s house in PA for 4th of July weekend. And as is required for this patriotic holiday, we had ourselves a barbecue. I thought this cornbread sounded like a perfect accompaniment to our grillings.

The result was cheesy, slightly sweet, salty, spicy and amazing. Lucky for me, Nate’s mom owns a really old cast iron skillet, but this could easily be made in an 8 inch square baking pan.

Please do yourself a favor and make this ASAP. You will thank me.


Cheddar Jalapeno Cornbread

Taken from  Mad Hungry: Feeding Men and Boys 

Print this recipe!

Serves 6-8

1 cup all-purpose flour
1 cup stone-ground yellow cornmeal
1 tablespoon sugar
1 1/2 teaspoons baking powder
1 teaspoon coarse salt
Pinch of cayenne pepper
1 1/2 cups milk
2 large eggs, lightly beaten
1 1/2 tablespoons unsalted butter, melted
1 cup grated cheddar cheese
1/2 cup corn kernels (frozen, fresh, or left over from a cooked cob)- I used frozen that I got to room temp in microwave
2 tablespoons chopped pickled jalapeños (optional, but highly recommended!)

1. Preheat the oven to 425°F (220°C).

2. In a large bowl, whisk together the flour, cornmeal, sugar, baking powder, salt, and cayenne. Blend in the milk, eggs, and butter. Fold in the cheese, corn, and the jalapeños, if using.

3. Scoop into a well-seasoned 10-inch cast-iron skillet or a buttered 8-inch square baking pan and smooth over the top. Bake for 35 to 45 minutes, until the top is golden brown and a cake tester inserted in the center comes out clean.

Note: Do not overbake or the corn bread will be dry. Cut into wedges or squares and serve hot.

I went to Cleveland this past weekend to visit two of my oldest friends, Mike and Sarah, who happen to be married to each other.

I’ve known them since nursery and kindergarten! And now they have the most adorable baby boy.

Here, you can see some pics of us all over the years.

Sarah and her brother used to come stay with my family in Martha’s Vineyard for a week in the summer since we had a house there. Her brother was also in the same grade as my brother. Here are Sarah and me on my dad’s boat :)

Here’s Sarah and Erica (remember her from my bday cake post a month ago?) and me at Sarah’s bachelorette party:

I can’t believe we forgot to take a pice of all of us while I was visiting! I had such a good time with Sarah and Mike, and got the bonus surprise of having her parents visit too, so we had some good catching up :)

Anyway, since Mike typically has to work crazy hours and they’re both busy taking care of the baby, I figured I’d take the opportunity to make them a yummy dinner. Sarah suggested that I take advantage of their grill since I don’t have one in nyc, and that’s exactly what I did.

The weather was so nice. It was perfect for being out on the deck grilling.

Now I have to tell you that I’m not much of a griller. That was always the men’s job in my household (although my mom is pretty good at it). I guess no one ever really showed me how. I can never tell when the meat is cooked.

But that’s what’s perfect about this chicken. You bake it first til it’s fully cooked, so there’s no chance of undercooking it on the grill. The grilling part is basically just used to caramelize the sauce on it and heat it back up. Also, because you bake it ahead of time, you can make it mostly the day ahead and just heat it on the grill the day you’re ready to barbecue. Easy peasy.

Note that I took the pics before flipping the chicken. Yours should have grill marks and crispy skin on both sides when it’s ready.

Come back on Thursday for that salsa recipe I’ve been promising you, just in time for the 4th of July!

Important notes about the recipe:

You have to use skin on, bone-in chicken pieces or it will dry out. If you don’t like the skin, take it off when you’re ready to eat it, not before it’s cooked completely. It holds the moisture in. For this weekend, I used 4 breast pieces and a pack of chicken thighs. The breasts took maybe 10 extra minutes in the oven. You know they’re done when you prick it with a fork and the juices that come out are clear. If you’re worried with the big pieces, you can make a small incision in the thickest part and check that it’s not pink. If it’s a little pink it shouldn’t be a problem since they do end up cooking a bit more while on the grill.


Easy Grilled BBQ Chicken
Recipe from mom

Print this recipe!

Serves 4

Ingredients:

2 lbs chicken pieces, bone-in, skin on
Seasoning: salt, pepper, paprika, garlic powder, etc
Equal parts of your favorite bbq sauce and Saucy Susan or other Sweet and Sour sauce (found in the ethnic aisle of supermarkets)

Preparation:

Bring chicken to room temperature. Liberally season chicken on both sides. Bake chicken, skin side up, at 350 for 30 min or until juices run clear when pierced with fork. Chicken should be completely, or almost completely cooked.

Cool chicken, or refrigerate overnight. Bring to room temp before grilling.

Mix equal parts of your favorite brand of barbecue sauce and sweet and sour sauce. The amount you use depends on how sauce you like your chicken, but I used about 1/2 small bottle of bbq sauce and had enough left for dipping.

Brush underside of chicken with bbq sauce mixture and place on grill. Grill 5-10 minutes or until grill marks form and sauce is caramelized.

Brush tops of chicken pieces and flip over, grilling skin side. Leave 5-10 min or until other side is crispy. Remove from grill and enjoy!

Remember, the chicken is fully cooked before grilling, so this step is really just to get that lovely caramelization.