Orange Iced Gingerbread Bars ~ ElephantEats.com

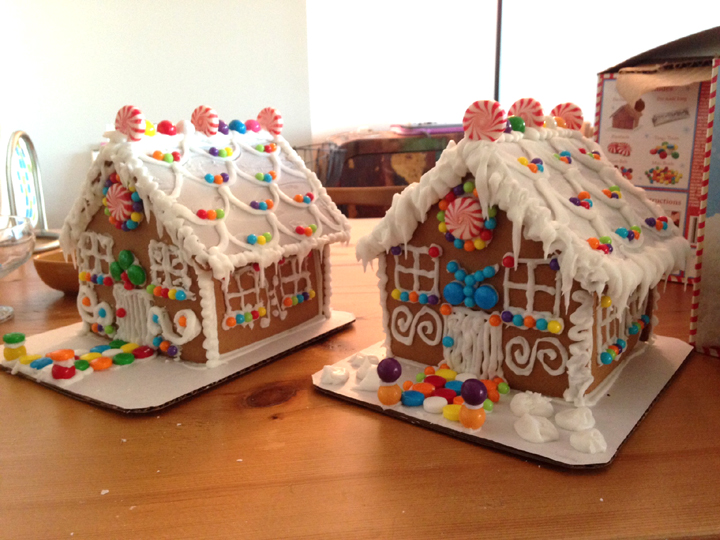
This past weekend I had my annual gingerbread house decorating brunch with my friend, Erica. We do it every year, but it has gradually been changing for the better, I think.

The first year we did it we used graham crackers and tried to attach the structure together with icing. Anyone who has attempted a gingerbread house knows that this method works, but only if the structure has a day to dry before decorating it. Since we only had an afternoon, we found out the hard way that royal icing takes a while to set.

Orange Iced Gingerbread Bars ~ ElephantEats.com

The next year I had read online that you could use melted sugar to instantly bind the crackers together. This works awesomely, as long as you’re SUPER careful not to burn yourself on molten sugar. Don’t say I didn’t warn you. We did this for a couple years, but you still have to set aside time to assemble it. 

But this year I decided to just buy a couple of those gingerbread house kits.

gingerbread house kit ~ ElephantEats.com

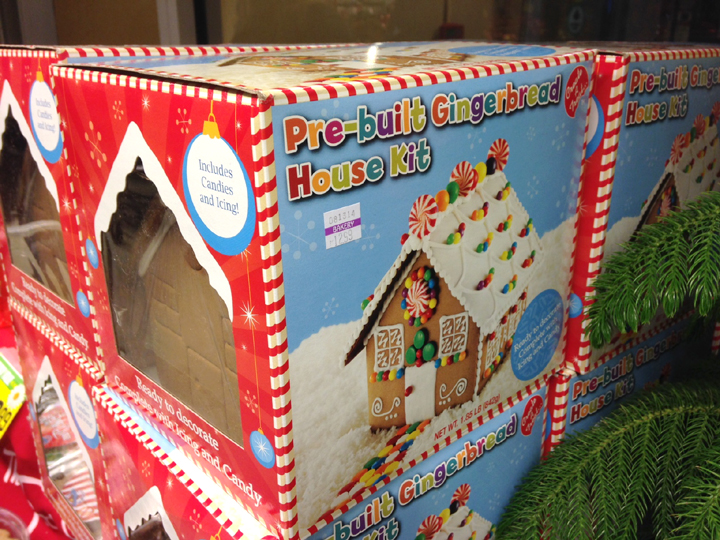
The kits come with pre-assembled houses, saving us hours of aggravation, and they also come with candy included and an idea for how to decorate. I knew the kit was great because I decorate a house from a kit every year when I go down to my mother-in-law’s for Christmas. 

photo 2

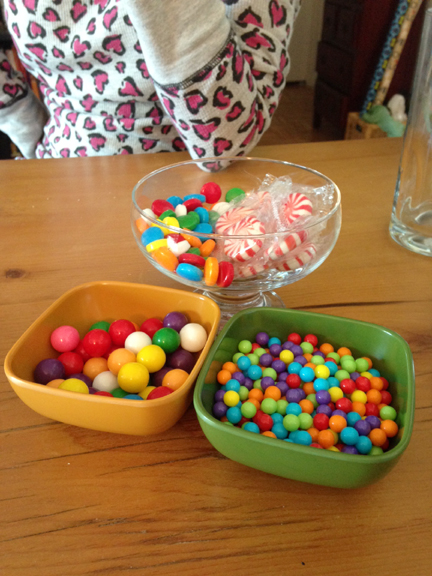
Anyway, it ended up being perfect. We had a tasty brunch that Erica prepared and then got to spend a couple hours decorating our houses. I think Erica did a much neater job with the icing, but it was fun nonetheless.

Gingerbread Houses 2013

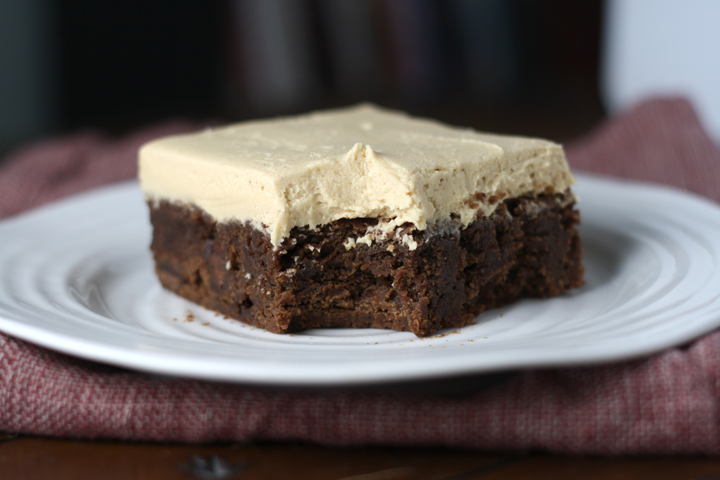
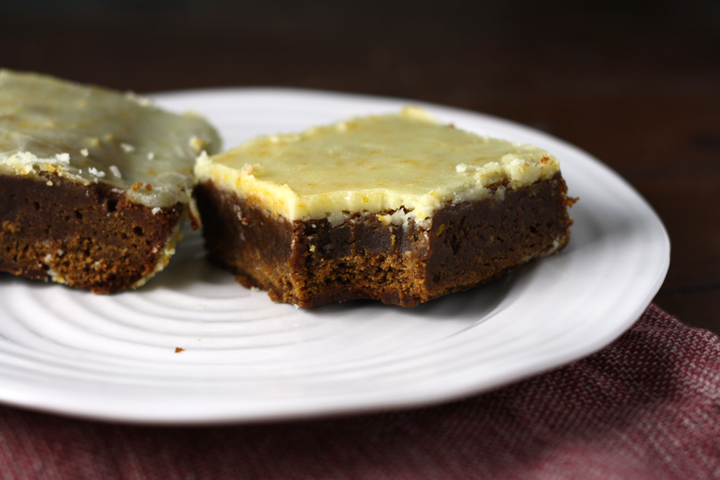
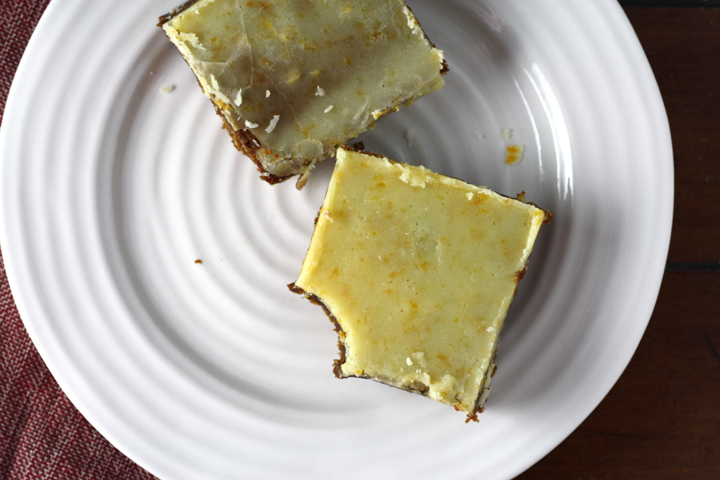
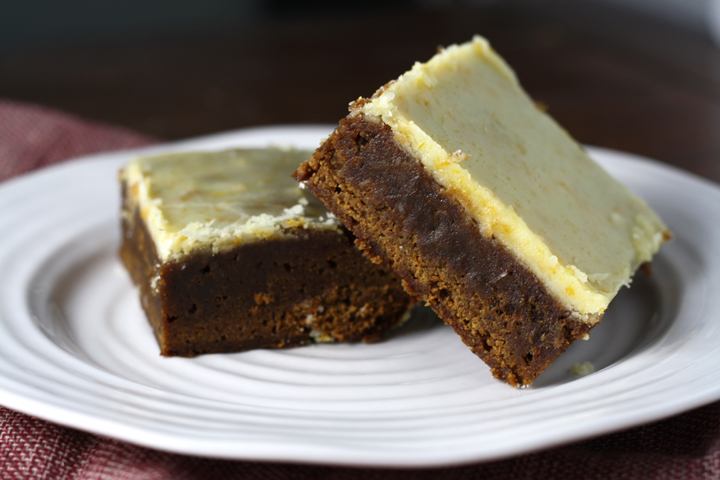
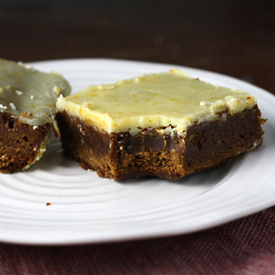
Today’s recipe is related because it’s for gingerbread bars! Not only that, but I literally think they’re the best thing to come out of my kitchen this year…and that’s saying a lot since it’s now December.

Orange Iced Gingerbread Bars ~ ElephantEats.com

These bars are spicy from the molasses, have tons of flavors from all the spices and have the ooey gooey texture of the perfect brownie. I chose to add some orange juice and zest too, because for some reason i feel like gingerbread goes really well with that citrus flavor.

Basically, you NEED to make these. They taste like the holiday season :)

Orange Iced Gingerbread Bars ~ ElephantEats.com


Orange Iced Gingerbread Bars
Yields 9
A spicy, citrusy, dense and chewy gingerbread bar!
Write a review
Print
Ingredients
  1. 1/2 cup (1 stick) unsalted butter, melted and slightly cooled
  2. 1 large egg
  3. 1 cup light brown sugar, firmly packed
  4. 1/2 cup unsulphered light or medium molasses
  5. zest of 1 orange, divided in 2 (will be about 1 Tbsp total)
  6. juice of 1 orange (will be used in both bars and icing)
  7. 3 teaspoons ground ginger
  8. 2 teaspoons cinnamon
  9. 1 teaspoon ground cloves
  10. 1 teaspoon ground nutmeg
  11. 1 1/4 cups unbleached all-purpose flour
  12. 1 teaspoon unsalted butter, melted
  13. 1 cup powdered sugar
Instructions
  1. Preheat the oven to 350ºF. Coat an 8x8 baking dish with cooking spray and set aside.
  2. In a large bowl, whisk together butter, egg, brown sugar, molasses, half of orange zest (about 1.5 tsp), 1 Tbsp of the fresh orange juice, ginger, cinnamon, cloves, and nutmeg until smooth.
  3. Add the flour and stir until just combined, don't over mix.
  4. Pour the batter into the prepared pan and smooth the top. Bake 32-34 minutes or until a toothpick inserted in the center comes out clean or with moist crumbs clinging. Allow the bars to cool while you prepare the icing.
  5. In a small bowl, combine melted butter, powdered sugar and rest of orange zest. Add orange juice (you will only need about 1 Tbsp plus 1 tsp) a little at a time until it reaches a smooth, pourable consistency. Pour evenly over cooled bars. Cut and serve.
Notes
  1. Best served at room temperature.
Adapted from The Live in Kitchen
https://elephanteats.com/

Peppermint White Chocolate Swirl Cheesecake Bars ~ ElephantEats.com

I hope that everyone who celebrates had a wonderful Thanksgiving! My family had Thanksgiving in Manhattan this year, for the first time ever.

This is the last year that Nate and I will be living in NYC, and the first that we were actually here on Thanksgiving, so my parents, brother, Nate and I decided to go to my office to check out the Macy’s Thanksgiving Day Parade.

Macy's Day Parade 2013 ~ ElephantEats.com

Snoopy!

It was a pretty awesome view since my building is right on the parade route. The only problem was that the balloons were kept low to the ground this year because they were worried about the wind, and the floor we were on was pretty high above them. It was still closer than I’ve ever been to the parade though!

We took a nice family photo on Thanksgiving but I think my mom is using it for her holiday card, so you’ll have to settle for this pic of just me and Nate. I think I dressed for the wrong holiday :)

Thanksgiving 2013 ~ ElephantEats.com

Yes, I’m really that pale…

Actually, I think my outfit is kind of appropriate for this post, since it matches this dessert I’m sharing with you. I don’t know why but I just got this idea of peppermint white chocolate cheesecake bars in my head and couldn’t get it out. I had visions of these swirly pink and white bars perfect for a holiday dessert. 

These definitely need to be refrigerated overnight if you like them to firm up a bit, but they’re more on the softer side of cheesecake bars- this is according to Nate who likes cold, dry, hard food. If you leave the candy cane bits out of the batter and just sprinkle them on top, they should firm up a little more, but I thought they were perfect!

Peppermint White Chocolate Swirl Cheesecake Bars ~ ElephantEats.com

Oh, and for another house update, since you guys seem to love that so much :) :

The contractor had told me at the beginning of last week that he was pretty much done with demolition and would start framing by Friday. On Wednesday he texted me, saying his guys had removed the ceiling in the basement and found some asbestos underneath that had been overlooked when they did the asbestos removal back in August…UGH! 

He told me that he called up the company that I had used for the removal before and they said it was ok for him to work, but he thought it would be best to wait til Monday when the asbestos guy would meet him at the house to check it out. Because of Thanksgiving, that only meant one day of work (Friday) would be wasted. 

Peppermint White Chocolate Swirl Cheesecake Bars ~ ElephantEats.com

So Monday, my contractor had a smaller than normal crew there working and the asbestos guy came to assess the situation and gave me a quote for removing it ( $$ :( ), but the good news is that he can do it this Thursday and that the contractor can continue to work in the meantime. 

But the exciting part is that I took my family over to the house on Friday since my brother had never seen it, and when I opened the door, I was SO surprised. There are NO WALLS in my house at all! Like completely gone…all that’s there are the studs. I had NO idea they were going to remove every single wall!! It was so crazy to see the house that way and I’m sorry I don’t have a pic, but it was getting dark out. I should be able to take one before they put up the drywall I think.

Anyway, I’m so psyched :) It totally made this project feel like it’s really happening!

Oh yeah, and on Friday morning my mom came with me and Nate to the bath store and we managed to pick out pretty much all of our faucets, sinks, toilets and a bath vanity. Still a few more things to decide but good progress. Thank you, Mom!!!

Peppermint White Chocolate Swirl Cheesecake Bars ~ ElephantEats.com

Peppermint White Chocolate Swirl Cheesecake Bars
Creamy cheesecake squares with a festive minty swirl!
Write a review
Print
Ingredients
  1. 2 cups finely crushed chocolate wafer cookies (about 35 cookies)
  2. 2 Tbsp sugar
  3. 1/3 cup unsalted butter, melted
  4. 4 8-oz packages cream cheese, softened (I used two light and two regular)
  5. 1 cup sugar
  6. 1 tsp vanilla
  7. 1 cup sour cream
  8. 4 eggs
  9. 6 oz. white chocolate chips
  10. red food coloring (I used 7 drops of red liquid food coloring)
  11. 1/2 tsp peppermint extract
  12. 3/4 cup crushed peppermint candy canes (about 6 oz), divided
Instructions
  1. Preheat oven to 350. Grease bottom of a 9x13 pan.
  2. For crust, mix crushed cookies, 2 Tbsp sugar and the melted butter. Press mixture evenly into bottom of prepared pan. Bake for 10 min then set aside to cool while making batter.
  3. For filling, in a large bowl, beat cream cheese, 1 cup sugar, sour cream and vanilla with electric mixer until smooth. Beat in eggs until blended. Pour 2/3 of batter over the prepared crust, spreading to edges and set the remaining 1/3 of the batter aside.
  4. Put white chocolate chips in a microwaveable container and microwave 1 min at 50% power. Stir well. Continute microwaving in 30 sec increments, stirring well in between until melted. There can still be a couple solid pieces- do not over cook!
  5. Stir white chocolate into the 1/3 of the batter that you set aside. Stir in about 6 drops red food coloring (or enough to give a pink hue), along with peppermint extract and 1/2 cup of the crushed candy canes.
  6. Put the pink batter on top of the white batter in the pan in 5-6 large blobs, making sure to leave white in between. Drag a knife back and forth through the batter to create swirls.
  7. Bake for 35-40 min or until set (a knife pierced 1" from edge comes out almost clean).
  8. Cool in pan for an hour or so, and then cover and chill for 4-24 hours. Cut into bars and sprinkle with remaining peppermint candies as desired.
Notes
  1. For slightly firmer bars, leave the chopped peppermint out of the batter, and only use as a garnish.
  2. Best served after being refrigerated overnight.

Peanut Butter Frosted Brownie ~ ElephantEats.com

Well, yesterday Nate ran the NYC marathon. It was his 7th marathon overall and his 4th time running New York. A lot was riding on this marathon after the 2012 Boston marathon heat wave, and the fact that Sandy caused last year’s NY marathon to be cancelled.

Nate's 2013 NYC marathon ~ ElephantEats.com

Nate had a goal to finish under 3 hours since his last marathon he ran in 3:03. The temperatures were perfect this year but it was VERY windy. To give you an example, this year’s male winner, Geoffrey Mutai, finished in 2:08:24 which was well off his course record of 2:05:06 set in nearly perfect conditions two years ago. 3 minutes to an elite runner is huge. Nate ended up finishing in 3:24:21, which he wasn’t completely happy with, but it’s still an amazing time! I’m so proud of my hubby :)

On to the recipe…since the last recipe I gave you guys was a healthy one, I figured I’d include a very unhealthy one to go with it. I mean, you’re probably having sugar withdrawal since your halloween binge, so this should help with that.

Peanut Butter Frosted Brownie ~ ElephantEats.com

These brownies were another Nate-inspired recipe. You see, we’ve been stopping by our new house a bunch since we closed on it back in August, and there’s a deli nearby that has the most amazing peanut butter-frosted brownies. The brownie itself is really moist and delicious, but what takes it over the top is this really thick layer of peanut butter frosting- the really sweet kind. That frosting must be like 1/2 inch to an inch thick!

So I set out to recreate the brownies for Nate since I know he loves them so much. Plus, it will probably save us money in the long run since I could see Nate stopping by the deli a little too often to grab a brownie once we finally live nearby ;)

Peanut Butter Frosted Brownie ~ ElephantEats.com

And for those of you that have been wanting to know about how our house stuff is going, we officially got the permits on Thursday! The contractor bids were also due on Thursday and on Tuesday I will be going over everything with the architect so I can make a decision as to which contractor we will hire. 

I think that once I narrow it down to two people, I should probably meet with them to really get a feel for whether I could work with them. I’ll share our finalized house renovation plans with you guys soon! Hopefully demolition can start in the next 2 weeks!!

Peanut Butter Frosted Brownie ~ ElephantEats.com

Thick Peanut Butter Frosted Brownies
Yields 18
Write a review
Print
Brownies
  1. 2 sticks unsalted butter, chopped into small pieces
  2. 6 oz. dark chocolate, chopped
  3. 1 cup granulated sugar
  4. 1 cup brown sugar, packed
  5. 4 large eggs
  6. 2 tsp vanilla extract
  7. 3/4 cup semisweet chocolate chips
  8. 1.5 cups flour
  9. 2 tsp baking powder
  10. 1/2 tsp salt
Frosting
  1. 6 Tbsp shortening (i.e. Crisco)
  2. 2 Tbsp unsalted butter, room temp
  3. 3/4 cup creamy peanut butter (like Jif or Skippy, not "natural" pb)
  4. 2 cups confectioners sugar
  5. 1 tsp vanilla extract
  6. 2 Tbsp water
Brownies
  1. Preheat the oven to 350. Line a 9x13 pan with foil, letting the excess hang over the edges. Lightly grease foil and set aside.
  2. In a medium, microwave-safe bowl, combine the chocolate and butter for the brownies. Microwave in 1 minute increments at 50% power, stirring in between, until the chocolate and butter are melted and smooth.
  3. Whisk in the granulated sugar and brown sugars. Whisk in the eggs and the vanilla. Add the flour, baking powder and salt. Fold the dry ingredients into the chocolate mixture with a spatula until combined. Stir in the chocolate chips.
  4. Pour the batter into the pan and bake for 30 minutes, until a thin knife or toothpick inserted in the center comes out clean or with a few moist crumbs. Remove brownies from the oven and allow them to cool completely.
  5. Once brownies are fully cooled, spread frosting (directions below) evenly over brownies. Remove from pan using foil "handles" and cut into pieces.
  6. Store brownies in airtight container or tightly wrapped at room temperature or in fridge for 3-5 days.
Frosting
  1. Using an electric stand or hand mixer, combine butter and shortening. Add peanut butter and combine til fully incorporated. Slowly add confectioners sugar and vanilla. Add enough water (about 2 Tbsp) to get to a fluffy, moist consistency.
Notes
  1. These could probably last longer than 3-5 days in the fridge, but I personally love them room temp.
Adapted from (Brownies, not frosting) Annie's Eats
https://elephanteats.com/

Nate's Birthday 2013

Beardo is how I affectionately refer to my husband, Nate. I think you can figure out why. 

As I mentioned in my last post, we had a little get-together, where I cooked up dinner for 6 of Nate’s closest friends. 

Having vegetarians to dinner always makes it hard for me to plan a menu. It’s easy to leave out any animal protein, but then there’s only so much you can do with legumes as your protein…and I never have the courage to serve soy products, for fear the non-vegetarians in the group would hate me forever.

Butterscotch Cake ~  ElephantEats.com

I decided to try not to think about how balanced the meal was and went with a slow-roasted tomato pasta dish, beets with mint, homemade marinated mushrooms, some asparagus with chopped tomatoes and a vinaigrette, and some good crusty bread. I’ll try to share some of the recipes with you soon.

I also had some cheese and crackers, and nuts for an appetizer, plus there was cheese in the pasta, so I figured that was plenty of protein for the vegetarians. I served some turkey sausage on the side so the meat eaters wouldn’t feel too deprived.

But the real star of the show was this 9-layer butterscotch cake.

Butterscotch Cake ~  ElephantEats.com

If you noticed my cake only has 7 layers, well you’re very perceptive. That’s because I generously scooped the batter into the prepared pans, thinking it was only supposed to be six layers. When I got to layer 4, I realized my error but by that point I had already baked 3 layers. There was still time to correct it to 7 layers but I couldn’t get 9 out of the remaining batter, and figured it would still look impressive and no one would know the difference. Thankfully I was right.  

All of the comments of this cake on the site I got it from raved about it’s amazingness. It was definitely good but was SO rich. I cut Nate a huge piece not knowing, and he proceeded to eat the whole thing, though I’m not sure how. I think, being the sweet husband that he is, he didn’t want to offend me by not finishing what I served him. I cut myself a small piece and made myself nauseous finishing it.

The cake was definitely impressive-looking, tasted good, and I was proud of myself for making a homemade butterscotch… but aside from that I think it wasn’t worth the effort to attempt it more than once in a lifetime.

Butterscotch Cake ~  ElephantEats.com

*Helpful notes if you try this yourself:

When you go to reheat the butterscotch for the top and sides of the cake, make sure you use a heavy-bottomed saucepan over EXTREMELY low heat.

I think my pan wasn’t “heavy” enough and the butterscotch completely separated. I was ready to cry since it took me about 45 minutes of stirring over a hot pot to make that damn butterscotch, but I was thankfully able to salvage it. The butter basically separated out so I poured it off and had a butterscotch that was more spread-able than pourable, but still tasted exactly the same. So it worked out…phew! If it hadn’t worked, I probably would have thrown my brand new pot out the window, along with the cake and anything else nearby. Hopefully my cat would know well enough to run into the bedroom to hide. 

Also, since there was so little batter that you had to spread it as evenly as possible in the pan, the layers were all slightly uneven/lumpy. When I stacked them I noticed they were sagging on the sides since the middles were so much higher. So i took each cake layer and very carefully shaved off the top of the middle section to make them as flat and even as possible. It wasn’t too hard to do with a good, sharp serrated knife.

I didn’t change a thing, so you can find the recipe here at Leite’s Culinaria

Chocolate Apricot Torte Ice Cream ~ ElephantEats.com

I think I mentioned this when I posted the Butterscotch Ice Cream recipe, but we got an ice cream machine as a wedding gift.

It has been both a blessing and a curse. On the one hand, it’s been awesome to make homemade ice cream in all kinds of flavors. But then we have to eat all of this ice cream, and I imagine it’s contributed to my gaining some weight. I think every bite of ice cream I’ve taken has been worth it though.

Chocolate Apricot Torte Ice Cream ~ ElephantEats.com

The best part of having the ice cream machine has been coming up with different flavors ideas. Up until this point I haven’t experimented much because I figured I needed to just get the hang of making ice cream first. I wanted to understand the proportions of milk/cream/sugar, etc. I think I’ve got it down pat now, though!

I’ve had this idea swirling around in my head to make an ice cream version of one of the most delicious desserts ever- Apricot Chocolate Torte. If you haven’t made this recipe before, you absolutely must. It’s my family’s go-to recipe for Passover because the original recipe contains so little flour that it easily converts with a flour substitute (for those who don’t know, wheat flour is forbidden during Passover). 

Chocolate Apricot Torte Ice Cream ~ ElephantEats.com

Anyway, I happen to love chocolate and fruit. Chocolate covered apricots are one of my favorite things- I even had them on our wedding dessert buffet! So for this ice cream, I imagined a rich chocolate ice cream base, with a fruity apricot swirl and chunks of the amazing crust from the torte. 

The ice cream ended up being everything I imagined. Nate said it was really good but he’d rather not have chunks of fruit in his ice cream. Oh well, more for me ;)

Chocolate Apricot Torte Ice Cream ~ ElephantEats.com

On another note, what do you guys think of this new recipe format? Better? Worse? I’d love the feedback.

Apricot Chocolate Torte Ice Cream
Rich chocolate ice cream with a chunky apricot swirl and bits of walnut chocolate crust.

Yields: about 1 quart

Write a review
Print
Chocolate Base
  1. 2 cups whole milk
  2. 1 cup sugar
  3. 1/3 cup unsweetened cocoa powder
  4. pinch salt
  5. 3 Tbsp corn starch
  6. 1 cup heavy cream
  7. 3/4 cup semi-sweet chocolate chips
Apricot Swirl
  1. 6 oz. dried apricots, chopped
  2. 1/2 cup sugar
  3. 2/3 cup water
  4. 1.5 Tbsp flour
  5. Juice of 1/2 lemon
"Crust"
  1. 3/4 oz. chocolate chips
  2. 1/2 cup whole walnuts
  3. 2 Tbsp old fashioned oats
  4. pinch salt
  5. 1 Tbsp cold butter (i actually used oil in mine because I was afraid butter would be too hard when frozen, but the oil crust was too soft, so I think butter like the original crust it's based on would be better)
  6. 1 Tbsp cold water
  7. 2 Tbsp brown sugar
Chocolate Base
  1. In a sauce pan over medium heat, stir together 1.5 cups whole milk, sugar, cocoa powder and salt. Heat until the milk start to steam, but before it starts to boil.
  2. In a small bowl, stir together the remaining 1/2 cup of whole milk and the cornstarch. Stir until no lumps remain.
  3. Add the cornstarch mixture to the heated milk and chocolate mixture and bring to a low boil. Boil until thickened. The mixture will look the consistency of chocolate pudding. Remove from flame.
  4. In a small sauce pan, heat 1 cup of heavy cream. Once boiling, remove from heat and pour over the chocolate chips. Let sit for 1 minute, then stir the cream and chocolate mixture until incorporated.
  5. Stir the cream and chocolate mixture into the cooling chocolate ice cream base. Place in a bowl, covered with plastic wrap or a lid, and put in the fridge until cool.
Apricot Swirl
  1. Combine all ingredients in heavy saucepan. Bring slowly to a boil over medium heat. Reduce heat and simmer, stirring frequently and mashing any large pieces of apricot until mixture resembles thin jam, about 10-15 minutes. Cool to room temperature.
Chocolate "Crust"
  1. Place chocolate in bowl of food processor and chop roughly. Add nut and chop coarsely. Add oats, sugar and salt then blend. Add butter and process to blend. Add water and pulse until mixture is crumbly. Keep in fridge til ready to use.
Assembly
  1. Once base is cool, follow the manufacturers instructions on the ice cream maker to churn ice cream. Once the mixture has chilled and thickened in the ice cream maker, add the apricot swirl and crust in your favorite way- Some people prefer to layer ice cream and mix-ins in their freezer-safe container and swirl with a knife. Otherwise blend half of apricot into ice cream, then transfer the ice cream into a freezer safe container and fold in the remaining apricot and the crust crumbles.
  2. Cover and freeze until solid.
https://elephanteats.com/